background image


SCOTTY ProMin HD 

Equipment Manual 


Summary of Contents for ProMin HD

Page 1: ...SCOTTY ProMin HD Equipment Manual ...

Page 2: ...yright and other intellectual property rights in the software embedded in and associated with the product described in the documentation the Software Some products include software distributed under GNU General Public License GPL please contact SCOTTY for further information and source code By purchasing the product described in the documentation you are granted a limited license to use the Softwa...

Page 3: ...Installation 12 4 4 Software Configuration 12 5 Maintenance 13 5 1 Internal Battery Replacement 13 5 2 Fan Dust Filter Replacement 14 5 3 Storage Disk Replacement 14 6 Physical Specifications 15 6 1 Weight and Dimensions short variant 15 6 2 Weight and Dimensions long variant 15 6 3 Outline Drawings 16 7 Electrical Interfaces 19 7 1 Overview 19 7 2 Hardware Specification 20 7 3 Video Interfaces 20...

Page 4: ... Video Input SDI SDI IN 30 8 6 Codec Video Input DVI HDMI VGA DVI IN 30 8 7 Codec Video Output DVI HDMI Analog HD DVI OUT 31 8 8 Codec Equipment 1 EQU1 32 8 9 Codec Equipment 2 EQU2 33 8 10 System Control CTRL 34 8 11 Power Input PWR AC variant 35 8 12 Power Input PWR DC variant 35 9 Environmental Specifications 37 9 1 Operation 37 9 2 Storage 37 10 Options 39 ...

Page 5: ...ransfer from air land and sea over satellite and terrestrial networks This package is used by customers around the world to support their border control intelligence gathering reconnaissance surveillance search and rescue and other missions which require beyond line of sight connectivity and ruggedized reliable equipment SCOTTY is EN9100 certified and has over fifteen years experience serving cust...

Page 6: ...on how to perform the most common applications and more We recommend you read the manuals carefully in order to fully benefit from SCOTTY s advanced solutions Furthermore Quick Reference Guides are available describing the basic functionality on a single page these are suitable for daily use 1 3 Customer Support The Support section on our website www scottygroup com offers help to maximize the fun...

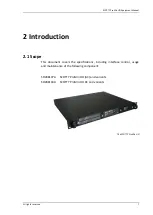
Page 7: ...ed 7 2 Introduction 2 1 Scope This document covers the specifications including interface control usage and maintenance of the following component SD208107A SCOTTY ProMin HD AC and variants SD208194A SCOTTY ProMin HD DC and variants The SCOTTY ProMin HD ...

Page 8: ...wide range of video interfaces like Composite HD SDI HDMI DVI and VGA with resolutions of up to 1080p60 Highly adaptable audio interfaces support a wide range of signal requirements Flexible data interfaces support various data sources and sinks to be integrated in the communication system The platform also provides standard PC interfaces like DVI HDMI LAN and USB An internal solid state disk is u...

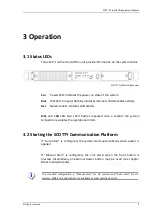
Page 9: ...ity Disk and LAN LED two short flashes repeated once a second the system temperature violates the operational limits 3 2 Starting the SCOTTY Communication Platform If Auto Start is configured the system starts automatically when power is applied If Manual Start is configured the unit starts when the front button is pressed Alternatively an external bower button may be used see chapter Other Inputs...

Page 10: ...anual for details The unit can also be turned off with the power button on the front of the unit or an external power button see previous chapter Pushing the button will gracefully shutdown Windows Holding the power button for more than four seconds will result in an immediate power off without shutting down Windows first If the system is not shut down in the correct fashion data loss can occur ...

Page 11: ...TTY ProMin HD and may be used if the unit is placed e g on a desktop Please note that mounting screws or nuts are not part of the SCOTTY ProMin HD unit The unit should be installed in a location compatible to its environmental specifications see the corresponding chapter An M4 grounding thread is available for additional grounding of the unit For mechanical details see chapter Physical Specificati...

Page 12: ...s The use of shielded cables is highly recommended Use shielded twisted pair wiring for all balanced connections and coax cables with the appropriate impedance Before connecting the unit make sure the power supply matches power requirements see chapter Power Requirements 4 4 Software Configuration To allow optimal operation the software settings of the SCOTTY ProMin HD need to match the electrical...

Page 13: ...functional with the exception of the real time clock This will result in the wrong date and time stamp on each file created or modified Battery replacement is recommended after five years No tools are required to change the battery The battery is accessible by removing the hard disk cover plate Battery type Renata CR2477N Replace only with a battery of this type and from this manufacturer SCOTTY P...

Page 14: ...y depending on the operating environment A replacement of the fan filter pad not later than 24 month is recommended A proper filter pad can be ordered at SCOTTY Filter pad P200 10mm 36x130mm part number SD208306A1 5 3 Storage Disk Replacement A solid state disk is used for the operating system the applications and user data No maintenance is required but if necessary the disk can be removed by pul...

Page 15: ...its Except for depth and slightly weight long and short units are identical 6 1 Weight and Dimensions short variant Width 483 mm 445 5mm 19 17 54 including flanges excluding flanges Depth 380 mm 14 96 Height 44 mm 1 73 Weight 4 4 kg 9 7 lbs slightly depending on power variant 6 2 Weight and Dimensions long variant Width 483 mm 445 5mm 19 17 54 including flanges excluding flanges Depth 490 mm 19 29...

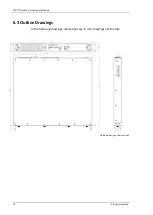
Page 16: ...SCOTTY ProMin HD Equipment Manual 16 All rights reserved 6 3 Outline Drawings In the following drawings dimensions are in mm drawings not to scale Outline drawings short variant ...

Page 17: ...SCOTTY ProMin HD Equipment Manual All rights reserved 17 Outline drawings long variant ...

Page 18: ...SCOTTY ProMin HD Equipment Manual 18 All rights reserved This page intentionally left blank ...

Page 19: ... Video Subsystem Computer System PC System Controller Power Supply Video Input DVI HDMI Video Output DVI HDMI 6 Audio Inputs 2 Display DVI HDMI Video Input SDI 2 LAN 10M 100M 1G 4 USB Power Input 12V Power Output Maintenance RS232 2 RS232 1 RS422 6 Audio Outputs 2 Video Output Analog SD Video Output Analog HD Power Button Input Power LED Output Video Input VGA 3 Video Inputs Analog USB 3 0 Front R...

Page 20: ...t One VGA Input Three composite video inputs also configurable as one S video and one composite input The DVI HDMI outputs of the computer system are the main display outputs allowing single monitor operation or dual monitor with duplicated or extended display operation showing the PC desktop the Teleport software and the video overlay Two DVI HDMI PC display outputs Additional video outputs from ...

Page 21: ...Two line inputs Input resistance 8kOhm symmetrical AC coupled Differential input suitable for balanced and unbalanced signals Input range line aux 22dBV 2 3dBV 1 3Vrms Input range microphone 63 5dBV 2 3dBV 1 3Vrms Configurable as one mono or one stereo codec input Configurable to connect an acoustic source line mode a playback device aux mode or a microphone without phantom power mic mode Six anal...

Page 22: ...yboard mouse and other interface or storage equipment Four USB 2 0 USB power allows a maximum load of 1A USB 2 0 standard 0 5A One USB 3 0 Front USB power allows a maximum load of 1A USB 3 0 standard 0 9A Total current of all USB outputs must not exceed 3A Three Windows accessible serial interfaces are available useable to connect controllable cameras GPS receiver or other external equipment One R...

Page 23: ...hut down the unit when active Activating the input for more than four seconds will result in an immediate power off Internally this input is pulled up to 3 3V via a 10kOhm resistor A semiconductor relay output provides the same information as the front power LED The contacts are electrically isolated from the power input and from the other system signals The switching capabilities are 50V 0 2A A t...

Page 24: ...external load 70W internal maximum no external load 100W typical with maximum external load When power is applied the system will wait for activation via the front power button or the power button input As order specified option Auto Start is available The system will start immediately when power is applied Temperature monitoring turns off the unit if the system temperature violates the operation ...

Page 25: ...der specified option Manual Start is available The system will wait for activation via the front power button or the power button input The system will continue to operate normally during short 100ms power interruptions Longer power interruptions may result in loss of unsaved data and normal power up behavior after power is re applied The power inputs are electrically isolated from other system si...

Page 26: ...SCOTTY ProMin HD Equipment Manual 26 All rights reserved This page intentionally left blank ...

Page 27: ...COTTY ProMin HD gets connected via several interface connectors at the rear side of the unit In addition an USB 3 0 port is available on the front of the unit For details see below Front interface configuration Rear interface configuration AC variant Rear interface configuration DC variant ...

Page 28: ...rSpeed Transmitter 9 USB7_SSTX_P SuperSpeed Transmitter 8 2 Computer USB 1 4 Type USB 2 0 Type A standard USB 2 0 pinout Pin Name Signal Description 1 USBx_5V 5V Out 2 USBx_D_N Data Computer 3 USBx_D_P Data USB 4 USBx_GND GND x indicates the port number 1 4 8 3 Computer LAN 1 2 Type RJ45 standard LAN pinout Pin Name Signal Description 1 LANx_D0_P BI_DA TX 2 LANx_D0_N BI_DA TX 3 LANx_D1_P BI_DB RX ...

Page 29: ...x_D1_P Data 1 Computer 11 HDMIx_SHIELD Shield Data 1 Display Output 12 Not Connected DVI HDMI x 13 Not Connected 14 HDMIx_5V DDC 5V Out 15 HDMIx_GND GND 16 HDMIx_HPDET DDC Hot Plug Detect 17 HDMIx_D0_N Data 0 18 HDMIx_D0_P Data 0 19 HDMIx_SHIELD Shield Data 0 20 Not Connected 21 Not Connected 22 HDMIx_SHIELD Shield Clock 23 HDMIx_CK_P Clock 24 HDMIx_CK_N Clock 8 VGAx_VSYN VGA V Sync C1 VGAx_R VGA ...

Page 30: ...DAT DDC SDA 9 VI10_HDMI_D1_N Data 1 10 VI10_HDMI_D1_P Data 1 11 VI10_HDMI_SHLD Shield Data 1 Codec 12 not connected Video Input 13 not connected DVI HDMI 14 VI10_HDMI_5V DDC 5V In 15 VI10_HDMI_GND GND 16 VI10_HPDET Hot Plug Detect 17 VI10_HDMI_D0_N Data 0 18 VI10_HDMI_D0_P Data 0 19 VI10_HDMI_SHLD Shield Data 0 20 not connected 21 not connected 22 VI10_HDMI_SHLD Shield Clock 23 VI10_HDMI_CK_P Cloc...

Page 31: ...1 Codec 11 VO10_HDMI_SHIELD Shield Data 1 Video Output 12 Not Connected DVI HDMI 13 Not Connected 14 VO10_HDMI_5V DDC 5V Out 15 VO10_HDMI_GND GND 16 VO10_HDMI_HPDET DDC Hot Plug Detect 17 VO10_HDMI_D0_N Data 0 18 VO10_HDMI_D0_P Data 0 19 VO10_HDMI_SHIELD Shield Data 0 20 Not Connected 21 Not Connected 22 VO10_HDMI_SHIELD Shield Clock 23 VO10_HDMI_CK_P Clock 24 VO10_HDMI_CK_N Clock 8 VO11_HD_VSYN V...

Page 32: ...I HOT 25 AI31_AN_N Line In Left Mono LO GND Codec 9 AI32_AN_P Line In Right HI HOT Audio Input 26 AI32_AN_N Line In Right LO GND Line 18 AI3_AN_GND GND 4 AO11_AN Line Out Left Mono Codec Audio 13 AO11_AN_GND GND Output Line 21 AO21_AN Headset Speaker Left Mono Codec Audio 17 AO21_AN_GND GND Output Headset 5 AO31_AN Speaker Left Mono Codec 22 AO32_AN Speaker Right Audio Output 14 AO3_AN_GND GND Spe...

Page 33: ...I22_AN_N do not connect Input Mic 4 16 AI22_AN_GND GND Electret 4 AO12_AN Line Out Right Codec Audio 13 AO12_AN_GND GND Output Line 21 AO22_AN Headset Speaker Right Codec Audio 17 AO22_AN_GND GND Output Headset 2 VI22_AN CVBS 2 S Video Y Codec Video 3 VI23_AN CVBS 3 S Video C Input Analog 12 VI22_AN_GND GND 19 SER1_TXD TxD Codec 20 SER1_RXD RxD RS232 11 SER1_GND GND SER1 1 AVSYS_12V 12V Out 12V Po...

Page 34: ... RS232 18 COM3_GND GND COM3 7 MAINT_TXD Maint TxD Maintenance 37 MAINT_RXD Maint RxD RS232 22 MAINT_GND GND 1 OUT1 Output 1 Power 31 OUT1 Output 1 LED Output 2 OUT2 Output 2 General 32 OUT2 Output 2 Purpose Output 8 IN1 Input 1 Power 23 IN1_GND GND Button Input 38 IN2 Input 2 General 24 IN2_GND GND Purpose Input 40 PWR_12V 12V Out 12V Power 25 PWR_12V_GND GND Output 16 GND GND 17 GND GND 26 GND GN...

Page 35: ...t 41 do not connect 42 do not connect 43 do not connect 44 do not connect 8 11 Power Input PWR AC variant Type IEC 60320 C14 SCOTTY ProMin HD IEC 60320 C13 Cable 8 12 Power Input PWR DC variant Type FCT F2W2PC SCOTTY ProMin HD FCT F2W2SC Cable Pin Name Signal Description 2 PWR Power Input Power Input 1 RTN Power Return ...

Page 36: ...SCOTTY ProMin HD Equipment Manual 36 All rights reserved This page intentionally left blank ...

Page 37: ... Temperature 40 C to 65 C Humidity 5 to 95 non condensing Storage Life 30 years An internal standard off the shelf button cell lithium battery powers the system clock while the unit is switched off This battery needs to be replaced periodically The replacement interval is five years No tools are required to change the battery For further details see chapter Maintenance ...

Page 38: ...SCOTTY ProMin HD Equipment Manual 38 All rights reserved This page intentionally left blank ...

Page 39: ...s Wake On LAN Wake On USB Power outputs 12V USB active even when system is in standby VGA PC display video output depending on CPU module Extended input voltage range 10V 33V Individual video source configuration RX or TX of the video outputs of the Codec Individual configuration of the audio inputs Phantom power voltage impedances pre amplifier and sensitivity Different configurations of the seri...

Page 40: ...dditional protocols for streaming RTP HTTP Live Streaming other audio protocols and or other data rates Free configuration of the power button input and the general purpose input Free configuration of the power LED output and the general purpose output Software write protected system partition changeable only by administrator Please contact SCOTTY for further details ...

Reviews: