background image

53

Helm Control Systems

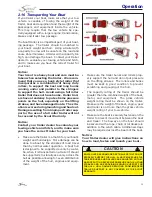
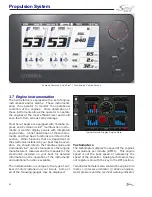
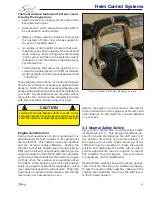
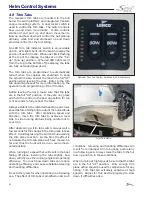
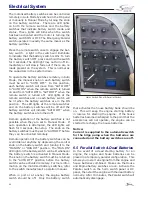
Tilt Steering Wheel

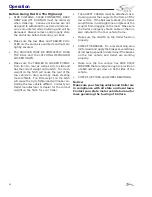
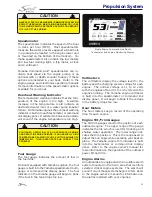
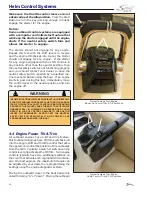
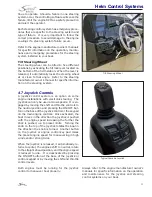
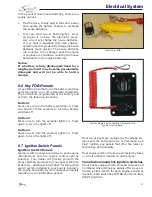
Typical Yamaha Joystick

tinue to operate.  Should a failure in one steering 

system occur, the controlling software will sense the 

failure, limit the engine RPM as a safety precaution 

and alert the operator.  

Each steering control system has emergency proce-

dures that are specific to the steering system and 

type of failure.  It is very important to follow the 

correct procedure to avoid damage to the engine 

cowlings if a steering system failure occurs. 

Refer to the engine manufacturer owner’s manuals 

for specific information on the operation, mainte

-

nance and emergency procedures for the steering 

system installed in your boat.

Tilt Steering Wheel

The steering wheel can be tilted to five different 

positions by activating the tilt lock lever located on 

the bottom of the helm station.  When the lever is 

released, it automatically locks the steering wheel 

at or close to that angle.  Refer to the steering 

manufacturer owner’s manual for specific informa

-

tion on the steering system.

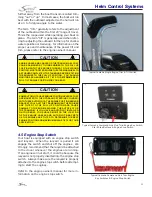
4.7  Joystick Controls

A joystick control system is an option on some 

engine installations with electronic steering.  The 

joystick can only be used at slow speeds.  It is en-

gaged by moving the shift and throttle controls to 

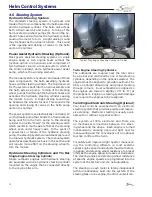
the neutral position and pressing the ON/OFF but-

ton on the base of the joystick control or the keypad 

on the main engine controls.  Once activated, the 

boat moves in the direction the joystick is pushed 

with the engine speed increasing the further the 

stick is pushed, up to preset limits.  Turning the 

knob on the top of the joystick rotates the boat in 

the direction the knob is turned.  Another button 

on the joystick or engine control key pad raises 

the preset engine speed for maneuvering in high 

winds and/or strong tides.  

When the joystick is released, it automatically re-

turns to center, the engines shift to neutral, rotate 

to the straight ahead position, and the engine speed 

is reduced to idle.  It is deactivated by pressing 

the ON/OFF button at the base of the joystick or 

control keypad or by moving the shift and throttle 

control levers.

Both engines must be running for the joystick 

control to maneuver boat properly.

Always refer to the engine manufacturer owner’s 

manuals for specific information on the operation 

and maintenance for the joystick and steering 

control systems on your boat.

Summary of Contents for 255 DORADO

Page 1: ...1 Owner s Manual 255 DORADO Scout Boats Inc 2531 Hwy 78 West Summerville SC 29483 ...

Page 2: ...2 Rev 0 Print Date 9 20 2017 ...

Page 3: ...ules of the Road 25 2 3 Pre Cruise Check 28 2 4 Operating Your Boat 29 2 5 Single Engine Docking Anchoring Mooring 30 2 6 Controls Steering or Propulsion System Failure 33 2 7 Collision 33 2 8 Grounding Towing Rendering Assistance 33 2 9 Flooding or Capsizing 34 2 10 Fishing 34 2 11 Water Skiing Wakeboarding 34 2 12 Man Overboard 37 2 13 Teak Surfing 37 2 14 Trash Disposal 38 2 15 Yacht Certificat...

Page 4: ...view 63 6 3 Batteries Battery Switches Twin Engines 64 6 4 Batteries Battery Switches Single Engine 65 6 5 Parallel Switch Dead Batteries 66 6 6 Key FOB Remote 67 6 7 Ignition Switch Panels 67 6 8 12 volt Accessory Switch Panels 69 6 9 DC Breaker Panel 72 6 10 Additional DC Circuit Protection 74 6 11 DC Power Management 75 6 12 AC Battery Charging System 76 6 13 Bonding System 77 6 14 Electrical S...

Page 5: ...op 110 10 6 Cockpit Bow Covers 111 10 7 Aftermarket Hardtop or Arch 111 Chapter 12 Interior Equipment 12 1 Head Compartment 113 12 2 Portable Marine Head System 113 12 3 Manual Marine Head System 114 12 4 Head System Holding Tank 115 Chapter 13 Routine Maintenance 13 1 Exterior Hull Deck 117 13 2 Upholstery Canvas Enclosures 120 13 3 Interior 122 13 4 Engines and Fuel 122 13 5 Bilge Pump Component...

Page 6: ... Freshwater System 133 Raw Water System 134 Waste System 135 Fuel System 136 Steering System 137 Propulsion System 138 Appendix B Glossary of Terms 139 Appendix C Maintenance Log 143 Appendix D Boating Accident Report 149 Appendix E Float Plan 153 Appendix F Troubleshooting Guide 155 ...

Page 7: ...SONAL INJURY OR DEATH HAZARDS OR UNSAFE PRACTICES WHICH COULD RESULT IN MINOR PERSONAL INJURY OR PRODUCT AND PROPERTY DAMAGE All instructions given in this book are as seen from the stern looking toward the bow with starboard being to your right and port to your left A glossary of boating terms is included IMPORTANT NOTE Your boat uses internal combustion engines and flammable fuel Every precau ti...

Page 8: ...hes are the filter systems of the world As responsible boaters we must manage our natural resources so our children can enjoy them SOS S O S SAVE OUR SEAS A WIDE VARIETY OF COMPONENTS USED ON THIS VESSEL CONTAIN OR EMIT CHEMICALS KNOWN TO THE STATE OF CALIFORNIA TO CAUSE CANCER AND BIRTH DEFECTS AND OTHER REPRODUCTIVE HARM EXAMPLES INCLUDE ENGINE AND GENERATOR EXHAUST ENGINE AND GENERATOR FUEL AND...

Page 9: ...to make changes and improvements in equipment design and vendored equipment items at any time without notification BOAT MODEL HULL SERIAL PURCHASE DATE DELIVERY DATE IGNITION KEYS REGISTRATION DOOR KEY OTHER KEYS ENGINES MAKE MODEL PORT SERIAL STARBOARD SERIAL PROPELLERS MAKE BLADES DIAMETER PITCH TRAILER MAKE MODEL SERIAL GVRW TIRE SIZE ADDITIONAL EQUIPMENT NOTES DEALER SCOUT NAME REPRESENTATIVE ...

Page 10: ...________ 15 gal 57 L HOLDING TANK _______________________________________________________9 gal 34 L DEADRISE AT TRANSOM___________________________________________________ 21 5 o MAXIMUM HORSEPOWER_________________________________________ 400 HP 298 kw DRAFT W ENGINES UP approx _______________________________________ 17 0 43 m OUTBOARD SHAFT___________________________________________________ 25 0 6...

Page 11: ...e Identification Numbers Hull Identification Number Port Engine Serial Number Starboard Engine Serial Number Intended Design Category Ocean Inshore Offshore X Sheltered Waters Weight and Maximum Capacities Unladen Weight Kilograms Pounds Maximum Load Weight Kilograms Pounds Number of People Maximum Rated Engine Horsepower Kilowatts Horsepower Certifications Certifications Components Covered Scout ...

Page 12: ...12 NOTES ...

Page 13: ... name and mailing address in our files so that we can comply with the law if it should become necessary Product Changes Scout is committed to the continuous improve ment of our boats As a result some of the equipment described in this manual or pictured in the catalog may change or no longer be avail able Scout reserves the right to change standard equipment optional equipment and specifications w...

Page 14: ...ement This warranty applies to Yamaha outboard motors sold in the United States whether purchased separately or when supplied as original equipment by a boat builder If you need warranty repairs you must take your Yamaha outboard to an authorized Yamaha outboard dealer If you are away from home or your selling dealer is not an authorized Yamaha dealer use the following toll free numbers to find th...

Page 15: ...l outboard engines if directly related to damage in question as well as any and all personal effects and electronics equipment The decision to repair replace or make reimbursement for a particular boat or part shall be at the discretion of Scout Boats Inc Online registration a bill of sale or proof of purchase demonstrating individual in question as the purchaser along with a proof of customer s i...

Page 16: ...rcle in order for warranty to go into effect ___________________________________________________ _______________________________ Dealership Representative Date You must mail the original signed copy of this agreement to Scout Boats Inc at 2531 Highway 78 West Summerville SC 29483 and log on to www dealerscircle com to complete the warranty registration process WARRANTY WILL BE NULLAND VOID UNLESS ...

Page 17: ...IOUS OWNER S NAME _____________________________________________________________ ADDRESS ____________________________________________________________________________ CITY ______________________________________________ STATE_____________ ZIP__________ EMAIL ________________________________________ PHONE ______________________________ ORIGINAL DATE OF PURCHASE ________________________________________...

Page 18: ...18 NOTES ...

Page 19: ...one of these systems begins to fail Refer to the engine owner s manual for information on the alarms installed with your engines If the alarms sounds Immediately throttle the engine back to idle Shift to neutral Monitor the engine gauges to determine the cause of the problem If necessary shut off the engine and investi gate until the cause of the problem is found and corrected 1 3 Neutral Safety S...

Page 20: ...e device Type IV Please note that most state laws now require that children 13 years old and under must wear a PFD at all times Visual Distress Signals All Scout boats used on coastal waters the Great Lakes territorial seas and those waters connected directly to them must be equipped with Coast Guard approved visual distress signals These signals are either Pyrotechnic or Non Pyrotechnic devices P...

Page 21: ...ous components of the fuel system and the possibility for explosion You must make the decision to fight the fire or abandon the boat If the fire cannot be extinguished quickly or it is too intense to fight abandoning the boat may be your only option If you find yourself in this situation make sure all passengers have a life preserver on and go over the side and swim well upwind of the boat This wi...

Page 22: ...ed for the marine environment and be well supplied It should be accessible and each person on board should be aware of its location As supplies are used replace them promptly Some common drugs and antiseptics may lose their strength or become unstable as they age Ask a medical pro fessional about the supplies you should carry and the safe shelf life of prescription drugs or other medical supplies ...

Page 23: ... them quickly The satellites that receive and relay EPIRB signals are operated by the National Oceanic and Atmospheric Administration NOAA in the United States The EPIRB should be mounted and registered accord ing to the instructions provided with the beacon so that the beacon s unique distress code can be used to quickly identify the boat and owner Additional Equipment to Consider VHF Radio Life ...

Page 24: ...NG USING BOARDING LADDER WHILE ENGINE IS RUNNING CAN RESULT IN SEVERE PERSONAL INJURY TURN OFF ENGINE BEFORE USING LADDER WARNING LEAKING FUEL IS A FIRE AND EXPLOSION HAZARD INSPECT SYSTEM AT LEAST ANNUALLY Caution and warning labels must remain legible for the safety of you and your passengers If a label becomes missing or damaged it must be re placed Immediately contact your dealer or Scout cust...

Page 25: ...destructible no mat ter how well it is constructed Any boat can be severely damaged if it is operated in a manner that exceeds its design limitations If the ride is hard on you and your passengers it is hard on the boat as well Always modify the boat speed in accordance with the sea conditions boat traffic and weather conditions Remember it is the operator s responsibility to use good common sense...

Page 26: ... other vessels All navigation rules apply If the bow light of another vessel shows red you should give way to that vessel if it shows green you have the right of way It you only see a white light you are either overtaking or the boat is anchored and you must give way in both cases Slow down and never operate at high speeds when operating at night stay clear of all boats and use good common sense A...

Page 27: ...27 Operation ...

Page 28: ... engine oil tanks 2 cycle engines or the crankcase oil level 4 cycle engines Turn the battery switches to the ON position Check the bilge water level Look for other signs of potential problems Monitor for the scent of fuel fumes Test the automatic and manual bilge pump switches to make sure the system is working properly CAUTION THERE MUST BE AT LEAST ONE PERSONAL FLOTATION DEVICE ON BOARD FOR EVE...

Page 29: ...UENCE OF ALCOHOL AND DRUGS WARNING MAKE SURE ONE OTHER PERSON ON THE BOAT IS INSTRUCTED IN THE OPERATION OF THE BOAT AND ALWAYS OPERATE THE BOAT IN COMPLIANCE WITH ALL STATE AND LOCAL LAWS GOVERNING THE USE OF A BOAT DO NOT OPERATE THE BOAT UNLESS IT IS COMPLETELY ASSEMBLED KEEP ALL FASTENERS TIGHT KEEP ADJUSTMENTS ACCORDING TO SPECIFICATIONS Before operating the boat for the first time read the e...

Page 30: ...dock and secur ing the boat require skill and techniques that are unique to the water wind conditions and the layout of the dock If possible position a crew member at the bow and stern to man the lines and assist in docking operations While maneuvering close to the dock consideration must be given to the wind and current You should anticipate the effect these forces will have on the boat and use t...

Page 31: ... and stern lines are usually secured to the dock at a 40 angle aft of the stern cleat and forward of the bow cleat The after bow spring line is secured to the dock at a 40 angle aft of the after bow spring cleat The forward quarter spring line is secured to the dock at a 40 angle forward of the stern cleat or the stern spring cleat The spring lines keep the boat square to the dock and reduce fore ...

Page 32: ... by shifting the engines in and out of gear or turning the wheel When nearly in the slip all the way straighten the engines and shift to forward to stop Keep the engines running until the lines are secured Securing Dock Lines Securing a boat that is tied alongside the dock typically requires a bow and stern line and two spring lines The bow and stern lines are usually secured to the dock at a 40 a...

Page 33: ...stem Failure If the propulsion control or steering system fails while you are operating the boat bring the throt tles to idle and shift to neutral Decide whether you need to put out the anchor to prevent the boat from drifting or to hold the bow into the seas In vestigate and correct the problem if you can Turn the engine off before opening the engine cowling to make repairs If you are unable to c...

Page 34: ...at is in trouble If the boat becomes swamped and capsizes you and your passengers should stay with the boat as long as you can It is much easier for the Coast Guard aircraft or other boats to spot the boat than just people in the water 2 10 Fishing Fishing can be very exciting and distracting for the operator when the action gets intense You must always be conscious of the fact that your primary r...

Page 35: ...a skier to wear a flotation device designed to withstand the impact of hitting the water at high speed Make sure to inspect the ski equipment and tow rope before each ski session Never use equipment that is damaged or with loose screws torn boots severe corrosion or tears in the fabric You should also inspect the ski tow rope and replace if it is frayed has un necessary knots or damage Never use a...

Page 36: ...len Agree on hand signals to be used between the observer and skier to communicate This is important to eliminate confusion and ensure the safety of your skiers wakeboarders or tubers Refer the Hand Signals drawing in this section for signals that are commonly used during water sports activities Make sure the observer watches for the skier s signal to indicate he or she is OK If the signal is not ...

Page 37: ...TING THE ENGINES 2 13 Teak Surfing Teak Surfing is a new and dangerous boating fad that involves an individual holding on to the swim platform of a vessel while a wake builds up then lets go to body surf the wave created by the boat hence the term Teak Surfing This activ ity puts that individual directly in the path of the boat s exhaust and poisonous carbon monoxide Because of the multiple danger...

Page 38: ...4 by 9 inches notifying the crew and passengers of the discharge restrictions Marpol Treaty It is the boat owner s responsi bility to make sure this placard remains mounted and legible in accordance with the law 2 15 Yacht Certification Capacities Plate Coast Guard rules require boats less than 20 feet 6 meters to display a gross weight and person capacity plate provided by the manufacturer Boat m...

Page 39: ...nd to make sure you have the correct trailer for your boat Make sure the trailer is a match for your boat s weight and hull design More damage can be done to a boat by the stresses of road travel than by normal water operation A boat hull is designed to be supported evenly by water So when it is transported on a trailer it should be supported structurally as evenly across the hull as possible allo...

Page 40: ...lling the tow vehicle difficult Contact your trailer manufacturer or dealer for the correct weight on the hitch for your trailer The SAFETY CHAINS must be attached criss crossing under the coupler to the frame of the tow vehicle If the ball was to break the trailer would follow in a straight line and prevent the coupler from dragging on the road Make sure the trailer emergency brake cable or chain...

Page 41: ... DANGEROUS GAS THAT IS POTENTIALLY LETHAL 3 2 Drive System Corrosion Each outboard motor is a complete drive sys tem with the gear case being just forward of the propeller and connected to the power head with a vertical drive shaft All engines require some maintenance Routine maintenance recommend ed for your engine is outlined in the engine owner s manual Routine maintenance is normally the prima...

Page 42: ...dis tance traveled by the propeller in one revolution Always repair or replace a propeller immediately if it has been damaged A damaged and therefore out of balance propeller can cause vibration that can be felt in the boat and could damage the en gine gear assembly Refer to the engine owner s manual for information on propeller removal and installation CAUTION DO NOT PAINT THE OUTBOARD MOTOR WITH...

Page 43: ...changing propellers Your boat was shipped with propellers that typi cally provide optimum performance for your boat However there are factors that can affect perfor mance and propeller requirements The following are some other factors to con sider You should be sure the load conditions are those normally experienced If the boat ran in the required RPM range when it was new and you have not added a...

Page 44: ...be avail able You should refer to the Yamaha engine and Command Link owner s manuals or other engine manufacturer s manuals and the manuals for the electronics installed on your boat for detailed information on the operation of the instruments and additional functions available The instrumentation is unique to the type of out board motors installed on your Scout Some or all of the following gauges...

Page 45: ... PROBLEM Fuel Gauge The fuel gauge indicates the amount of fuel in the fuel tank On boats equipped with Yamaha engines the fuel gauge is built into the Yamaha speedometer multi gauge or command link display panel The fuel indicator on the Yamaha gauge will begin to blink if the fuel in the tank drops too low Voltmeters The voltmeters display the voltage level for the battery and the charging syste...

Page 46: ...on the top of the instrument panel The compass cannot be adjusted accurately at the factory as it must be compensated for the influence of the electrical equipment and electronics unique to your boat Therefore the compass should be adjusted by a professional after the electronics and additional electrical accessories are installed and before op Compass erating the boat To adjust the compass for yo...

Page 47: ...straight up and down a forward position the 1st detent forward of neutral and a reverse position the 1st detent aft of neutral Advancing the control lever beyond the shift range advances the throttle in forward or reverse Each control is equipped with a means of permitting the engine to be operated at a higher than idle RPM while in neutral for cold starting and warm up purposes Electronic Engine ...

Page 48: ...ilable option on others The following control description is typical of most electronic control installations The helm is designed for a binnacle style control with a single lever for each engine The electronic control system consists of three major compo nents the electronic control head engine instru ments and keypad the control processors and applicable harnesses The controls are completely ele...

Page 49: ...of a twin engine boat it is advantageous for both engines to be operated at the same RPM This reduces noise and vibration and can increase engine efficiency Setting the throttles so that the engines are running the same RPM synchronized can be done by listening to the engine sounds at low RPM and with the automatic synchronizer feature built into the electronic engine controls when the engines are...

Page 50: ... WARNING INSOMESITUATIONS ITMAYBEPOSSIBLETOACCIDENTALLY START THE ENGINES IN GEAR WITH THE THROTTLES ABOVE IDLE IF THE NEUTRAL SAFETY SWITCH IS NOT OPERATING PROPERLY THIS WOULD CAUSE THE BOAT TO ACCELERATE UNEXPECTEDLY IN FORWARD OR REVERSE AND COULD RESULT IN LOSS OF CONTROL DAMAGE TO THE BOAT OR INJURY TO PASSENGERS ALWAYS TEST THE NEUTRAL SAFETY SWITCH PERIODICALLY AND CORRECT ANY PROBLEMS BEF...

Page 51: ...L TILT ENGINE POSITION FOR YOUR BOAT CAUTION SOME AUTOPILOTS HAVE ENGINE POSITION SENSORS THAT ARE MOUNTED TO THE HYDRAULIC STEERING CYLINDER WITH THESE AUTOPILOTS THE ENGINE POSITION SENSOR BRACKET COULD HIT THE TRANSOM WHEN THE ENGINES ARE TILTED TO THE FULL UP POSITION AND CAUSE DAMAGE TO THE ENGINE RIGGING THE AUTOPILOT OR THE TRANSOM IF YOU HAVE AN AUTOPILOT INSTALLED ON YOUR BOAT YOU SHOULD ...

Page 52: ...vert to a manual hydraulic system The manual system operates as described previously in this section and will require more effort on the steering wheel to turn the motors Hydraulic Steering Cylinders and Tie Bar Single Engine Steering Cylinder Single outboard engines with hydraulic steering are equipped with one hydraulic steering cylinder mounted on the engine that is connected directly to the en...

Page 53: ...m is an option on some engine installations with electronic steering The joystick can only be used at slow speeds It is en gaged by moving the shift and throttle controls to the neutral position and pressing the ON OFF but ton on the base of the joystick control or the keypad on the main engine controls Once activated the boat moves in the direction the joystick is pushed with the engine speed inc...

Page 54: ...ablish the intended heading and cruise speed before attempting to adjust the hull attitude with the trim tabs After stabilizing speed and direction move the trim tabs to achieve a level side to side running attitude being careful not to over trim After depressing a trim tab switch always wait a few seconds for the change in the trim plane to take effect Avoid depressing the switch while awaiting t...

Page 55: ...e power steering fluid recommended by the steering system manufacturer when adding fluid Generally periodic lubrication of all moving parts and connections with a light waterproof grease is in order Check the hydraulic hoses and fittings for chaffing rub marks and leaks Replace if neces sary Failure to do so could lead to steering system failure that would result in loss of control When new or aft...

Page 56: ...ic corrosion Galvanic corrosion is the cor rosion process occurring when different metals are submerged in an electrolyte Seawater is an electrolyte and submerged metal components must be properly protected The anodes will need to be changed when they are 75 of their original size 25 depleted Refer to the Routine Maintenance chapter of this manual for information on maintain ing sacrificial anodes...

Page 57: ...out ing etc At certain speeds and hull trim angles the fuel supply at the withdrawal tank location can increase or decrease accordingly Be extremely careful when attempting to operate the boat when low on fuel Though some fuel may be in the tank the relative trim angle of the boat may cause the fuel to flow away from the withdrawal tubes Fuel Gauge Indicates the amount of fuel in the tank Due to t...

Page 58: ...d Each fuel withdrawal line is equipped with an anti siphon valve where the line attaches to the fuel tank This valve prevents gasoline from siphoning out of the fuel tank should a line rupture CAUTION DO NOT REMOVE THE ANTI SIPHON VALVES FROM THE SYSTEM SHOULD THE VALVE BECOME CLOGGED CLEAN AND REINSTALL OR REPLACE A fuel filter for each engine is installed in the aft systems compartment The filt...

Page 59: ...doors and hatches WARNING GASOLINE FUEL VAPORS THAT ACCUMULATE IN THE BILGE AFT SYSTEMS COMPARTMENT OR CABIN WHILE FUELING CAN EXPLODE FUEL VAPORS ARE HEAVIER THAN AIR AND CAN ACCUMULATE IF THEY ARE CARRIED BY THE WIND INTO THE BILGE OR CABIN THROUGH OPEN DOORS HATCHES OR VENTS ALWAYS CLOSE DOORS AND HATCHES BEFORE FUELING Estimate how much fuel is needed and avoid overfilling the fuel tank Fuelin...

Page 60: ...OATS ON THE SURFACE OF THE WATER AND CAN IGNITE IF FUEL IS SPILLED INTO THE WATER IMMEDIATELY EVACUATE THE AREA AND NOTIFY THE MARINA AND THE PROPER OFFICIALS Preparing the Boat For Operation Use the following procedure to prepare the boat for operation when fueling operations are complete Open all hatches windows and doors Check the fuel compartment and below the deck for fuel odors If you smell ...

Page 61: ... recom mended for your engine In many states most gasoline is blended with ethanol alcohol Ethanol is a strong solvent and can absorb water during periods of storage You should refer to the engine operating manual for information regarding alcohol blended fuels and how it affects the operation of your marine engine WARNING DO NOT DRAIN ANY FUEL INTO THE BILGE WHEN SERVICING THE FUEL SYSTEM THIS CO...

Page 62: ...62 NOTES ...

Page 63: ...es for the engines and for the house 12 volt accessories and electronics The batteries themselves can be charged by the engines or by the battery charger when connected to shore power Most 12 volt power is distributed to the 12 volt accessories through individual circuit breakers in the DC battery switch panel located in the helm storage compartment All circuit breakers and fuses are labeled by th...

Page 64: ...remote or manually by rotating the knob on each switch The parallel switches can be activated by Parallel switches located on the DC panel and helm switch panel The house battery is charged by the accessory charge circuit on the engines whenever they are operating The engine batteries are dedicated to starting and operating the engines They are charged by the engines whenever they are oper ating T...

Page 65: ...in port or at anchor the engine battery switches should be off Only the battery switch that activates the house battery bank should be on This will keep both engine starting batteries in reserve for starting the engines If the house batteries become discharged to the point that the accessories will not operate the engines can be started to recharge the house battery bank Notice Current is supplied...

Page 66: ...attery switch is ON To turn the battery switch OFF press and hold the switch for 3 seconds The LED light may not turn off im mediately or will slowly fade out if there are no loads present on the system This is normal as the capacitors in the system drain To operate the battery switches remotely in Auto Mode the manual knob on each battery switch must be set to AUTO OFF In this position each batte...

Page 67: ...he battery switches off Button 2 Press once to turn the spreader lights on Press again to turn the lights off Button 3 Press once to turn the courtesy lights on Press again to turn the lights off 6 7 Ignition Switch Panels Ignition Switch Panels Ignition switch panels are unique to each engine manufacturer and the engine control options selected Your dealer will provide you with the proper startin...

Page 68: ...y and durability The system en ergizes the ignition system of multiple outboards with only one key A START STOP panel is used in conjunction with the key panel and features lights which indicate when engines are running and a START STOP but ton for each engine This system greatly simplifies the starting and stopping process of your engines For convenience and protection engines can not be restarte...

Page 69: ...ski battery storage compartment Underwater Lights Optional Activates the LED underwater lights in the stern below the waterline Bilge Pump The switch has two positions ON and OFF When the switch is in the ON position it activates the aft bilge pump located in the stern bilge near the transom The pump moves water out a thru hull fitting in the hull side When pumping is complete move the switch to t...

Page 70: ...tch is reserved for additional 12 volt ac cessories Horn A momentary switch that activates the boat horn Parallel A momentary switch that provides additional start ing power to the engine starters When activated the house and engine batteries are temporarily connected in parallel to provide additional battery power to start an engine with a depleted or dead battery After 10 minutes the Parallel sw...

Page 71: ...cates the lights are activated Press the switch once to activate white lights Press the switch again to change the lights from white to blue Press the switch again to change the lights from blue to red Press the switch again to turn the lights off Seat A three position momentary switch that extends and retracts the rear facing lounge seat on the port side of the cockpit The center position is OFF ...

Page 72: ... fade out when the switches are turned off Interior Lights Switch Activates the helm storage compartment and head compartment lights Waste Discharge Activates the waste discharge pump that empties the waste tank Refer to the Marine Head System in the Interior Equipment chapter for additional information on the operation of the overboard discharge system DC Panel Main Breakers The main accessory br...

Page 73: ...for the LED underwater lights in the stern below the waterline If this option is not installed the breaker is wired in reserve Interior LTS Protects the circuit for the lights that illuminate the helm storage and head compartments Hard Top LTS Optional Protects the circuit for the lights in the hardtop that illuminate the helm and cockpit If the optional hard top is not installed this breaker is w...

Page 74: ...re always supplied current when the batteries are connected These circuits are not deac tivated when the battery switches are off 6 10 Additional DC Circuit Protection Heavy Duty Circuit Breakers Fuses Heavy duty circuit breakers or fuses located in the compartment behind the aft bench seat provide protection for the engine charging and power steering circuits These breakers are supplied Typical E...

Page 75: ...ri cal power demand if too many accessories are activated while the boat is operating at idle or trolling speeds Consequently POWER MANAGE MENT PRACTICES may need to observed at slow speeds particularly if your boat is equipped with a full electronics package optional stereo ampli fier and electric grill The house battery system in your Scout is de signed to provide several hours of reserve ca pac...

Page 76: ... cord includes a three prong plug with a ground wire Turn the dockside circuit breaker on and check that the battery charger is operating properly If the battery charger is not working turn off the shore circuit breaker and remove the cable Contact your dealer or a qualified electri cian to find and correct the problem WARNING DO NOT ATTEMPT TO CORRECT THE WIRING YOURSELF ELECTRIC SHOCK CAN CAUSE ...

Page 77: ...m the charger to the batteries Refer to the battery charger manual for additional information 6 13 Bonding System Your boat is equipped with a bonding system that interconnects the underwater metal hardware and the engine to ensure that they are of the same electrical potential Sacrificial anodes of the size and type recommended by the engine manufac turer are attached to each outboard motor There...

Page 78: ...vel in the batteries regu larly and add distilled water as necessary If the batteries are frequently charged by an automatic battery charger the electrolyte level will have to be checked more often The correct fluid level in the cells is approximately 1 4 to 1 2 inch above the plates If fluid is needed fill to the proper level with distilled water Do not over fill and only use distilled water Keep...

Page 79: ... ASSISTANCE IN HAVING THE FUEL PROFESSIONALLY REMOVED AND COMPONENTS OF THE FRESH WATER SYSTEM REPLACED AS NECESSARY 7 2 Fresh Water System Operation Fill the water tank slowly through the labeled deck fill fitting After filling the tank activate the Fresh water switch in the helm switch panel Partially open all faucets and allow the pump to run until all of the air is purged from the system and a...

Page 80: ...ke sure the fresh water system is activated Open the faucet to supply fresh water to the sink Washdown Hose Connector A quick release fresh water washdown hose con nector is located on the transom The connector has an automatic valve that is always closed until the washdown hose is connected The hose requires a special fitting that snaps into the con nector and activates the automatic valve The co...

Page 81: ...t be properly maintained and charged Operating the pressure pump from a battery with a low charge could lead to pump failure Add a commercially available potable water conditioner to the water tank to keep it fresh Sanitizing the Fresh Water Tank The freshwater system should be sanitized if it has not been used for a long period or you are unsure of the quality of the water in the system The follo...

Page 82: ... 1 minute Let the treated water stand for 4 6 hours Drain the system by pumping it dry and flush with several tank fills of freshwater The system should now be sanitized and can be filled with freshwater If the chlorine smell is still strong it should be flushed several more times with freshwater CAUTION THE FRESH WATER SYSTEM MUST BE PROPERLY WINTERIZED PRIOR TO WINTER LAY UP SEE SECTION ON WINTE...

Page 83: ...by activating the raw water washdown hose nozzle until all of the air is purged from the system then turn the nozzle off Turn on the Baitwell 1 switch and run the baitwell pump until all air is purged from the system Then turn the pump off The intake fitting for the baitwell seawater pumps are equipped with a scoop and seacock valve If the pump runs but will not prime make sure the valve is open I...

Page 84: ... boat is left unattended the Raw Water switch should be placed in the OFF position Washdown Hose Connector A quick release washdown hose connector is located on the port side of the transom The connector has an automatic valve that is always closed until the washdown hose is connected The hose requires a special fitting that snaps into the connector and activates the automatic valve The cover on t...

Page 85: ...tem that includes a separate centrifugal pump located in the aft systems compartment The recirculating system only recirculates and aerates the existing seawater it does not deliver additional water to the baitwell Once the water level is up to the overflow in the baitwell the re circulating system can be activated by the moving the Baitwell 1 switch to the recirculation position To avoid damage t...

Page 86: ...revent corrosion spray pumps and thru hull valves with a protective oil periodically Fishboxes and baitwells should be drained and cleaned after each use Operate all seacock valves at least once a month to keep them operating properly CAUTION SHOULD A HOSE RUPTURE TURN THE PUMP OFF IMMEDIATELY ALWAYS CLOSE THE THRU HULL VALVE WHEN PERFORMING MAINTENANCE ON A SEAWATER PUMP THE BATTERIES MUST BE PRO...

Page 87: ...ull fittings 9 2 Cockpit Deck Drainage Cockpit Drains Your Scout has two scupper drains located in the rear of the cockpit that drain the cockpit through fittings in the hull sides above the waterline A flap built into each scupper drain fitting reduces the surge of seawater through the scupper and into the cockpit while maneuvering or in rough water Water is channeled away from all hatches by a g...

Page 88: ...p The aft bilge pump is located in the aft systems compartment bilge It is activated both manually by a switch in the helm switch panel and automati cally by an automatic switch built into the pump The automatic switch is connected to the batter ies and protected by a circuit breaker in the DC breaker panel The automatic switch remains ac tivated when the battery switches are in the OFF position a...

Page 89: ...k the drain plug regularly to make sure it is tight Notice Any oil spilled in the bilge must be thoroughly removed and properly disposed of before op erating the bilge pump The discharge of oil from the bilge is illegal and subject to a fine CAUTION THE FEDERAL WATER POLLUTION CONTROL ACT PROHIBITS THE DISCHARGE OF OIL OR OILY WASTE INTO OR UPON THE NAVIGABLE WATERS OF THE UNITED STATES OR THE WAT...

Page 90: ...it drain rails with a hose to remove debris that can block water drainage Clean the hardtop leg drain holes This is es pecially important just before winter lay up Clean the bilge pump strainer of debris and check the bilge for foreign material that can cause the automatic switch to malfunction Frequently test the bilge pump automatic switch Flush all gravity drains with fresh water to keep them c...

Page 91: ...BE USED FOR TOWING ANOTHER VESSEL OR HAVING THIS BOAT TOWED Bow Roller The bow roller assembly is built into the hull and allows the anchor to be operated and stored at the roller The windlass roller assembly anchor line and chain binder are concealed below a hatch in the bow at deck level A gas spring holds the hatch in the open position A twist latch secures the hatch when it is closed Always ma...

Page 92: ...deterioration It is important to replace the anchor line with a new line of the type recommended or supplied by the windlass manufacturer Windlass The windlass is mounted to the deck below a hatch at the bow The anchor is stored on the bow roller and is raised and lowered by the windlass The anchor line is stored in the rope locker and routed out through the windlass to the anchor chain The anchor...

Page 93: ... LOWERED AND LOOSE ANCHOR CAN CAUSE CONSIDERABLE DAMAGE TO THE HULL DO NOT USE A WINDLASS AS A SOLE MEANS OF SECURING AN ANCHOR IN THE BOW PULPIT ALWAYS SECURE THE ANCHOR WITH THE CHAIN BINDER BEFORE OPERATING YOUR BOAT Bow Ladder Optional A telescoping boarding ladder could be installed in the windlass recess below the bow hatch To use the ladder make sure the engines are off and the boat is secu...

Page 94: ...the latches Make sure the center section is properly secured in the open or closed position before cruising CAUTION USE CAUTION WHEN OPENING WINDSHIELD WALKTHROUGH SECTION ALWAYS MAKE SURE THE LATCH THAT SECURES THE PANEL WHEN IT IS OPEN IS RELEASED SO IT WILL AUTOMATICALLY SECURE THE PANEL IF THE LATCH IS NOT RELEASED THE PAUL ON THE PANEL WILL REST ON TOP OF THE LATCH AND IT WILL NOT BE SECURED ...

Page 95: ...t the entire hull The engine hoses and cables or transom gel coat can be damaged by tilting the engines to the full up position with the engines turned to the wrong position You should monitor the engines as they tilt to determine the best full tilt engine position for your boat Stern Boarding Ladder A telescoping boarding ladder is recessed into the swim platform To use the ladder make sure the e...

Page 96: ...e the ladder side rails and transom grab rail for stability while boarding Remember to retract the ladder and fold it into the recess before starting the engines Underwater Lights Optional Your boat may be equipped with optional under water lights mounted in the transom They are activated by a switch in the helm switch panel and should only be used when the boat is in the water and the lights are ...

Page 97: ...ENEVER THEY ARE IN THE OPEN POSITION Transom Door A access door is incorporated into the transom It is secured by a sliding bolt latch mounted on the inboard side of the door The latch is secured in the closed and latched position by rotating the dead bolt handle into the slot in the latch base When the transom door is closed make sure the latch dead bolt is completely engaged and rotated into the...

Page 98: ...pe should always be attached to the pylon us ing the attachment loops and never tied to the pylon or to any type of metal hook Tied ski ropes are very difficult to remove and metal hooks will damage the ski tow Additionally metal hooks can cause injury to your skiers or damage the engine cowlings if the metal hook breaks under the strain of the tow When attaching a tow rope using the attachment lo...

Page 99: ...pit The side supports move out with the seat as it folds out When the seat is half way out lift the rear of the seat with one hand while pushing the front of the seat down with the other hand until it rotates to the full down position To store the seat lift the front of the seat with one hand while pushing the rear of the seat down with the other hand until the seat rotates to the half closed posi...

Page 100: ...he switch to extend the seat base to the reclined position Press and hold the front of the switch retract the seat Release the switch to stop the seat in the current position A limit switch in the actuator will automatically stop the seat when it reaches the maximum ex tended or retracted position In the reclined position this seat works with the port and stern bench seats to covert the seats to a...

Page 101: ...ems are located in the electrical systems compartment behind the aft bench seat Access to the compartment is provided by a large removable hatch located be hind the seat To access the electrical systems compartment open the bench seat approximately half way to expose the hatch Release the hatch latches and remove it Adjust the angle of the seat as required to provide optimum access to the compartm...

Page 102: ...ush to close latches To open pull the latch handle to release the latch To close push the door or drawer until the latch catches Periodically clean and lubricate the latch to protect it from corrosion and help keep it operating properly Slide Out Cooler A carry on slide out cooler is located in a com partment below the sink and storage drawer The cooler is mounted on a slide track in the compart m...

Page 103: ...fer to the grill operating manual for additional in formation on the proper operation and maintenance of the grill Notice The inverter draws significant amperage from the house batteries when the grill is operating Always monitor house battery voltage when us ing the grill for extended periods when the bat tery charger is not plugged into shore power Helm and Passenger Seats The helm and passenger...

Page 104: ...n it is open To secure the door in either position push the door until the latch catches Both doors are opened simultaneously to access the storage compart ment when the walk through door is nested to the storage compartment door Periodically clean and lubricate the latches to protect them from corrosion and help keep them operating properly A 12 volt light activated by the Interior Lts switch at ...

Page 105: ...MENT IS NOT BEING USED THE BOAT IS IN MOTION OR IN ROUGH WATER CONDITIONS Ski Battery Storage Compartment There is a large storage compartment located below the cockpit sole between the helm and passenger seats The compartment is designed for the storage of large items such as skis and wakeboards The batteries and fresh water sys tem valves are located in the rear of this compart ment If your boat...

Page 106: ...re the center windshield panel is secured in the open or closed position and that passengers in the bow seating area are properly seated before operating the boat above idle speed The passengers also should not be restricting the forward visibility of the operator There are seats and built in drink holders that drain to the bilge forward of the windshield For ward facing backrests with folding arm...

Page 107: ...nserted in each drain fitting to control drainage or isolate the compart ments from the seawater If the compartments are used as fishboxes or coolers they should be cleaned and flushed thoroughly with fresh water after each use ForwardBelowDeckStorageCompartment A storage compartment that provides additional storage for dunnage is located below the cockpit sole between the bow seats A flush twist ...

Page 108: ...anchions loose Next open the bimini and attach the front straps to the metal eye straps on the top of the windshield frame Attach the rear stanchion ball ends one at a time to the rear deck hinge sock ets located aft of the windshield Use your body weight on the rear corner of the bimini to pull down and stretch the fabric until the stanchion ball end aligns with the socket in the deck hinge Inser...

Page 109: ...onnector Snap the curtains to the windshield and the deck beginning with the forward snaps on the windshield If the bimini is adjusted properly the side curtains will have to be stretched slightly to pull out the wrinkles and reach the snaps The main load for the top should remain on the front straps and the rear stanchions If you have the optional drop curtain attach it to the zipper on the back ...

Page 110: ...d drop cur tain are custom made to each boat at the factory To install the curtains slide the front clear connec tor into the slide track at the front of the top and snap it to the top of the windshield frame begin ning with the center snaps The clear connector will have to be stretched just enough to pull out the wrinkles to reach the snaps on the windshield Once the clear connector is completely...

Page 111: ...ch side of the forward windshield base Secure the Velcro flap on the cockpit cover to the flap on the bow cover Insert the support pole in the center of the cockpit cover and make sure it is adjusted slightly higher than the windshield Continue fastening the snaps on the port and starboard sides of the cover as you work your way to the rear of the boat When you get near the stern seat double check...

Page 112: ...112 NOTES ...

Page 113: ...ther by a clamping mechanism when the portable head is ready for use In some areas the law requires that portable heads be equipped with an optional permanent deck mounted pump out system to evacuate the waste with a dock side pump Boats with a portable head pump out will be equipped with a deck fitting marked WASTE located on the deck Since this system is required to be permanent the bottom waste...

Page 114: ...anual marine toilet is available as optional equipment Flush water is supplied by a thru hull fitting located in the ski battery compartment and a raw water supply line Before using make sure the valve at the thru hull fitting is on Then open the inlet valve on the head and pump to wet the inside of the bowl After use close the inlet valve and pump to discharge the waste to the holding tank Once t...

Page 115: ... areas where the discharge of sewage is prohibited CAUTION IN MANY AREAS IT IS ILLEGAL TO PUMP HEAD WASTE DIRECTLY OVERBOARD VIOLATION OF THESE POLLUTION LAWS CAN RESULT IN FINES OR IMPRISONMENT ALWAYS KNOW THE LAW FOR THE AREAS IN WHICH YOU BOAT NEVER DUMP HEAD OR HOLDING TANK WASTE OVERBOARD ILLEGALLY Head System Maintenance The head should be cleaned and inspected for leaks regularly The holdin...

Page 116: ...116 NOTES ...

Page 117: ...The anodes are less noble than copper based alloys stainless steel and aluminum They will deteriorate first protect ing the more noble underwater hardware against galvanic corrosion They must be monitored if the boat is to be left in the water Anodes should be checked monthly and changed when they are 75 of their original size When replacing the anodes make sure the contact surfaces are clean shin...

Page 118: ... a high sulfur content or polluted water the stainless steel will periodically develop surface rust stains This is perfectly normal under these conditions The following guidelines will help keep stain less steel looking good for many years Clean stainless steel frequently daily in salt or polluted environments with mild soap and plenty of water Any cleaner safe for use on glass is usually safe for...

Page 119: ...nted just below the top is more likely to be attacked by the salt and become corroded than the exposed areas on the structure Make sure the aluminum in this area is washed frequently with soap and water and rinsed thoroughly Pay particular at tention to places where the top material and or lacing contact the frame Once a month check the entire frame for damaged powder coating and corrosion around ...

Page 120: ...lakes and water Rinse with clean water Stubborn spots and stains Spray with either Fantastik Cleaner or Tannery Car Care Cleaner and rub with a soft cloth Rinse with clean water Liquid spills Wipe immediately with a clean absorbent cloth Rinse with clean water Food grease and oily stains Spray immediately using either Fantastik Cleaner or Tannery Car Care Cleaner wiping with a soft cloth Take care...

Page 121: ...curtains should be stored either rolled or flat without folds or creases Folding the curtains will make permanent creases that could cause the vinyl to crack Notice Do not use any polish containing lemon scents or lemon The lemon juice will attack the vinyl and shorten its life Snaps should be lubricated periodically with petro leum jelly silicone grease or a lubricant designed for snaps Zippers s...

Page 122: ...light sanding and machine buff ing may be necessary so contact your dealer or a professional Avoid exposing Corian to strong chemicals such as paint removers oven cleaners etc If contact occurs quickly flush the surface with water Remove nail polish with a non acetone based polish remover and flush with water Do not cut directly on Corian counter tops Interior Woodwork Oiled and varnished woodwork...

Page 123: ...e bilge pumps and alarms for proper operation The automatic switch should be manually activated periodically to verify operation by pressing the Pump Check button on the pump until the pump is activated You can also use a garden hose to flood the bilge until the water level is high enough to activate the pump 13 6 Drainage System It is essential that the following items be done pe riodically to ma...

Page 124: ...124 NOTES ...

Page 125: ...cal Scout dealer Drain water from the fresh water system Consult the engine owner s manual for detailed information on preparing the engines for storage Lifting It is essential that care be used when lifting your boat Make sure the spreader bar at each sling is at least as long as the distance across the wid est point of the boat that the sling will surround Refer to the sling locations drawing fo...

Page 126: ...ete or pavement All of the supports must be set up properly to prevent the boat from shifting while it is in storage Preparing The Boat For Storage Remove the bilge drain plug if installed Some boats do not have bilge drain plugs Thoroughly wash the fiberglass exterior especially the antifouling portion of the bottom Remove as much marine growth as possible Lightly wax the exterior fiberglass comp...

Page 127: ...e sure antifreeze has flowed through all of the raw water drains Install the baitwell drain plug and pour potable water antifreeze in the baitwell until it covers the intake for the recirculation pump Then activate the recirculation pump until antifreeze is visible at the discharge fitting Remove the drain plugs and wipe down the inside of the wells Refer to the Raw Water System chapter for ad dit...

Page 128: ...N HOLES ARE CLEAR WHEN THE BOAT IS LAID UP FOR THE WINTER WATER TRAPPED INSIDE THE HARDTOP OR TOWER LEGS COULD FREEZE AND CAUSE THE LEGS TO SPLIT Special Notes Prior To Winter Storage If the boat will be in outside storage properly sup port a storage cover and secure it over the boat It is best to have a frame built over the boat to sup port the canvas It should be a few inches wider than the boat...

Page 129: ...olts for the engines to make sure they are tight Perform all routine maintenance Check all hose clamps for tightness Pump the antifreeze from the fresh and raw water systems and flush several times with fresh water Check and lubricate the steering system Clean and wash the boat Install all upholstery cushions and canvas After Launching Carefully check all water systems and the engine bolts for lea...

Page 130: ...130 NOTES ...

Page 131: ... STBD FWD SPEAKER STBD NAV LT WIPER MOTOR PLUG TO MDP CTSY LT STBD AFT SPEAKER CTSY LT PORT AFT SPEAKER INTERIOR LT INTERIOR LT CTSY LT STORAGE LT FOOT SWITCH CTSY LT HARD TOP PLUG PORT STBD HARD TOP SPEAKERS STEREO 12V ACCY PLUGS WINDLASS WIRES PORT NAV LT HORN WINDLASS DECK HARNESS ...

Page 132: ... System Drainage System Transom Drains Sink Drain Sink Baitwell Drain Anchor Locker Drain Rod Holder Drains Bilge Drain Cockpit Drains Ski Locker Drain Cup Holder Drains Cup Holder Drains Storage Box Drains Storage Box Drain ...

Page 133: ...133 Schematics Freshwater System Freshwater System Freshwater Fill Freshwater Washdown Freshwater Tank Freshwater Pump Sink Sink Toilet ...

Page 134: ...134 Schematics Raw Water System Raw Water Washdown Raw Water Pump Raw Water System ...

Page 135: ...135 Schematics Waste System Optional Waste Seacock Optional Waste Pump Out Waste Tank Waste Outlet Vent Head Waste Water System ...

Page 136: ...136 Schematics Fuel System Fuel System Fill and Vent Deck Fill Sender Fuel Tank Pickups Fuel Water Separator ...

Page 137: ...137 Schematics Steering System Hydraulic Cylinders Power Steering Pump Optimus Steering Helm Electric Steering Wiring Hydraulic Hoses Steering System ...

Page 138: ...138 Schematics Propulsion System Garmin Screen Throttle Key Switch Props And Engines Propulsion System ...

Page 139: ...nt end of a boat s hull Bow Line A line that leads forward from the bow of the boat Bow Rail Knee high rails of solid tubing to aid in preventing people from falling overboard Bridge The area from which a boat is steered and controlled Bridge Deck A deck forward and usually above the cockpit deck Broach When the boat is sideways to the seas and in danger of capsizing a very dangerous situ ation th...

Page 140: ...g around the boat both on deck and below Ground Tackle A general term including anchors lines and other gear used in anchoring Grounds A boat touches the bottom Gunwale The upper edge of a boat s side Hand Rail Rail mounted on the boat for grab bing with your hand to steady you while walking about the boat Harbor An anchorage which provides reasonably good protection for a boat with shelter from w...

Page 141: ...e and aft rocking motion of a boat as the bow rises and falls Pitch The measure of the angle of a propeller blade Refers to the theoretical distance the boat travels with each revolution of the propeller P F D Personal Flotation Device Port The left side of the boat when facing the bow Porthole port The opening in the side of a boat to allow the admittance of light and air Propeller A device havin...

Page 142: ...ills with water from over the side Swimming Ladder Much the same as the boarding ladder except that it extends down into the water Taffrail Rail around the rear of the cockpit Thru hull A fitting used to pass fluids usually water through the hull surface either above or below the waterline Topsides The side skin of a boat between the waterline or chine and deck Transom A flat stern at right angles...

Page 143: ...143 143 Appendix C Maintenance Log Hours Date Dealer Service Repairs ...

Page 144: ...144 Maintenance Log Hours Date Dealer Service Repairs ...

Page 145: ...145 Maintenance Log Hours Date Dealer Service Repairs ...

Page 146: ...146 Maintenance Log Hours Date Dealer Service Repairs ...

Page 147: ...147 Maintenance Log Hours Date Dealer Service Repairs ...

Page 148: ...148 Maintenance Log Hours Date Dealer Service Repairs ...

Page 149: ...149 149 Appendix D ...

Page 150: ...150 Boating Accident Report ...

Page 151: ...151 Boating Accident Report ...

Page 152: ...152 NOTES ...

Page 153: ...ler License Color and make of auto 7 Persons aboard Name Age Address telephone No 8 Do any of the persons aboard have a medical problem Yes No If yes what 9 Trip Expectations Leave at From Going to Expect to return by time and no later than 10 Any other pertinent info 11 If not returned by time call the COAST GUARD or Local authority 12 Telephone Numbers Scout recommends filling out a float plan e...

Page 154: ...154 NOTES ...

Page 155: ...will not start with the shift control lever in neu tral The shift control lever is not in the neutral detent Try mov ing the shift lever slightly There is a loose wire on the neutral safety switch in the control Inspect wires and repair loose connections The starter or ignition switch is bad There is a problem with the electronic control system at the helm control module or at the engine Have the ...

Page 156: ...d The on board computer has sensed a problem and has limited the RPM to protect the engine Find correct the problem The tachometer is bad and needs to be replaced A throttle control is not responding properly Have the throttle setting checked by a qualified technician An engine is loosing RPM The boat is not overloaded and the hull bottom and running gear are clean and in good condition The engine...

Page 157: ... is clogged Clean strainer The pump is defective Repair or replace the pump The washdown pump runs but the pump will not pump water The thru hull valve is not open Open valve There is an air leak in the intake line Repair the air leak The intake scoop strainer for the raw water system is clogged with weeds or debris Back down the boat to clear debris or clean the scoop strainer The in line sea str...

Page 158: ...s and secure above the bilge waterline The switch is defective Replace the switch The pump is defective Replace pump Head will not flush The holding tank is full Pump out the holding tank The flush valve is defective Replace the flush valve Excessive odor from marine head Back pressure in the holding tank Pump out holding tank and clean the vent and vent hose or replace the in line fil ter No deod...

Page 159: ...159 ...

Page 160: ...160 ...

Page 161: ...161 Scout Boats Inc 2531 Hwy 78 West Summerville SC 29483 ...

Reviews: