background image

HC-SG550M                                              3 Item Settings                                                                                                         

                                                                                Page   

19 

3.4 Laser Pointer 

The laser light pointer beam can be turned on as an 
additional  function  for  pointing  to  an  object  or  a 
certain  region  of  interested  (ROI)  by  pressing 

of 

the remote.   

NOTE: 

Please the laser could be harmful to eyes 

if pointed at another person. 


Summary of Contents for HC-SG550M

Page 1: ...Infrared Mobile Digital Scouting Camera User s Manual HC SG550M ...

Page 2: ...tart Guide 6 2 1 Power Supply 6 2 2 Insert the SD card and SIM card 7 2 3 Do the Camera Settings 7 2 4 Enter into Test Mode 8 2 5 Custom Settings 9 2 6 Enter into On Mode 9 2 7 Power Off 10 3 Item Settings 11 3 1 Camera Menu 11 3 2 Default Setting 16 3 3 Playback Mode 18 3 4 Laser Pointer 19 4 Trouble Shooting 20 5 PIR Detection Zone 21 6 Technical Specifications 22 7 Parts List 24 ...

Page 3: ...ent of humans or animals monitored by a high sensitive Passive Infrared PIR motion sensor and then automatically captures high quality pictures or records video clips according to default settings or preset customer settings It will then send the pictures instantly to your mobile device or e mail via GSM GPRS network You ll be alerted just when the camera is triggered or per custom settings There ...

Page 4: ... and is primarily used for customer settings This is an infrared type wireless remote control The maximum remote distance is about 30 feet Note The remote will not work properly without the antenna attached When power on the camera allow approximately 10 20 seconds for the camera to acquire a signal The remote will not function properly until the camera has acquired a signal You can determine that...

Page 5: ...splay When the camera is turned on power switch is slid to TEST position the current settings will be displayed on the screen Menu Cancel OK 1 2abc 3def 4 ghi 5 jkl 6 mno 7 pqrs 8 tuv 9 wxyz 0 Menu Cancel OK 1 2abc 3def 4 ghi 5 jkl 6 mno 7 pqrs 8 tuv 9 wxyz 0 ...

Page 6: ... function you need to open GPRS service from your service provider It supports GSM with 850MHz 900MHz 1800MHz and 1900MHz SIM card Icon There are two SIM card icons which stand for different installation situations means the SIM card is inserted and it works well means the MMS function can t work correctly because of loss of signal or other communication issues 1 6 Cautions The working voltage of ...

Page 7: ...t down automatically after a continuous indication beep Please do not insert or take out the SD card when the power switch is in the ON position It is recommended to format the SD card by the camera when used for the first time The camera will be in USB mode when connected to a computer In this case the SD card function is as a removable disk In TEST mode the camera will shut down automatically af...

Page 8: ...nd you a SMS or Email to indicate the low battery situation Caution Risk of explosion if battery is replaced by an incorrect type Also dispose of used batteries according to the instructions Correct Disposal of this product This marking indicates that this product should not be disposed with other household wastes throughout the EU To prevent possible harm to the environment or human health from u...

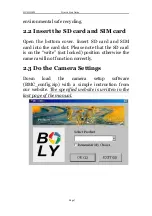
Page 9: ...card and SIM card into the card slot Please note that the SD card is on the write not locked position otherwise the camera will not function correctly 2 3 Do the Camera Settings Down load the camera setup software BMC_config zip with a simple instruction from our website The specified website is written in the last page of the manual ...

Page 10: ...s in Receive Email 1 step3 For first time use we suggest you to use default settings step2 any settings you want to change please click Change Setting Please note save the txt file in the root directory of GSM folder of SD card after all settings being done step4 the file will automatically disappear once camera is turned on 2 4 Enter into Test Mode Slide the power switch to the TEST position and ...

Page 11: ...HT to stop a video after exit menu setting When Send Mode is set as Manual you can send the selected photo in playback mode by pressing OK to enter to the preset address in TEST mode Daily Report and Instant mode are used in ON mode Please note that the images can only be sent and video cannot be sent If the SIM card is not inserted the image cannot be sent as well 2 6 Enter into On Mode Slide the...

Page 12: ...and walking away The camera has the sound recording function so the sound will be embedded in the video clip while capturing a video 2 7 Power Off Slide the power switch to OFF position to power off the camera Please note that even in OFF mode the camera still consumes a small amount of battery power Therefore please remove the batteries if the camera is not in use for a length of time ...

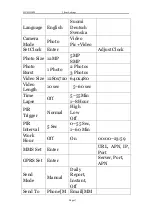
Page 13: ...fault setting Setting Items Description Langu age Choose language you need It supports four languages English Finnish German Swedish Camer a Mode Choose capturing Photo Video or Pic Video Set Clock Set camera date and time You can change the date and time of the device by setting this parameter when necessary e g after every battery change The date format is month day year the time format is hour ...

Page 14: ...cond Time Lapse Time lapse means the camera can capture images or videos at a preset time interval regardless of whether motions are detected The default parameter is Off which means the timer function is disabled Changing this parameter to a non zero value turns on the Time Lapse mode and camera will take photos at given time interval Please note that if the PIR Trigger is set to Off then the Tim...

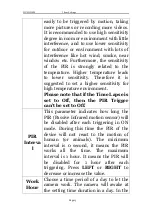
Page 15: ...ity for high temperature environment Please note that if the Time Lapse is set to Off then the PIR Trigger can t be set to Off PIR Interva l This parameter indicates how long the PIR Passive Infrared motion sensor will be disabled after each triggering in ON mode During this time the PIR of the device will not react to the motion of human or animals The minimum interval is 0 second it means the PI...

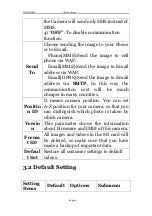
Page 16: ...the settings GPRS Set The camera sends image through GPRS network with SMTP protocol to an Email address In this way the communication cost will be much cheaper in many countries You should set the right GPRS setting parameters The settings of GPRS Email server port APN and so on please contact the network service provider if you are not familiar with the settings Send Mode There are 3 sending mod...

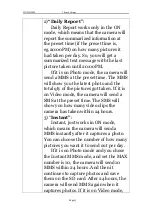
Page 17: ...f the pictures got taken If it is on Video mode the camera will send a SMS at the preset time The SMS will show you how many video clips the camera has taken within 24 hours 3 Instant Instant just works in ON mode which means the camera will send a MMS instantly after it captures a photo You can choose the number of how many pictures you want it to send out per day If it is on Photo mode and you c...

Page 18: ...way the communication cost will be much cheaper in many countries Positio n ID It means camera position You can set A Z position for your camera so that you can distinguish which photo is taken by which camera Versio n This parameter shows the information about Firmware and IMEI of this camera Forma t SD All images and videos in the SD card will be deleted so make sure that you have made a backup ...

Page 19: ... 8MP Photo Burst 1 Photo 2 Photos 3 Photos Video Size 1280x720 640x480 Video Length 10 sec 5 60 sec Time Lapse Off 5 55Min 1 8Hour PIR Trigger Normal High Low Off PIR Interval 5 Sec 0 55 Sec 1 60 Min Work Hour Off On 00 00 23 59 MMS Set Enter URL APN IP Port GPRS Set Enter Server Port APN Send Mode Manual Daily Report Instant Off Send To Phone M Email MM ...

Page 20: ...wed on the LCD screen on camera The videos can only be viewed on your computer For simplicity operations with PC won t be introduced here View Photo in playback mode Press OK of the remote to view the latest picture in TEST mode UP or DOWN to view the previous and the next one And OK to return to info display Note that video can not be displayed on the screen Delete photo or Video View the image o...

Page 21: ...Pointer The laser light pointer beam can be turned on as an additional function for pointing to an object or a certain region of interested ROI by pressing of the remote NOTE Please the laser could be harmful to eyes if pointed at another person ...

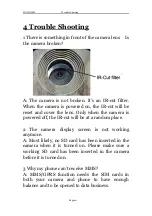
Page 22: ...nly when the camera is powered off the IR cut will be at a random place 2 The camera display screen is not working anymore A Most likely no SD card has been inserted in the camera when it is turned on Please make sure a working SD card has been inserted in the camera before it is turned on 3 Why my phone can t receive MMS A MMS GPRS function needs the SIM cards in both your camera and phone to hav...

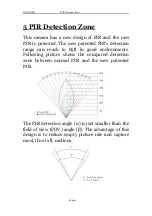
Page 23: ...ented PIR s detection range can reach to 85ft in good environments Following picture shows the compared detection zone between normal PIR and the new patented PIR The PIR detection angle α is just smaller than the field of view FOV angle β The advantage of this design is to reduce empty picture rate and capture most if not all motions ...

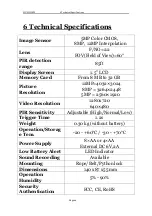
Page 24: ...ure Resolution 12MP 4032 3024 8MP 3264 2448 5MP 2560 1920 Video Resolution 1280x720 640 480 PIR Sensitivity Adjustable High Normal Low Trigger Time 1 2s Weight 0 30 kg without battery Operation Storag e Tem 20 60 C 30 70 C Power Supply 8 AA or 4 AA External DC 6V 2A Low Battery Alert LED Indicator Sound Recording Available Mounting Rope Belt Python lock Dimensions 140 x87 x55 mm Operation Humidity...

Page 25: ...HC SG550M 7 Parts List Page23 ...

Page 26: ...HC SG550M 7 Parts List Page24 7 Parts List Part Name Quantity Digital Camera One Wireless Remote One USB Cable One Belt One User Manual One Enhanced Antenna One Warranty Card One ...

Reviews: