1
IN
AU
STRAL
IA
PR
OU
DLY BUILT
Continued Over.../
INSTRUCTIONS -
INTERFIT
PROJECTOR LIFT – FVI and HTI Series
Thank you for purchasing a Screen Technics AV Lifter and please ensure to
read the instruction fully before proceeding to install the unit.
GENERAL ADVICE
•
The Interfit AV Lifter is a fully integrated unit that is designed to be installed above the ceiling
line of the room and utilises bottom ceiling edge trim pieces to create a neat finish against the
ceiling material cut-out.
•
No plaster or paint trades are required for this standard installation.
•
All electrical and control equipment is contained in the ceiling space. A standard 3 pin GPO for
power supply is required.
•
Review the cut-out dimension fact sheet attached to the top lid of the unit, as model sizes vary
throughout the range.
•
Before proceeding ensure that you have enough in-ceiling height to fit the unit. And that your
model lifter will accommodate the projector that is specified for the project.
•
Make sure you have reviewed the Lens Throw Distance Chart provided with the projector so that
the Lifter will be the correct distance from the projection screen and to allow for any sideways
lens off-set to achieve a perfect result.
INSTALLATION ADVICE
•
Having decided on the position of the Lifter you must now cut the ceiling material to the stated
cut-out dimension. We recommend that you divide the cut-out in two and remove one half at a
time to prevent torn edges.
•
Every above ceiling environment is unique and therefore there is no singular approach to
securing the unit within the ceiling space. Following are some accepted install practices.
PLEASE NOTE:
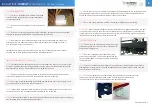
You MUST utilise the four (4) Black Steel L Brackets and the 12mm bolts to secure
this lifter into the ceiling. The four (4) smaller white L brackets may be used to stabilise the unit
but CANNOT be the main support.
CHAIN AND TURNBUCKLE
STEP 1.
Secure the chain to a suitable structure, such as
overhead timber beams, or dyna-bolted to an overhead
concrete slab.
STEP 2.
A minimum of 4 points to secure the chain is
required and it is the installers responsibility to ensure
the chain turnbuckle system chosen is strong enough
for the safe installation of the unit.
STEP 3.
Secure the chain to a suitable structure, such as overhead timber beams, or dyna-bolted
to an overhead concrete slab.
STEP 4.
Now raise the unit into the ceiling, hold in position from below while a second person
secures the other end of the chain to the lifter using the supplied BLACK angle brackets and
tighten the turnbuckles till the units ceiling edge trims are firmly pressing against the underside
of the ceiling material.
STEP 5.
Lock off the turnbuckles.
Interfit PROJECTOR LIFT – FVI and HTI Series
Thank you for purchasing a Screen Technics AV Lifter
and please ensure to read the instruction fully before
proceeding to install the unit.
General Advice
The Interfit AV Lifter is a fully integrated unit that is designed to be installed above the ceiling line of the room
and utilises bottom ceiling edge trim pieces to create a neat finish against the ceiling material cut-out.
No plaster or paint trades are required for this standard installation.
All electrical and control equipment is contained in the ceiling space. A standard 3 pin GPO for power supply is
required.
Review the cut-out dimension fact sheet attached to the top lid of the unit, as model sizes vary throughout the
range.
Before proceeding ensure that you have enough in-ceiling height to fit the unit. And that your model lifter will
accommodate the projector that is specified for the project.
Make sure you have reviewed the Lens Throw Distance Chart provided with the projector so that the Lifter will
be the correct distance from the projection screen and to allow for any sideways lens off-set to achieve a
perfect result.
Installation Advice
Having decided on the position of the Lifter you must now cut the ceiling material to the stated cut-out dimension. We
recommend that you divide the cut-out in two and remove one half at a time to prevent torn edges.
Every above ceiling environment is unique and therefore there is no singular approach to securing the unit within the
ceiling space. Following are some accepted install practices:
Please Note
: You MUST utilise the four (4) Black Steel L Brackets and the 12mm bolts
to secure this lifter into the ceiling. The four (4) smaller white L brackets may be used
to stabilise the unit but CANNOT be the main support.
Primary Brackets for load support
Stabilising Brackets only
Chain and Turnbuckle
Secure the chain to a suitable structure, such as overhead timber beams, or dyna-bolted to an overhead
concrete slab.
A minimum of 4 points to secure the chain is required and it is the installers
responsibility to ensure the chain turnbuckle system chosen is strong enough for
the safe installation of the unit.
Now raise the unit into the ceiling, hold in position from below while a second
person secures the other end of the chain to the lifter using the supplied BLACK
angle brackets and tighten the turnbuckles till the units ceiling edge trims are
firmly pressing against the underside of the ceiling material.
Lock off the turnbuckles.
All-thread Brooker Rod
Secure 4 x brooker rods to a suitable overhead structure with a proprietary loxin
system designed to accept threaded rod.
Space around the outside corner dimensions of the unit.
Wind a set of nuts up the rods above the installation height and then insert the rods
through the supplied angle brackets, now attached to the lifter unit.
Now wind on a set of nuts under the bracket till the ceiling edge trims are firmly
pressing against the underside of the ceiling material, then wind the upper nuts down
onto the angle brackets to lock off unit.
Installations are best achieved by have access into the roof space but this is not always possible, and in these
instances we advise the following practices:
Installing from Beneath the Ceiling Line
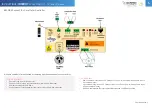
Connect power in a safe manner to the unit and support the lifter so you can motor the projector cage
lower than the ceiling edge trims and you will see 6 Allen key bolts holding the cage assembly to the unit.
Remove these and set aside the cage unit.
Remove the projector mounting plate by removing the 2 Allen key bolts at the front under side of plate
and pull the forward to remove from the lifter assembly.
Motor the remaining assembly to the full up position (watch out for your fingers…) and you now have room
to access the interior of the unit.
Inspect the 8 installation slots running up the corner frame uprights. These are used to secure the device
to some suitable structure from below the ceiling line.
Either add some timber in the ceiling along two sides to coach bolt into place or suspend from threaded
rod or some suitable angle brackets.
Raise the unit into the ceiling, fit the screws or bolts (as appropriate to selected method) and apply
upward pressure to the unit so the ceiling edge trims are pressed firmly against the underside of the
ceiling material and tighten off the screws or bolts.
Motor down the mechanism and refit the projector plate and cage assembly.
Please Note
:
When utilising the above method of installation from beneath the ceiling, it is best to use a method of
fixing to any structure that will allow you at a latter date to remove the lifter for any future servicing issues, without
the need to break into the ceiling – please consider this issue before deciding on the best installation method.
info@screentechnics.com.au
screentechnics.com.au
AUSTRALIA
22-24 Suttor Road, Moss Vale NSW 2577
+61 2 4869 2100
NEW ZEALAND
44 Mahana Road, Te Rapa, Hamilton
0800 022 821
IN
AU
STRAL
IA
PR
OU
DLY BUILT


