background image


Index 

Features: .................................................................................................................... 1 
Application and Installation View: ............................................................................... 2 
Panel View: ................................................................................................................ 4 
Video Output Setting: ................................................................................................. 5 
LED Indication Status: ................................................................................................ 5 
RJ45 LED Indication Status: ...................................................................................... 5 
Rotary Switch Function: ............................................................................................. 6 
Panel Button Function: ............................................................................................... 6 
Cable & Transmission Distance: ................................................................................ 7 
System Default Settings: ............................................................................................ 7 
Bandwidth Chart: ....................................................................................................... 7 
USB Hot Key Function: .............................................................................................. 7 
Remote Control Function: .......................................................................................... 8 
Remote Control Button Function: ............................................................................... 8 
Remote Control Operation: ........................................................................................ 9 
RS-232 Assign Mode: .............................................................................................. 11 
Caution: ................................................................................................................... 15 
APP Control Function: .............................................................................................. 16 
Web Setting Function: .............................................................................................. 17 

Bonjour plug-in installation: ................................................................................ 18 
Login in to the web setting: ................................................................................ 20 
System Menu: .................................................................................................... 21 
Channel expansion: ........................................................................................... 21 
Network Menu: ................................................................................................... 23 
Functions Menu: ................................................................................................ 24 

Package: .................................................................................................................. 26 
Specification: ............................................................................................................ 27 
 

Summary of Contents for DKM01BT

Page 1: ...HDMI DVI VGA over IP system User Manual ...

Page 2: ...on Distance 7 System Default Settings 7 Bandwidth Chart 7 USB Hot Key Function 7 Remote Control Function 8 Remote Control Button Function 8 Remote Control Operation 9 RS 232 Assign Mode 11 Caution 15 APP Control Function 16 Web Setting Function 17 Bonjour plug in installation 18 Login in to the web setting 20 System Menu 21 Channel expansion 21 Network Menu 23 Functions Menu 24 Package 26 Specific...

Page 3: ... DVI VGA signal with bi directional RS232 USB signal IR and analog audio signals over LAN l Supports resolutions up to 1080p Full HD or 1920 x 1200 WUXGA 32bpp 60 Hz l Transmission range up to 150M over CAT5e 180M over CAT6 l Support window based management software using PC for easy setting input output link l Support Android iOS APP control l Receiver input source select could be from IR remote ...

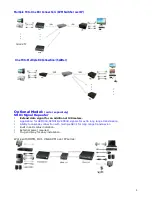
Page 4: ...920x1200 V V V V Bi Directional HE05BER HDMI 1080p V Unidirectional V HE05BR HDMI 1080p V V V Unidirectional V HKM01BR HDMI 1080p V V V V Bi Directional V VDKM01BR VGA DVI 1920x1200 V V V V Bi Directional V Application and Installation View Point to Point Direct Connection Extender Point to Point With Switch Hub Connection Extender over LAN Multiple TX to Multiple RX via Switch Hub Connection Mult...

Page 5: ...ter l Extend data signal for an additional 120meters l Application for HKM01B DKM01B VKM03B signals for extra long range transmission l Ability to cascade connection with multiple SR01 for long range transmission l Built in LED status indication l External power required l Plug and play for easy installation Work with HDMI DVI VGA KVM over IP series ...

Page 6: ...4 Panel View Transmitters HE05BT HKM01BT DKM01BT VKM03BT Receivers HE05BER HE05BR HKM01BR VDKM01BR ...

Page 7: ...DVI and VGA dual output Notice in dual output mode the DVI monitor must be connected and power on LED Indication Status Panel LED Status Description Power Green LED Off No power On Boot completed Flash Twice Booting Flash Slowly Turn off video output Not available for transmitters HE05BER Pulse Screen saver mode Not available for transmitters HE05BER Link Blue LED Off Not cconnected with transmitt...

Page 8: ...on Hold until Green LED Flash N A Update EDID from loop output Press to power on Hold until Green and Blue LED Flash then manually reboot RESET to Default N A Above bold font part as the default ITEM RECEIVER Button CH CH Press both Confirm Enter menu Turn on video output Short Press Reduce the numbers of Channel Menu Value Increase the numbers of Channel Menu Value Press for 1 second before power...

Page 9: ...l be varied based on different resolution Higher resolution may not request bigger bandwidth Below Chart is the resolution and bandwidth status for reference Resolution 60Hz Average Bandwidth Mbps Resolution 60Hz Average Bandwidth Mbps 1080p 77 24 91 1600x1200 UXGA 59 24 73 720p 46 29 150 1280x1024 SXGA 58 31 76 480p 63 36 73 1024x768 XGA 118 56 138 800x600 SVGA 83 64 107 Above bandwidth chart not...

Page 10: ...e Remote ID Press and hold power button then press button 8 to complete the setting for example Remote Control Button Function Symbol Function Power Temporarily turn off on the video output Setup remote control Remote ID MENU Menu selection input numbers after press menu button LEFT Previous channel RIGHT Next channel UP Previous quick Menu selection DOWN Next quick Menu selection ENTER Confirmati...

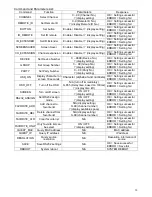
Page 11: ... current Remote ID setting 21 Set Remote ID Set Remote ID to 0 9 default 8 22 Enable IR Remote Enable IR Remote 23 Disable IR Remote Disable IR Remote 24 Enable IR Extender Enable IR Extender 25 Disable IR Extender Disable IR Extender 26 Enable Channel Button Enable Channel Button 27 Disable Channel Button Disable Channel Button 28 Enable RS 232 Assign Mode Enable RS 232 Assign Mode auto reboot af...

Page 12: ...sable Fatal Error Reboot Disable auto reboot when fatal error found 410 Enable Keep RS232 Connection Enable keep RS232 connection at assign mode 411 Disable Keep RS232 Connection Disable keep RS232 connection at assign mode 420 Input Analog In Volume Set volume 0 100 for analog in firmware A6 3 0 up 420 Input Analog Out Volume Set volume 0 100 for analog out firmware A6 3 0 up 430 Newline Unix CR ...

Page 13: ...sign mode to fix the connection of RS232 not follow channel ID as below diagram Receiver 1 3 fix to channel 1 by assign mode receiver 4 follow the channel ID without assign mode AAA BBB CCC CH 1 CH 2 CH 3 CH 1 CH 2 CH 3 CH 3 RS 232 RS 232 RS 232 RS 232 Transmitter 1 Transmitter 2 Transmitter 3 Receiver 1 Receiver 2 Receiver 3 Receiver 4 AAA AAA AAA CCC RS 232 Assign to CH 1 Network Switch Video Vi...

Page 14: ... connection broken by video channel switching Command format CMD_Address Command Parameters Address command and parameters are char not hex code Enter LF or CR LF is required to execute the command All accord receivers will run the command and parameters we also add 3 kinds of user defined numbers except MAC IP Device No Group No Party No for flexible application Mxxxx The last 4 digits of MAC Add...

Page 15: ...ting successful ERROR Setting fail OSD_ON Display character on screen 30 seconds Character alphabet and numbers OK Setting successful ERROR Setting fail OSD_OFF Turn off the OSD N A turn off immediately 0 655 Delay time based on 100ms display time left OK Setting successful ERROR Setting fail SCREEN Turn on off screen ON OFF display setting OK Setting successful ERROR Setting fail RS232_ASSIGN Set...

Page 16: ...F 49 30 41 31 32 3C 20 4F 4B 0D 0A CMD_G34 CHANNEL 5 Set receivers which Group No is 34 to Channel 5 HEX code 3E 43 4D 44 5F 47 33 34 3E 20 43 48 41 4E 4E 45 4C 20 35 0D 0A No response from multiple receivers CMD_ALL OSD_ON Hello x28123 x29 x22ABC x22 Show Hello 123 ABC to all monitor and send response HEX code 3E 43 4D 44 5F 41 4C 4C 3E 20 21 4F 53 44 5F 4F 4E 20 48 65 6C 6F 21 20 5C 78 32 38 31 ...

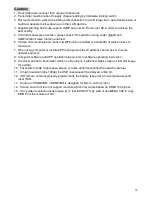
Page 17: ...omputer or mobile APP management the IP address should be set in same network segment 8 Computer software and APP operation please refer to software operating instruction 9 If receiver switch to transmitter which no video input it will show blank screen or last still image for a while 10 Fast switch mode might cause screen or audio abnormal briefly when switch channel 11 In high resolution like 10...

Page 18: ...e Play Download QR code iTunes Download QR code APP name Remote Control Center PRO Advanced control for installer Google Play Download Link https play google com store apps details id sct com remotecontrolcenterpro iTunes Download Link https itunes apple com us app remove control center pro id930779117 l zh ls 1 mt 8 Google Play Download QR code iTunes Download QR code For APP instruction please r...

Page 19: ... when receiver booting or no video input from transmitter 2 Connect monitor with receiver connect receiver with transmitter and set in the same channel press remote control button MENU 2 ENTER Host IP Address at receiver side it will shows the transmitter IP Address on screen must remove the HDMI cable of transmitter or turn off the video source 3 Install Internet explorer plug in Bonjour click de...

Page 20: ... plug in installation a Click BonjourSDKSetup exe to install Bonjour plug in for Internet Explorer b Click Next to continue c Click I accept the terms in the license agreement to continue d Click Next to continue ...

Page 21: ...ick Finish to exit installation g Right click on My Network Place à Properties then right click on Local Area Connection à Properties then double click on Internet Protocol TCP IP to setting as below IP address 169 254 111 111 sub mask 255 255 0 0 ...

Page 22: ...direct input known IP address of TX RX or open IE browser then select View à Explorer Bars à Bonjour Double click on HTTP on ast2 gateway transmitter or HTTP on ast2 client receiver it will pop up web setup in Bonjour windows as below Click Network page you will see the IP address of transmitter receiver ...

Page 23: ...opy and paste below command in bold at System Utilities Console API Command to set the transmitter Step 1 disable channel setting from rotary switch astparam s hostnamebydipswitch n astparam s reset_ch_on_boot n After copy and paste press Apply button notice do not use Enter key Set up once only unless you run Factory Default Step 2 set channel of transmitter ast_send_event 1 e_stop_link astparam ...

Page 24: ... 225 0 110 001 10001 73 225 0 140 110 40110 24 225 0 111 110 11110 74 225 0 141 010 41010 25 225 0 110 110 10110 75 225 0 140 010 40010 26 225 0 111 010 11010 76 225 0 141 100 41100 27 225 0 110 010 10010 77 225 0 140 100 40100 28 225 0 111 100 11100 78 225 0 141 000 41000 29 225 0 110 100 10100 79 225 0 140 000 40000 30 225 0 111 000 11000 80 225 0 151 111 51111 31 225 0 110 000 10000 81 225 0 15...

Page 25: ...0000 ast_send_event 1 e_chg_hostname astparam save ast_send_event 1 e_reconnect To disable channel expansion please click Factory Default button on web channel setting will back to 0 F total 16 channels by rotary switch Network Menu IP Setup l IP Mode could be Auto IP DHCP Static three mode default is Auto IP For mass deploying please use static or DHCP mode l Casting Mode could be Multicast Unica...

Page 26: ... function setup the video signals send from network default is checked Please note it will turn off HDMI output of receiver if this function be disabled only analog audio output Copy EDID from this Video Output Check this box will auto copy EDID from the TV connected to receiver when receiver booting default is not checked In multiple connections transmitter will use default EDID 1080p with 2 chan...

Page 27: ...SB device operation setting default is Auto select mode In Unicast mode recommend set to Active on link In Multicast mode recommend set to Active per request Serial over IP This function setup Serial RS232 signal sends from network l Operation Mode Default is Type 2 Recommended Dumb redirection l Baudrate Setting for Type 2 default is 115200 8 None 1 ...

Page 28: ...ge Include Transmitter x 1 USB A to B cable x 1 IR emitter cable x 1 DC 5V 2Amp power adapter x 1 Software CD x1 HE05BER Package Include Receiver x 1 IR receiver cable x 1 IR remote control x1 DC 5V 2Amp power adapter x 1 HE05BR HKM01BR VDKM01BR Package Include Receiver x 1 IR emitter cable x 1 IR remote control x1 DC 5V 2Amp power adapter x 1 ...

Page 29: ...dity up to 95 Dimensions mm 125x140x30 125x140x30 167x105 5x40 167x105 5x40 Weight g 380 380 470 460 ITEM NO HE05BER HE05BR HKM01BR VDKM01BR Support Resolution 480i 480p 720p 1080i 1080p 24Hz 25Hz 30Hz 50Hz 60Hz Transmission Distance CAT 5e 150M CAT 6 180M Max USB Connector X USB Type A x 4 RS232 Connector X DB9 Male x 1 Video Output Connector HDMI Type A x 1 DVI I x 1 29 Pin Digital Only 15 pin M...

Reviews: