background image

VECTRA X1  -  Page 9

Mounting the Control Unit 

The control unit must only be mounted in the interior of the vehicle.   Do not mount the

main unit in the engine compartment. Choose a mounting location that will not be easily

accessible to a thief, and will not interfere with the operation of any vehicle components

such as foot pedals, steering column, air vents, seat rails, etc.

Do not mount the control unit until after setting the internal jumpers and performing a

complete operation check of the system. After installation is complete and performance

verified, the control unit can be easily mounted using wire ties through the mounting tabs

on the bottom of the unit.

Mounting the Siren

Choose a siren mounting location that is away from heat sources such as exhaust manifolds,

and where it cannot be easily accessed from underneath the vehicle.  Be sure to face the

siren downward to prevent the collection of water in the siren’s housing.  

Always route all wires from the engine compartment into the interior of the vehicle through

a proper grommet.

Mounting the Shock Sensor 

Choose a suitable interior mounting location for the shock sensor that provides ample

coverage of the vehicle. Keep the sensor away from the vehicle’s ECM or other sources of

electrical interference. Suggested mounting locations include air conditioning ducts,

dashboard braces, or center console supports.

During proper operation, the shock sensor will detect impacts to the vehicle only and will

not usually be triggered by slow rocking movements of the vehicle like those caused by

wind. 

Summary of Contents for Vectra X1

Page 1: ...VECTRA X1 VEHICLE SECURITY SYSTEM PRODUCT MANUAL...

Page 2: ...ear if required for repair and or replacement of any defective parts A copy of the original purchase and installation receipt must accompany any products returned for warranty service Warranty is limi...

Page 3: ...ion Controlled Door Locks Page 7 Dome Light Activation Page 7 Auxiliary Function Outputs Page 7 Remote Sensor Disable Page 7 Silent Arm Disarm Page 7 Anti Carjacking Protection Page 7 5 System Install...

Page 4: ......

Page 5: ...re additional parts and or labor see store for details VECTRA X1 Page 1 Remote Door Locking Starter Defeat Horn Honk Illuminated Entry Remote Car Start Power Trunk Hatch Release Radar Sensor Back up B...

Page 6: ...tly Button 4 then Button 2 Disarms the system silently Adding Replacing Transmitters To replace lost or stolen transmitters or to add additional transmitters into the system have all desired transmitt...

Page 7: ...ered the system after disarming and turning on the ignition The LED indication will repeat 8 times LED Flashes 1 flash optional sensor 2 flashes shock sensor 3 flashes not used 4 flashes door 5 flashe...

Page 8: ...or hood trunk the system will alarm for 45 seconds If triggered by the shock sensor input the system will alarm for 30 seconds In the event the alarm is triggered and remains triggered continuously by...

Page 9: ...nic Mode If the ignition is on when the Panic feature is activated the doors will lock for personal safety Emergency Override If the transmitter is lost or inoperable the system can still be disarmed...

Page 10: ...the security system so the vehicle may be operated by a mechanic or parking attendant To activate or deactivate the Valet Mode 1 Turn on the ignition 2 Press and hold the override switch for 5 seconds...

Page 11: ...ess the Arm button again The siren will chirp 5 times and the parking lights will flash 5 times to indicate the sensor is disabled The sensor will remain disabled until the next arming cycle Silent Ar...

Page 12: ...vehicle systems before and after the installation 6 Always use a Volt Ohm meter for testing vehicle circuits Never use a test light 7 Always look before drilling any holes or mounting self tapping scr...

Page 13: ...ren Choose a siren mounting location that is away from heat sources such as exhaust manifolds and where it cannot be easily accessed from underneath the vehicle Be sure to face the siren downward to p...

Page 14: ...ng Light Output 10A The WHITE wire must connect to the circuit that shows 12V when only the parking lights are on For parking light circuits exceeding 7 amps a relay is required For vehicle s with ind...

Page 15: ...r Button 3 The siren will chirp 6 times indicating that the reset signal was received All System Programming parameters are now set to factory default settings The Valet Mode is off 3 Turn off ignitio...

Page 16: ...between one pulse or two pulse operation for the door unlock output Vehicles that require two pulses on the proper wire to unlock the doors can be interfaced directly without the use of relays or any...

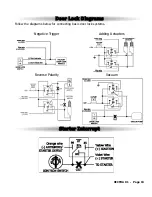
Page 17: ...VECTRA X1 Page 13 Negative Trigger Adding Actuators Reverse Polarity Vacuum Follow the diagrams below for connecting basic door lock systems Door Lock Diagrams Starter Interrupt...

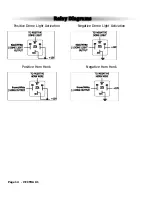
Page 18: ...Page 14 VECTRA X1 Relay Diagrams Positive Dome Light Activation Negative Dome Light Activation Positive Horn Honk Negative Horn Honk...

Page 19: ...This device complies with Part 15 of FCC Rules Operation is subject to the following two conditions 1 This device may not cause harmful interference 2 This device must accept any interference received...

Page 20: ...ite Domelight Activation Output 500mA Brown White Horn Output 500mA Gray Auxiliary 1 Output 500mA Brown Siren Output 3A Green Door Trigger Input Purple Door Trigger Input White Parking Light Output 10...

Reviews: