background image

Proper microSD Card Use

☞ Insert/remove the microSD card only after powering the main unit off (front LED off).
    Inserting/removing the microSD card while the unit is powered on can cause serious
    errors. In addition, removing the microSD card while recording is in progress can corrupt
    recording data and damage the card itself.
☞ Format the microSD card and perform a virus check at least twice a month to prevent
    potential data recording failures.
☞ Use authorized microSD cards only.
☞ The warranty period is 3 months for the microSD card, 6 months for the accessories,
    and 1 year for the main unit.
☞ Using a microSD card that contains existing data can lead to errors. Delete all existing
    data before use.
☞ Frequently check the recordings and format the microSD card at least once a week
    (File System: FAT32/32bit).
☞ Replace the microSD card if it is not recognized when connected to a computer or
    cannot be formatted properly.
☞ Using a microSD card that contains existing data can lead to errors. Delete all existing
    data before use.
☞ The manufacturer claims no responsibility for data stored on to the microSD card.
☞ Regularly check the data stored on the microSD card and the internal memory to
    ensure normal recording performance. This product has been designed as an in-vehicle
    recording device. Do not use for purposes other than as intended. The manufacturer is
    not responsible for any product defect or issue resulting from negligent use or care of
    the product by the consumer.

3

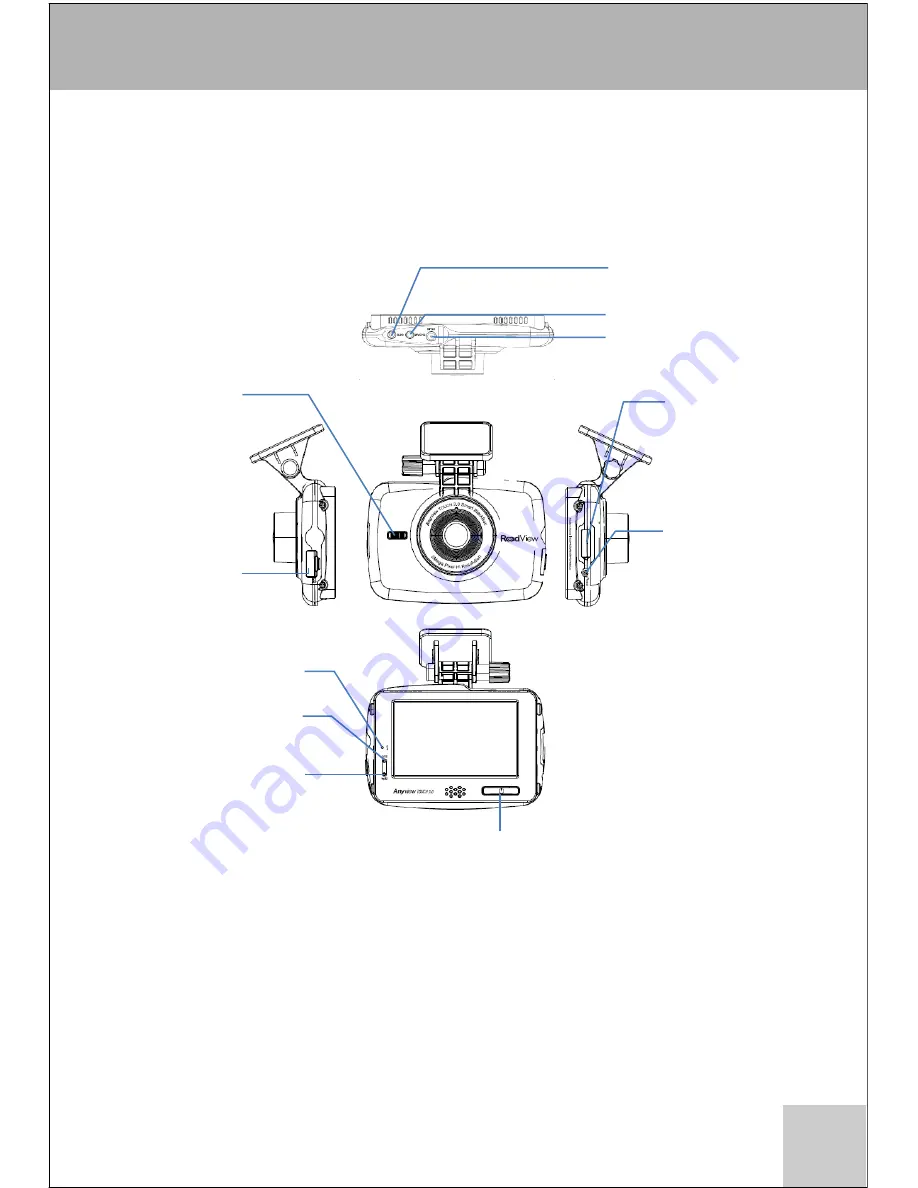
Product Overview

# The actual component may differ from the images above.

Security LED

Flashing

security indicator.

External GPS Antenna
Connector
Rear Camera Connector
Power Cable Connector

Debugging Port
Servicing Port
(do not open.)

Reset Button 
If the black box
becomes
unresponsive
during use,
press this button
to reboot the
device.

microSD Card

Slot

Built-In Microphone

Status LED

Blue

Recording LED

Red

Power/Manual Recording Button
Press and hold to turn the power on/off.
Short press to start manual recording.

Summary of Contents for RoadView Touch 3.0 smart HD

Page 1: ......

Page 2: ...nual are intended to ensure your safety and prevent property damage Read them carefully before using the product The product s functions and design features may change without prior notice for quality...

Page 3: ...lectric leakage hazards If this occurs turn off the product unplug the power cable and contact the service center Proper microSD Card Use Insert remove the microSD card only after powering the main un...

Page 4: ...ents may differ from the images below Main Unit Rear Camera Extension Cable microSD Card microSD Card Adapter Clips Quick Guide Power Cable OR Constant Power Cable Cigarette Jack Cable Actual componen...

Page 5: ...Connector Power Cable Connector Debugging Port Servicing Port do not open Reset Button If the black box becomes unresponsive during use press this button to reboot the device microSD Card Slot Built...

Page 6: ...4 Product Overview Mount Lens Rear Camera Specifications Rear Camera Effective Pixels Power Viewing Angle Operating Temperature Approx 120 640X480 DC 5V 20 C 60 C...

Page 7: ...ion Correct Installation Angle 1 3 of Vertical Space 2 3 of Vertical Space Distant Area Dynamic Area Fixed Area Incorrect Installation Angle Distant Area Dynamic Area 2 3 of Vertical Space 1 3 of Vert...

Page 8: ...ard has not been inserted the screen will not turn on Instead the black box will repeatedly ask you to check the microSD card The black box will function normally once a microSD card has been inserted...

Page 9: ...to GPS System time and date can be configured under Settings LCD Off Tap on the LCD screen to turn the screen back on Terminology Infinite Captures 1minute recordings while the vehicle is on the move...

Page 10: ...recording data on to a separate storage device on a regular basis Choose between Front Rear and Front Front Rear Displays video feeds from front and rear cameras on a single screen Front camera feed...

Page 11: ...utomatically turns off after the specified amount of time To turn the LCD back on simply tap on it Clock displays a clock instead of a blank screen after 1 minute of inactivity Sensitivity LCD Off Cau...

Page 12: ...specified under Switchover While in Parking mode the black box automatically reverts to Infinite mode when its G sensor detects motion Parking Mode Clock Configure the black box s system time and date...

Page 13: ...a source of constant power for the black box While the black box is operating in Parking mode Shutoff Voltage automatically turns off the black box if the battery voltage drops below the specified le...

Page 14: ...in to be recorded along with the video Calibrate the black box s LCD screen Calibrate the screen if your touch input is not being recognized correctly Tap on the calibration points accurately using yo...

Page 15: ...erases all previous user configured settings Format the microSD card If using a new microSD card make sure to format it first Formatting a used microSD card erases all files stored on the card Back up...

Page 16: ...icon to launch PC Viewer 2 PC Viewer Overview 14 PC Viewer Menu Bar Playback Window G Sensor Playback Window Settings Default Playback Speed Playback Speed Default Brightness Brightness Mute Volume Sp...

Page 17: ...B Approx 160 recordings Approx 310 recordings Approx 3GB Approx 170 recordings Approx 330 recordings Allocation Available Space Recording Capacity G Sensor G Sensor Recording Resolutions Mode Conditio...

Page 18: ...tting in progress Specification Category Model Road View RV 330LB 3 0 WQVGA LCD Touch Panel Camera Resolution Frame Rate Front Main Unit Rear Viewing Angle Front 1CH Front Rear 2CH Encoding File Forma...

Page 19: ...te of purchase 3 months for the microSD card and 6 months for accessories 2 Paid Servicing Upon expiration of normal warranty coverage Malfunctions resulting from user negligence Malfunctions caused b...

Page 20: ......

Reviews: