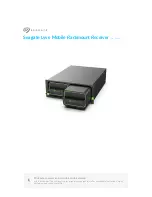
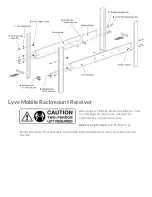
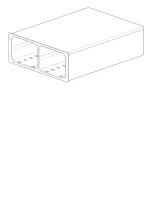
Summary of Contents for Lyve Mobile Rackmount

Page 1: ...le Rackmount Receiver User Manual Click here to access an up to date online version of this document You will also find the most recent content as well as expandable illustrations easier navigation and search capability ...

Page 2: ... theback rails Step 3 Attach cagenuts to rack Step 4 Attach thefront rails to thefront of therack Step 5 Attach theback rails to theback of therack Step 6 Attach thefront rails to theback rails Step 7 Install LyveMobileRackmount Receiver Recommended clearance 5 Non Rack Setup Latch attachment 6 Data Connections Connect to host interfaces Dimensions Weight Electrical Front view Back view Fiber opti...

Page 3: ...nections Connect Ethernet port Connect SeagateLyveMobileArray Turn on power Unlock thedevice Safely removing a device 9 Regulatory Compliance FCC DECLARATION OF CONFORMANCE CLASS B VCCI B China RoHS Taiwan RoHS 24 24 26 26 26 28 29 30 31 31 31 31 31 32 ...

Page 4: ...r cord x4 US UK EU AU NZ Rail kit accessory box Front latch kit accessory box Power cord zip tie lock x2 Quick Start Guide Specifica ons Dimensions Side Dimensions in mm Length 19 in 482 6 mm Width 4 638 in 117 8 mm Depth 24 598 in 624 78 mm Weight Part Weight lb kg Mobile Rackmount Receiver 47 52 lb 21 6 kg Electrical Power adapter AC DC base in 100 240V 9 4A out 12V 65A Views ...

Page 5: ...Views Front view Key I O Description A Slot A Slot for compatible device B Slot B Slot for compatible device Back view ...

Page 6: ...ot A See Data Connections 3A Slot A Right Host interface for future expansion Not available with all models 4A Ethernet management port A Ethernet connection for device in slot A Not to be used for data transfers 5A CLI management port A Command line interface port for device in slot A For service only Not to be used for data transfers 2B Slot B Left Host interface for future expansion Not availab...

Page 7: ...nagement port B Ethernet connection for device in slot B Not to be used for data transfers 5B CLI management port B Command line interface port for device in slot B For service only Not to be used for data transfers ...

Page 8: ... you can contact customer support using the Lyve Virtual Assist Chat To unlock and access Lyve devices connected to your computer you must enter your credentials in the Lyve Client app Install Lyve Client on any computer intended to connect to devices inserted in Lyve Rackmount Receiver See below for details Download Lyve Client The Lyve Client app is required to authorize a host computer to acces...

Page 9: ...on the computer and re enter your credentials Lyve devices lock when powered off ejected or unplugged from the host computer or if the host computer goes to sleep Lyve Client is required to unlock a Lyve device when it is reconnected to the host or the host has awakened from sleep Lyve Client can only unlock a device when the host computer is authorized using Lyve Management Portal credentials ...

Page 10: ...kage Image Name Quantity Notes Back rails 2 Front rail left 1 Front rail right 1 A M4 pin for 7 1mm hole hole 4 M4 x L10 6 8 2 5 Phillips screw B M4 pin for 375 hole 4 M4 x L10 9 1 2 5 Phillips screw C M4 nut 4 D 10 32 cage nut 4 ...

Page 11: ...10 32 x L12 7 Phillips screw F Stepped washer 8 G M4 pan head screw 4 M4 x L8 Phillips screw H 10 32 pan head screw 4 10 32 x L25 4 Phillips screw I Flat washer 4 J Latch 2 K 10 32 nut and washer 2 each Zip ties 2 Parts diagram ...

Page 12: ... Mobile Rackmount Receiver from its packaging and carrying the unit must be performed by at least two people Receiver weight empty 47 52 lb 21 6 kg Do not attempt to lift or assemble Lyve Mobile Rackmount Receiver with compatible devices inserted ...

Page 13: ......

Page 14: ...re provided for both hole dimensions Insert an M4 screw for 7 1mm or 375 in the indicated hole on the left front rail and fasten it with an M4 nut Repeat the process for the right front rail Step 2 A ach M4 rack screws to the back rails Insert M4 screws in the indicated holes on the back rails and fasten them with M4 nuts ...

Page 15: ...Step 3 A ach cage nuts to rack Attach two 10 32 cage nuts to each front rack post Leave 101 6mm space between the two nuts on each post ...

Page 16: ...screws into two stepped washers Use the screw washer assemblies to fasten the left front rail to the left front rack post Repeat the process for the right front rail and right front rack post Step 5 A ach the back rails to the back of the rack Position the back rails at the correct height on the rear rack posts Insert two 10 32 flat head screws into two ...

Page 17: ...d washers Use the screw washer assemblies to fasten the back rails to the rear rack posts Step 6 A ach the front rails to the back rails Use M4 flat pan head screws to attach the front rails to the back rails ...

Page 18: ...ng Lyve Mobile Rackmount Receiver from its packaging and carrying the unit must be performed by at least two people Receiver weight empty 47 52 lb 21 6 kg Do not attempt to lift or assemble Lyve Mobile Rackmount Receiver with compatible devices inserted ...

Page 19: ...two flat washers Use the screw washer assemblies to attach Lyve Mobile Rackmount Receiver to the top cage nuts attached to the left and right front posts Insert two 10 32 screws into the two latches Use the screw latch assemblies to attach Lyve Mobile Rackmount Receiver to the bottom cage nuts attached to the left and right front posts Recommended clearance ...

Page 20: ......

Page 21: ...Non Rack Setup Latch a achment If Lyve Mobile Rackmount Receiver is not assembled on a rack use the additional lock washer and 10 32 hexagonal nut to attach each latch to the enclosure ...

Page 22: ...faces Connect to host interfaces Connect the appropriate fiber optic Ethernet or SAS cables to available ports on Lyve Mobile Rackmount Receiver s back panel Fiber op c cable FC 32Gb 2 Port SFP FC 16Gb 2 port SFP iSCSI 25Gb 4 port 25Gb SFP iSCSI 25Gb 4 port 10Gb SFP Ethernet cable iSCSI 10GbaseT 2 Port RJ45 ...

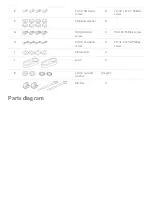
Page 23: ...SAS cable SAS 12Gb 2 Port SFF 8644 ...

Page 24: ...Power Connec ons Secure power cord Insert the zip tie into the slot below the socket ...

Page 25: ...Insert the power cord into the socket and secure with the zip tie ...

Page 26: ...s Ensure that the Ethernet management ports are connected to the same network as the host devices running Lyve Client If no device is inserted in a slot there s no need to connect its corresponding Ethernet management port to the network Connect Seagate Lyve Mobile Array Insert Lyve Mobile Array into slot A or B on Lyve Mobile Rackmount Receiver ...

Page 27: ...Slide device in until it snaps in place and is firmly connected to Lyve Mobile Rackmount Receiver s data and power Close latches ...

Page 28: ...Turn on power Set the power switch on Lyve Mobile Rackmount Receiver to ON ...

Page 29: ...Unlock the device The LED on the device inserted in Lyve Rackmount Receiver blinks during the boot process and turns solid orange The solid orange LED color indicates the device is ready to be unlocked ...

Page 30: ...reen The device is unlocked and ready for use Safely removing a device Your computer must perform filing and housekeeping operations on your Lyve device before it is physically removed from Lyve Rackmount Receiver To avoid corrupting or damaging files always eject the device s volumes from your computer using the Lyve Client app or your computer operating system before physically removing the devi...

Page 31: ...n accordance with the instructions may cause harmful interference to radio communications However there is no guarantee that interference will not occur in a particular installation If this equipment does cause harmful interference to radio or television reception which can be determined by turning the equipment off and on the user is encouraged to try to correct the interference by one or more of...

Page 32: ...息化部令第 32 号 电力电子产品限制使用有害物质管理办 法 为了符合中国 RoHS 2 的要求 我们根据 电子电气产品有害物质限制使用标识 SJT 11364 2014 确定本产品 的环保使用期 EPUP 为 20 年 Taiwan RoHS Taiwan RoHS refers to the Taiwan Bureau of Standards Metrology and Inspection s BSMI s requirements in standard CNS 15663 Guidance to reduction of the restricted chemical substances in electrical and electronic equipment Beginning on January 1 2018 Seagate products must comply...

Page 33: ......

Reviews: