background image

1

Speciications:

Wingspan---------------80 in (203.3 cm)
Wing area---------------1083.8 sq.in (69.9 sq.dm)
Weight-------------------19.8 lbs (9.0 kg)
Length-------------------62.9 in (159.7 cm)
Engine-------------------50cc
Motor size---------------Power 360
Radio--------------------8 channels with 8 servos
Electric Power Conversion Optional

ASSEMBLY MANUAL

Code : SEA 257M

Summary of Contents for FOCKE-WULF FW190

Page 1: ... 80 in 203 3 cm Wing area 1083 8 sq in 69 9 sq dm Weight 19 8 lbs 9 0 kg Length 62 9 in 159 7 cm Engine 50cc Motor size Power 360 Radio 8 channels with 8 servos Electric Power Conversion Optional ASSEMBLY MANUAL Code SEA 257M ...

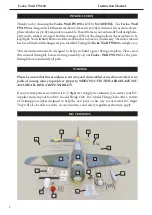
Page 2: ... lying aeroplane Please read this manual throughly before starting assembly of your Focke Wulf FW190 Use the parts listing below to indentify all parts Please be aware that this aeroplane is not a toy and if assembled or used incorrectly it is ca pable of causing injury to people or property WHEN YOU FLY THIS AEROPLANE YOU ASSUME ALL RISK REPONSIBILITY If you are inexperienced with basic R C light...

Page 3: ... glue Medium cyanoacrylate glue 30 minute epoxy 5 minute epoxy Hand or electric drill Assorted drill bits Modelling knife Straight edge ruler 2mm ball driver Phillips head screwdriver 220 grit sandpaper 90 square or builder s triangle Wire cutters Masking tape T pins hread lock Paper towels 50cc gasoline engine Computer radio 8 channel with 8 servos Glow plug to suit engine Propeller to suit engin...

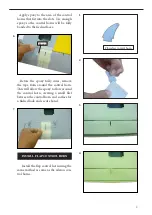
Page 4: ...the it of the control horns to the aileron and lap hey should rest lush against the control surface as shown INSTALL THE AILERONS CONTROL HORN 1 2 3 Ailerons control horn Place low tack tape 1 32 inch 1mm from the control horn slot his will pre vent epoxy from getting on the control surface when the control horns are glued in place Remove the control horns from the control surfaces Apply epoxy to ...

Page 5: ...e area of the control horns that ist into the slots Use enough epoxy so the control horns will be fully bonded to the ied surfaces Before the epoxy fully cures remove the tape from around the control horn his will allow the epoxy to low around the control horn creating a small ilet between the control horn and surface for a iished look and secure bond 7 6 Epoxy 4 ...

Page 6: ...h Use a pencil to mark the mounting hole loca tions on the blocks Use dental loss or heatshrink tube to secure the connection so they cannot be come unplugged C A glue INSTALLING THE AILERON SERVOS 5 6 Use drill bit in a pin vise to drill the mouting holes in the blocks Apply 2 3 drops of thin C A to each of the mounting holes Allow the C A to cure without using accelerator 1 5mm 3 4 2 1 20 0 Mini...

Page 7: ...ting tabs Allow the C A to cure without using accelerator Remove the string from the wing at the servo location and use the tape to attach it to the servo extension lead Pull the lead through the wing and remove the string C A glue 7 8 9 10 Set the aileron hatch in place and use a Phillips screw driver to install it with four wood screws 11 12 3x10mm 13 ...

Page 8: ...OD INSTALLATION Please study images below 75mm 75mm M3 clevis M3 clevis M3 lock nut M3 lock nut 2 1 3 2 4 3 1 INSTALLING THE FLAP SERVO Repeat the procedure for the lap servo 14 1 INSTALLING THE FLAP PUSHROD Repeat the procedure for the aileron pushrod ...

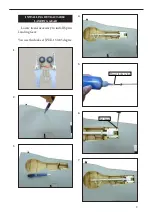
Page 9: ...9 INSTALLING RETRACTABLE LANDING GEAR Locate items necessary to install Sprin Landing Gear You use this fork set JP ER 150 85 degree 1 2 3 5 4 6 head locker glue 3x20mm 7 ...

Page 10: ...Focke Wulf FW190 Instruction Manual 10 9 8 10 12 11 13 14 15 ...

Page 11: ...11 16 17 18 19 20 2 1 INSERT BOMB ONTO THE WING Epoxy 3 ...

Page 12: ...Focke Wulf FW190 Instruction Manual 12 4 5 6 8 7 1 2 3 INSERT THE WING GUN ONTO THE WING 3x12mm ...

Page 13: ...13 4 5 6 Epoxy Epoxy 7 WING ASSEMBLY 1 2 3 4 ...

Page 14: ...s into the fuselage servo mounts Secure the servos with the screws provided with your radio system Elevator servo 1 Rudder servo Elevator servo THROTTLE SERVO ARM INSTALLATION Install adjustable servo connector in the servo arm as same as picture below 2 Elevator servo arm Elevator servo arm Minimum servo spec Torque 6 0V 157 00 oz in 11 31 kg cm 7 4V 179 00 oz in 12 89 kg cm Rudder servo arm 1 IN...

Page 15: ...er end to the nylon pick up tube 2 1 Carefully bend the second nylon tube up at a 45º angle his tube is the vent tube 3 Vent tube Fuel ill tube Fuel pick up tube Test it the stopper assembly into the tank It may be necessary to remove some of the lashing around the tank opening using a modeling knife If lashing is present make sure none falls into the tank With the stopper assembly in place the we...

Page 16: ...ands and seals the tank opening Do not overtight en the assembly as this could cause the tank to split FUEL TANK INSTALLATION You should mark which tube is the vent and which is the fuel pickup when you attach fuel tubing to the tubes in the stopper Once the tank is installed inside the fuselage it may be diicult to determine which is which 2 3 1 5 6 7 4 Epoxy ...

Page 17: ...ove mounting template from fie wall Firewall shown with mounting holes drilled ready for engine mounting Using mounting bolts and washers mount engine to fiewall 12 13 11 Drill a hole for the throttle pushrod Connect the lines from the tank to the en gine and muffler e vent line will connect to the muffler and the line from the clunk to the carburetor 5 1mm ...

Page 18: ... not become kinked inside the fuel tank compartment Air should low through easily MOUNTING THE ENGINE Please study images below Reinstall the servo horn by sliding the connector over the pushrod wire Cent er the throttle stick and trim and install the servo horn perpendiular to the servo center line 3 4 5 ...

Page 19: ...cures the throttle pushrod wire Make sure to use threadlock on the screw so it does not vibrate loose COWLING Please study images below 6 7 1 Tape the cowl to the fuselage using low tack tape Use a drill and drill bit to drill the holes for the cowl mounting screws Make sure the cowl position is correct before drilling each hole 2 3 4 ...

Page 20: ...he engine and make the cutout in the cowl for muffler clearance Connect the fuel and pressure lines to the carbu retor muffler and fuel filler valve Secure the cowl to fuse lage using the M3x10mm socket head screws 5 6 7 ELECTRIC POWER CONVERSION Locate the items neccessary to install the electric power conversion included with your model Locate the laser cut engine mounting template Align mounting tem...

Page 21: ...electric motor box using four 4mm blind nut four M5x25mm hex head bolts to se cure the motor Please see picture shown Attach the electric motor box to the irewall suitable with the cross lines drawn on the electric motor box and ire wall Using epoxy and balsa stick to se cure the motor box to the irewall Please see pictures below Motor 360 6000 Watts Propeller 24x10 25x12 ESC 160A 200A 10S 12S Lip...

Page 22: ... holes on the electric motor box 9 10 11 12 Attach the speed control to the side of the motor box using two sided tape and tie wraps Connect the appropriate leads from the speed control to the mo tor Make sure the leads will not interfere with the operation of the motor 13 14 15 ...

Page 23: ...pinner backplate propeller and spinner cone he propeller should not touch any part of the spinner cone If it does use a sharp modeling knife and carefully trim away the spinner cone where the propel ler comes in contact with it 2 INSTALL ELEVATOR HINGES 1 ...

Page 24: ...or and then the hinges into the horizontal stabilzer Ensure that the hinge pockets line up and that the hinges move freely 2 3 4 5 Epoxy Epoxy INSTALL ELEVATOR CONTROL HORN 3 Install the elevator control horn using the same method as same as the lap control horns 2 1 Epoxy 4 ...

Page 25: ...25 5 2 3 1 INSTALL HINGE FOR RUDDER AND FIN Please study images below Please study images below Epoxy Epoxy 5 1 2 4 INSTALL RUDDER CONTROL HORN ...

Page 26: ...Focke Wulf FW190 Instruction Manual 26 3 4 5 6 7 1 2 INSTALLING HORIZONTAL STABLLIZER Use Epoxy to glue the Horizontal Stabilizer to the fuselage ...

Page 27: ...27 3 4 7 5 6 8 1 2 3 Locate items necessary to install elevator pushrod Elevator pushrods assembly as pictures below ELEVATOR PUSHROD INSTALLATION ...

Page 28: ...ruction Manual 28 5 4 1 6 Locate items necessary to install rudder pushrod RUDDER PUSHROD INSTALLATION 4 2 3 5 Rudder pushrods assembly as pictures below MOUNTING THE TAIL WHEEL Locate items necessary to install tail wheel ...

Page 29: ...29 1 2 3 4 Steering arm Tail gear 7 5 6 8 9 ...

Page 30: ...Focke Wulf FW190 Instruction Manual 30 10 12 11 13 2x8mm 14 15 1 INSTALLATION PILOT AND CANOPY Locate items necessary to install pilot seats ...

Page 31: ...y SG Models hey are available at SG Models distributors 4 If you are going to install a pilot igure please use a sanding bar to sand the base of the igure so that it is lat Position the pilot igure on the canopy loor as shown Use epoxy to glue the base of the pilot igure to the cockpit loor please see pictures as shown 7 C A glue 240mm Epoxy Epoxy ...

Page 32: ...cals are not precut please use scissors or a sharp hobby knife to cut the decals from the sheet Please be certain the model is clean and free from oily in gerprints and dust Position decal on the model where desired using the photos on the box and aid in their location If all the decals are precut and ready to stick Please be certain the model is clean and free from oily ingerprints and dust Posit...

Page 33: ...e Place a piece of masking tape on the top of each wing 155mm back from the leading edge at the wing root Landing gear should be in the up re tracted position when balancing With the model inverted place your ingers on the masking tape and carefully lit the plane his is the point at which your model should balance for your irst lights Later you may wish to experi ment by shiting the balance up to ...

Page 34: ...odel installed ready to ly and empty fuel tanks hold the model at the marked balance point with the stabilizer level Lit the model If the tail drops when you lit the model is tail heavy and you must add weight to the nose If the nose drops it is nose heavy and you must add weight to the tail to balance 1 155mm Ailerons High Rate Up 15 mm Down 15 mm Low Rate Up 12 mm Down 12 mm Elevator High Rate U...

Page 35: ...35 15 20mm 12 15mm 20 25mm 20 25mm Wing Fuselage 12 15mm 15 20mm 30mm 80mm ...

Page 36: ...tick to the right he right aileron should move up and the other aileron should move down If it does not lip the servo reversing switch on your transmitter to change the direction 1 Completely charge your trans mitter and receiver batteries before your irst day of lying 2 Check every bolt and every glue joint in the Focke Wulf FW190 to en sure that everything is tight and well bonded 3 Double check...

Page 37: ...1A Hamlet 4 Le Van Khuong Street Dong hanh Ward Hoc Mon District Ho Chi Minh City Viet Nam Oice 62 8 Ngo Tat To Street Ward 19 Binh hanh District Ho Chi Minh City Viet Nam Phone 848 86622289 or 848 36018777 Website www SeagullModels com Email Sales seagullmodels com Facebook www facebook com SeaGullModels ...

Reviews: