L-4 Grasshopper 90 inches
Instruction Manual.
14
41
.
40
.
42
.
43
.
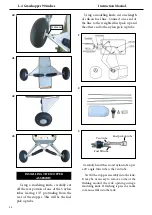
INSTALLING THE STOPPER
ASSEMBLY
Using a modeling knife, carefully cut
of the rear portion of one of the 3 nylon
tubes leaving 1/2” protruding from the
rear of the stopper. his will be the fuel
pick up tube.
1
.
2
.
3
.
Using a modeling knife, cut one length
of silicon fuel line. Connect one end of
the line to the weighted fuel pick up and
the other end to the nylon pick up tube.
Carefully bend the second nylon tube up at
a 45º angle. his tube is the vent tube.
Test it the stopper assembly into the tank.
It may be necessary to remove some of the
lashing around the tank opening using a
modeling knife. If lashing is present, make
sure none falls into the tank.
Vent tube.
Fuel ill tube.
Fuel pick up tube.
4x5mm
Summary of Contents for L-4 Grasshopper 90 inches
Page 10: ...L 4 Grasshopper 90 inches Instruction Manual 10 12 13 14 15 8 9 10 11 Epoxy ...
Page 11: ...11 20 21 22 23 16 17 18 19 Epoxy Epoxy ...
Page 12: ...L 4 Grasshopper 90 inches Instruction Manual 12 28 29 30 31 25 26 27 24 3x15mm 3x15mm ...
Page 13: ...13 36 37 38 39 32 33 34 35 3x15mm 3x15mm 3x12mm ...
Page 18: ...L 4 Grasshopper 90 inches Instruction Manual 18 3 2 4 5 8 9 6 7 ...
Page 19: ...19 11 15 10 14 12 16 13 17 ...
Page 32: ...L 4 Grasshopper 90 inches Instruction Manual 32 2mm C A glue 3x10mm M3x15mm 2 3 4 5 6 7 8 9 ...
Page 33: ...33 INSTALL BRACING WIRE AND METAL BRACKET AT THE TAIL TOP VIEW 3x15mm 10 14 1 2 3 11 12 13 ...
Page 34: ...L 4 Grasshopper 90 inches Instruction Manual 34 3x15mm 4 5 6 7 9 8 10 11 ...
Page 35: ...35 BOTTOM VIEW 15 16 17 12 13 14 19 18 ...
Page 37: ...37 INSTALL WINDSHIELD OF THE SIDE DOOR Please see below pictures 7 1 2 3 4 5 6 7 Epoxy ...
Page 38: ...L 4 Grasshopper 90 inches Instruction Manual 38 8 9 10 11 Epoxy Epoxy 12 13 14 15 ...
Page 44: ...L 4 Grasshopper 90 inches Instruction Manual 44 14 15 16 17 1 1 1 2 100mm 18 19 20 21 2 86mm ...


