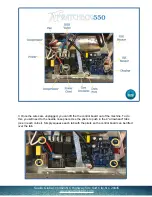
4. Now you’re ready to set the old control board aside and insert the new one. Carefully set the
replacement control board in place, ensuring the tabs secure into place.
5. Next, reinsert the wires into the control board. It’s helpful to go in the reverse order removal:
(starting at he bottom left corner and moving counterclockwise)
• Compressor (Red & Blue)
• Power Cord (Black)
• Dry Contacts/Terminal Strip (White & Blue)
• Data Port (Black &Red)
• Display (White)
• RH Sensor (Red)
• Coil Sensor (White)
• Hot Gas Bypass Valve (Black)
• Fan (Blue & Brown)
• Compressor (Black)
• Power (White)
6. Once all the wires are plugged in, all thats left is to place the cabinet back on the
dehumidifier.
Seaira Global • 14021 NC Highway 50 • Surf City, NC 28445


