background image


20

D E C A L I N G   ( P R E S S U R E -   S E N S I T I V E ) 

 
This process involves applying a cold pressure-sensitive 

over-laminate to the top and a cold pressure-sensitive 
mounting adhesive to the bottom of a graphic. If 
desired, set the top roller’s temperature to 120

°


F


(49

°


C). Using heat-assist may improve the adhesive 

bonding of the laminate. This process can be used to 

create self-adhesive images for mounting down onto 
various substrates. After performing this process, follow 

the Mounting Instructions in the manual to apply the 
decal to a substrate. It is important to follow the 

webbing instructions for films specific for your location. 


MEDIA: I

NK 

J

ET

, E

LECTROSTATIC

AND 

P

HOTOGRAPHIC


FILMS: 

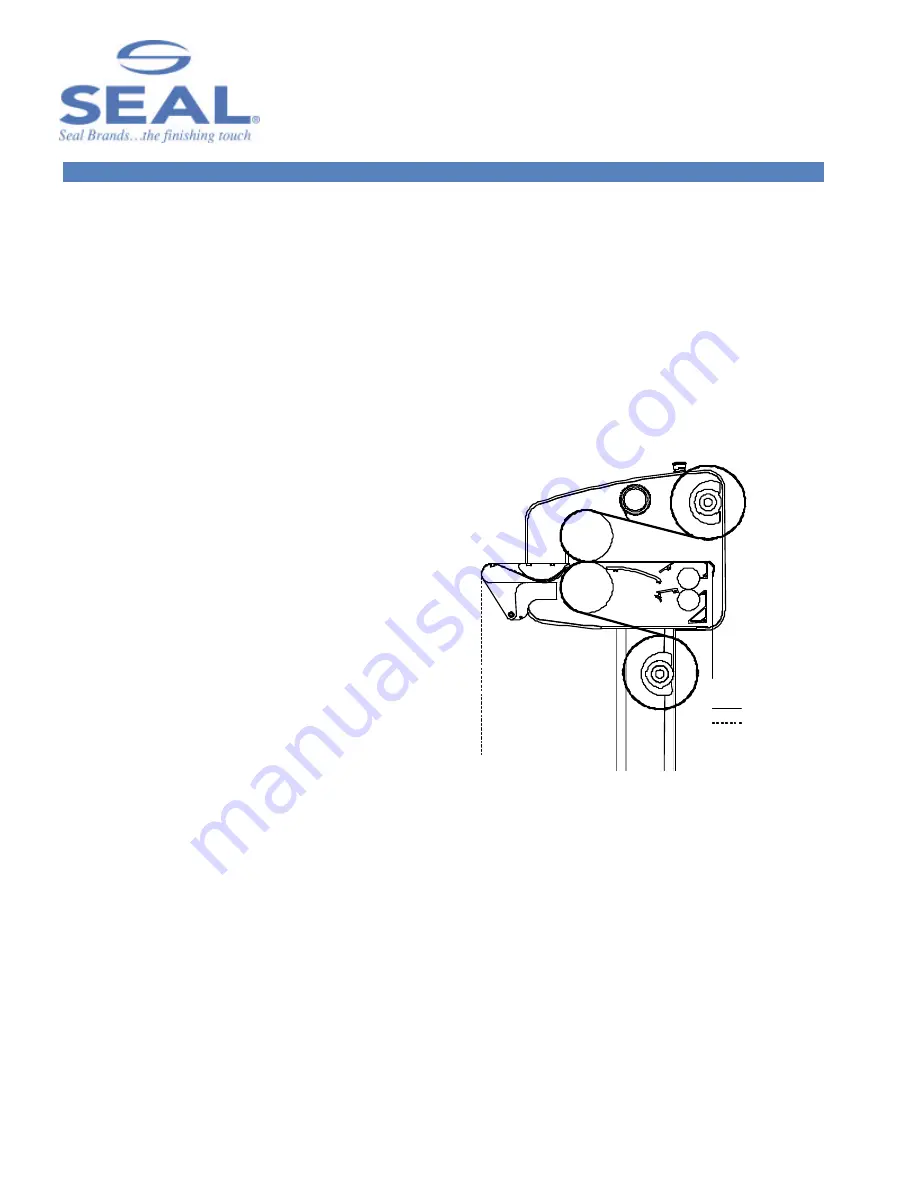
-- -- -- Top Unwind: Pressure-sensitive over-laminate  
____ Bottom Unwind: Pressure-sensitive mounting 

adhesive 
 

LAMINATOR SETTINGS 

C

ONTROL 

P

ANEL


Top Roller Temp: 

OFF or Heat-assist 

Bottom Roller Temp: 

OFF 

Motor Speed Setting:  

3-5 FPM (1-1.5 MPM) 


WEBBING SETTINGS 

Web Tension Top:  

Light  

Web Tension Bottom:  

Light  

Nip Setting:  

‘0’ 

NOTE: When using Mounting Adhesive on the 

back of images it is best to run over the back table. 
Running the film through the pull rollers may cause 

the backing to separate from the release liner. 


NOTE! Web the top laminate following the basic 
procedures for webbing films with a release liner.  


Film Path 
Media Path


Release Liner 


Figure 13. Webbing for Decaling (Pressure-

sensitive films) 


Summary of Contents for Image 410

Page 1: ...Image 410 Laminator Owners Manual Image 410 Laminator Owner s Operation Manual ...

Page 2: ...PERATION 15 WEBBING FILMS WITHOUT A RELEASE LINER 17 WEBBING FILMS WITH A RELEASE LINER 18 DECALING HEAT ACTIVATED 19 DECALING PRESSURE SENSITIVE 20 MOUNTING 21 ONE STEP MOUNTING AND LAMINATING 22 ENCAPSULATING 23 PRE COATING BOARDS 24 APPLYING AN OVERLAMINATE 25 PROCESS CONTROL SHEET 26 CLEANING MAINTAINING YOUR LAMINATOR 27 PERIODIC MAINTENANCE SHEET 28 ERROR CODES 29 TROUBLESHOOTING GUIDE 30 GL...

Page 3: ...ive and is ETL approved The SEAL Image410 laminator has been designed to be used with SEAL Brands materials When used with these products you are able to mount mount and laminate and encapsulate prints in one step Your laminator has been tested with SEAL Brands supplies and we recommend using these products for professional results WARNING This laminator is designed for mounting and laminating Any...

Page 4: ...lit CONNECTING YOUR LAMINATOR Connect the laminator in accordance with the details given on the identification plate Serial Number Label attached to the left stand leg of the laminator Refer also to the Technical Specifications page for more information IMPORTANT SEAL Graphics recommends that a licensed electrician in accordance with electrical codes in your area install your mains power or the wa...

Page 5: ...untry concerned SURROUNDINGS Install the laminator in surroundings that are as clean and dust free as possible in order to obtain the highest quality output The background dust level must not exceed that found in a typical office computer room environment The materials that are used on this laminator can have an electrostatic charge and will attract dust adversely affecting the output POWER SUPPLY...

Page 6: ...t to put it near its place of use IMPORTANT Set the forks of the forklift to the maximum lifting width of the laminator so the laminator s center of gravity is central between the forks NOTE We recommend that you save the transport bolts nuts and plates of the shipping crate for any major moves that you plan to make with the laminator in the future Remove the transport bolts from the skid s transp...

Page 7: ...placed between the top and bottom roller ends Remove the stickers securing the protective paper on the rolls using your fingers only Then gently pull the paper towards you to unwind off the roll WARNING DO NOT USE OPEN BLADES TO REMOVE THE PROTECTIVE PAPER ON THE ROLLERS Roller damage caused by improper use of cutting tools will void the user s warranty Small cuts and imperfections in the rollers ...

Page 8: ...ING Make sure the power disconnect located on the left side stand leg is turned to the OFF position before removing the side plate covers for any maintenance IMPORTANT Do not place heavy objects on the power supply cord PREVENTATIVE MEASURES Do not feed objects such as staples paper clips and rough or abrasive materials through the laminating rollers Keep all objects such as tools rulers pens mark...

Page 9: ...ssed the machine will default to Program 1 upon restart COVERED FOOT SWITCH The foot switch allows for complete user control when initially feeding an image into the nip or for feeding a delicate image through the rollers The cover prevents accidentally stepping on the foot switch and starting the laminator WARNING On Domestic version laminators the foot switch overrides the photoelectric eyes Whe...

Page 10: ...d Collar provides the means of adjusting the brake tension for the films and images Fitted on both the autogrip unwind shafts 6 High release Silicone Coating Covered Rollers Prevents adhesive build up and allows for easier cleaning 7 Automatic Wind up Idler Removable idler for winding up the release liner finished images or other laminate material Located on the top front of the laminator Use with...

Page 11: ...any servicing 4 Program Enter Button This button has two functions Function A Loading Preset Program Press and release to load shown program Function B Programming a New Preset First select the desired program 1 9 you are changing the settings for Next set the heat and motor speeds to how you want the program to recall them Then push and hold the Program Enter button The display will go blank appr...

Page 12: ...ller rotation 9 Motor Speed Adjustment Button Press the corresponding arrow to increase or decrease the speed 10 Motor Speed Readout Indicates speed in feet or meters per minute 11 Top Roller Temperature ON OFF Button Turns ON OFF the top roller heater The corresponding LED is lit when the heater is ON 12 Top Roller Temperature Adjust Button Press either arrow up or down once to see the temperatur...

Page 13: ...ssure sensitive adhesive to the back Top Jet Guard Crystal Matte 205 F 95 C Bottom Print Mount 110 F 45 C Speed 3fpm 1mpm PROGRAM 4 RIGID BACKLIT DISPLAYS Rigid Backlit Displays are created by face mounting an image to clear acrylic using an optically clear pressure sensitive adhesive Use the laminator to coat the acrylic and mount the print Top Optimount 140 F 60 C Bottom NA 110 F 45 C Speed 3fpm...

Page 14: ...K THE TEMPERATURE CONTROLS Press the Top Temperature On Off Button once The Top Temperature Indicator Light should be lit The corresponding temperature control readout will display the ambient temperature Press the Top Roller Temperature Adjust Button UP arrow once to see the temperature set point Press and hold the Top Roller Temperature Adjust Button UP arrow to increase the temperature set poin...

Page 15: ...nts Inches Metric mm Decimal MAX 28 6 mm 1 125 1 25 mm 1 000 3 4 19 mm 0 75 1 2 13 mm 0 50 3 8 10 mm 0 375 1 4 6 mm 0 25 3 16 5 mm 0 1825 1 8 4 mm 0 125 1 16 2 mm 0 0625 0 0 0 HOW TO SET THE ROLLER NIP First determine the thickness of the board that you will use for mounting Adjust the nip setting by pressing the UP or DOWN arrow until the desired measurement corresponds with the thickness of boar...

Page 16: ...ack into the receiver to prevent tension and tracking problems Center the films on the unwind shafts Measure the distance from the face of the cabinet and the film edges not the cores and adjust until they are equal IMPORTANT The position of all films boards rolls of media and cardboard cores for wind ups must be set central in the laminator to ensure optimum quality and correct tracking Laminate ...

Page 17: ...ver the top film draped over the face of the top roller The two films will then heat and stick together Set the Nip Setting to 1 16 2mm to allow for the thickness of a leader board FILMS INTO NIP Use the leader board to push the film s into the main roller nip Lower the top roller and use the foot switch to advance the leader board through the nip NOTE Keep the film under tension holding back on t...

Page 18: ...he top film draped over the face of the top roller The two films will stick together Set the Nip Setting to 1 16 2mm to allow for the thickness of a leader board FILMS INTO NIP Use the leader board to push the film s into the main roller nip Lower the top roller and use the foot switch to advance the leader board through the nip NOTE Keep the film under tension holding back on the film roll to pre...

Page 19: ...IC FILMS Top Unwind Heat activated Laminate 3 5 Mil _____ Bottom Unwind Pressure sensitive mounting adhesive LAMINATOR SETTINGS CONTROL PANEL Top Roller Temp 205 215 F 96 102 C Bottom Roller Temp OFF Motor Speed Setting 3 5 FPM 1 1 5 MPM WEBBING SETTINGS Web Tension Top Medium Web Tension Bottom Light Nip Setting 0 NOTE When using Mounting Adhesive on the back of images it is best to run over the ...

Page 20: ...for films specific for your location MEDIA INK JET ELECTROSTATIC AND PHOTOGRAPHIC FILMS Top Unwind Pressure sensitive over laminate ____ Bottom Unwind Pressure sensitive mounting adhesive LAMINATOR SETTINGS CONTROL PANEL Top Roller Temp OFF or Heat assist Bottom Roller Temp OFF Motor Speed Setting 3 5 FPM 1 1 5 MPM WEBBING SETTINGS Web Tension Top Light Web Tension Bottom Light Nip Setting 0 NOTE ...

Page 21: ...e release liner can be peeled off the image with the other hand Depress the foot switch to feed the board through the rollers IMPORTANT Because the foot switch overrides the photo eye be sure to keep your hands clear of the rollers to prevent injury At this point continuous run can be selected by pressing the Motor switch ON NOTE Take care that the rollers do not grab the liner If the board is acc...

Page 22: ...ed period of time WEBBING PROCEDURE IMPORTANT Ensure that the Nip setting corresponds to the board thickness Pull the film down from the top unwind shaft and place it evenly over the face of the top roller Use a piece of leader board to hold the laminate under the top roller When using this process a leader board or your product must be in the nip This will prevent adhesive from coating the bottom...

Page 23: ...ated Laminate 3 5 Mil ____ Bott Unwind Heat activated Laminate 3 5 Mil LAMINATOR SETTINGS CONTROL PANEL Top Roller Temp 205 215 F 96 102 C Bottom Roller Temp 205 215 F 96 102 C Motor Speed Setting 3 5 FPM 1 1 5 MPM WEBBING SETTINGS Web Tension Top Medium Web Tension Bottom Medium Nip Setting 0 NOTE Web the top laminate following the basic procedures for webbing films w o a release liner Film Path ...

Page 24: ...the same thickness as the boards to be coated Pull the adhesive down from the top unwind shaft and place evenly across the face of both rollers Press the foot switch and using the leader board push the adhesive into the roller nip Release the foot switch when the rear edge of the leader board is almost leaving the roller nip Position the board to be coated into the nip behind the leader board and ...

Page 25: ...ttom NA Nip Setting Substrate Determined WEBBING PROCEDURE Pull the film down from the top unwind Separate the film from the release liner and lay the film over the top roller Connect the release liner to the windup tube with a piece of tape Attaching the release liner to a cardboard core over the windup tube will allow for easier cleanup Pull the film evenly across the face of the main rollers Fe...

Page 26: ...n Top Unwind Shaft Light ________ Med _________ Heavy _________ Web Tension Bottom Unwind Shaft Light ________ Med _________ Heavy _________ Nip Setting _______________________________ Images Sheet Fed ___________ Roll Easel _______ NOTE We recommend that you make a photocopy of this page With each successfully run application record the process and settings and a diagram of the webbing procedure ...

Page 27: ...nate films and onto the top and bottom rollers This residue accumulates through normal use and can be easily cleaned off the rollers Use the Image roll cleaner included to remove the excess adhesive from the rollers This is best done with the rollers hot WARNING Use only an Image Roll Cleaner or a cotton cloth and Isopropyl Alcohol IPA to clean the rollers Do not use other solvents or cleaners Use...

Page 28: ... the Side Plate Cover and use this to record dates that authorized safety or maintenance personnel perform these laminator maintenance procedures Proper maintenance of your laminator ensures receiving many years of profit from your investment Use only replacement parts specified by SEAL Graphics Use lightweight household oil to oil the chain approximately every three months Call Technical Service ...

Page 29: ...using the Emergency stop button After 10 seconds turn the power on to restore the system WARNING Authorized service technicians must disconnect the power by using the power disconnect before servicing Speed Display Top Temp Display Problem Error Level 1 0 Error Data 1 The photo eye has failed Error Level 1 0 Error Data 5 The digital I O DIO card is defective Error Level 2 0 Error Data 0 Reset If e...

Page 30: ...ntenance personnel should do this The laminator is not heating up or shows erratic temperature readings Make sure the Heater Button is pressed ON The corresponding LED should be lit Check the circuit breakers on the under side of the left side plate Make sure the rollers are together with both Nip settings set at 0 and turning at a moderate speed when first heating up Images or Prints are rippling...

Page 31: ...plate NOTE All breakers are visible and can be reset from the outside of the laminator 1 5 4 3 2 Figure 20 Breaker Location Diagram TECHNICAL SERVICE For technical assistance please contact your Technical Service representative see rear cover When calling for Technical Service please have the Laminator Serial Number listed on the Identification Plate available The Laminator Serial Number is locate...

Page 32: ...om rollers meet OUT FEED The side of the laminator from which completed images emerge PRE COATING The process of coating a substrate with an adhesive mounting film onto which an image can be mounted PRESS The amount of force in distance put on anything that passes between the top and bottom rollers PRESSURE SENSITIVE FILMS Films with an adhesive that is activated when pressure is applied forming a...

Page 33: ...it 4062 Clutch Idler Kit 4063 Collar ID 2 pc 275400 Disconnect Power 143006 Dovetail Inner Assembly Left 4097 Dovetail Inner Assembly Right 4098 PART DESCRIPTION PART Heating Element 148042 Heater Spring Heavy duty 275215 Motor Control Isolated 154620 Motor Drive 107400 Motor Drive Bracket 511711 Nip Drive Kit Right 410 4070 Nip Drive Kit Left 410 4071 Photo Eye Micro switch Kit 4072 Relay Omron 1...

Page 34: ... 0 1 16 1 8 3 16 1 4 3 8 1 2 3 4 1 Max Mm 0 2 4 5 6 10 13 19 25 Max Max Roller Temperature 250 F 121 C ELECTRICAL REQUIREMENTS Single phase version Domestic 120 240 V 2W G 50 60 Hz 16A Single phase version International 208 240 V 1 50 60 Hz 16A Maximum Power consumption 3840 watts 12 065 BTU ORDER CODES SEAL Image 410 Single phase Domestic 60074 SEAL Image 410 Single phase International 60096 Each...

Page 35: ...ill transfer health and safety obligations to the user WARNING Changes or modifications to this unit not expressly approved by the party responsible for compliance could void the user s authority to operate the equipment NOTE This equipment has been tested and found to comply with the limits for a class A digital device pursuant to part 15 of the FCC rules These limits are designed to provide reas...

Page 36: ...d be fused no higher than 60 Amp Three phase or 100 Amp Single phase Specifications subject to change without notice Seal Graphics Seal Graphics Canada Seal Graphics U K Ltd Seal Graphics Europe BV Seal Graphics Pacific Americas Corporation 1601 Matheson Blvd E Unit 1 1 Watkins Close Kanaaldijk O Z 3 Limited 7091 Troy Hill Drive Unit 4 Burnt Mills Industrial Estate P O Box 29 Unit A 13th Floor Blo...

Reviews: