© Sealevel Systems, Inc.
- 13 -
SeaLINK User Manual
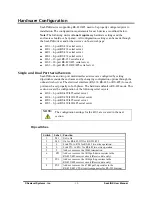
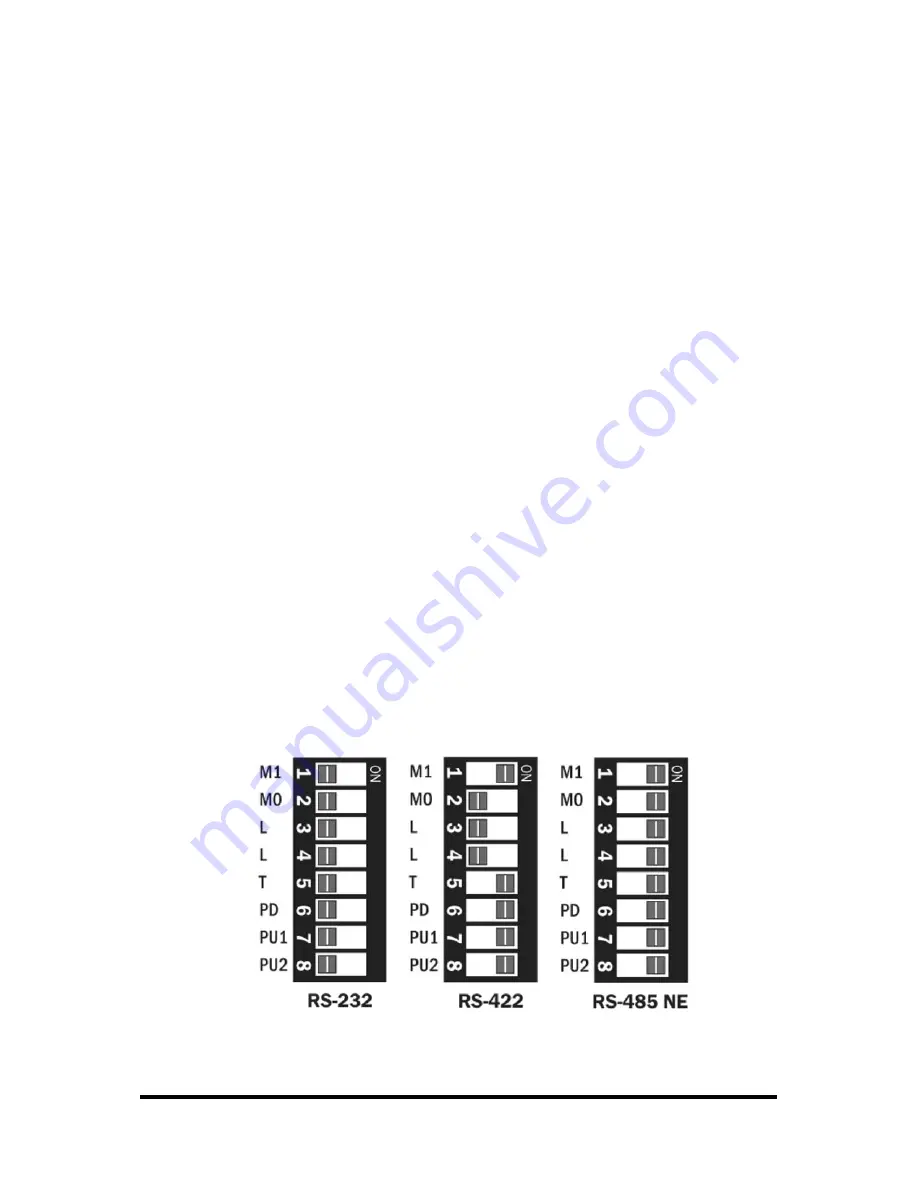
Dipswitches (continued)
Dipswitches on the PCB provide SeaLINK devices the ability to communicate with
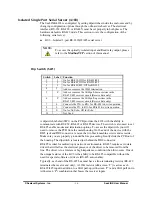
RS-232, RS-422 or RS-485 devices. These switches are also used to set RS-485
enable modes and termination options. The 4102 and 4104 have a single dipswitch
labeled (S2). On the 4202 and 4203, a pair of dipswitches are labeled (S2) and (S3).
To access the dipswitches, you will need to remove the PCB from the metal housing.
On the end of the device with the DB9 connector, remove the two black machine
screws and set aside. Make sure you are properly grounded before proceeding.
Gently slide the PCB out of the housing. The dipswitches are located on the PCB
adjacent to the DB9 connector.
RS-485 is ideal for multi-drop or network environments. RS-485 requires a tri-state
driver that will allow the electrical presence of the driver to be removed from the
line. The driver is in a tri-state or high impedance condition when this occurs. One of
the unique features of SeaLINK devices is the ability to be RS-485 compatible
without the need for special software or drivers (RS-485 auto-enable).
Typically, each end of the RS-485 bus must have a line-terminating resistor (RS-422
terminates the receive end only). A 120
Ω
resistor (silk-screen ‘T’) is across each
RS-422/485 input in addition to a 1K
Ω
pull-up (silk-screen ‘PU1’) and a 1K
Ω
pull
down (silk-screen ‘PD’) combination that biases the receiver inputs. The SeaLINK
device has RS-232 transceivers with built-in biasing, even when disabled. This is
compensated for by adding a 4.7K
Ω
pull-up (silk-screen ‘PU2) to the CTS circuit.
Only the ends of an RS-485 network should have the 120
Ω
terminating resistor.
These resistors may be removed or inserted using the dipswitch “T”. This allows the
user to customize the electrical interface to their specific requirements. Each switch
position corresponds to a specific portion of the interface.
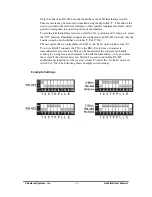
To add the termination/bias resistors, select the ‘On’ position, and to remove it, select
the ‘Off’ position. If multiple
adapters are configured in an RS-485 network, only the
boards on each end should have switches T, PD, PU1 & PU2 ‘On’
.
Example Settings

