


6. MAINTENANCE
7. 1.
Burning through thin metal:
On very thin sheet, e.g. car body work, the lowest amperage setting will be too fierce. In this case
you can still use your welder but you will need a brazing kit which is available from your Sealey stockist, Part Number AK4.
7. 2.
Machine frequently cuts out:
(A) The welder is being overworked causing the thermostatic control to activate. (B) May also be due
to a sticking electrode causing the machine to cut out for up to ten minutes. Cut out will automatically reset when welder has cooled.
7. 3.
Difficulty in striking an arc:
a). The electrode is damp. Heat it up to 60º - 70º before using.
b). Wrong type of rod.
7. TROUBLESHOOTING
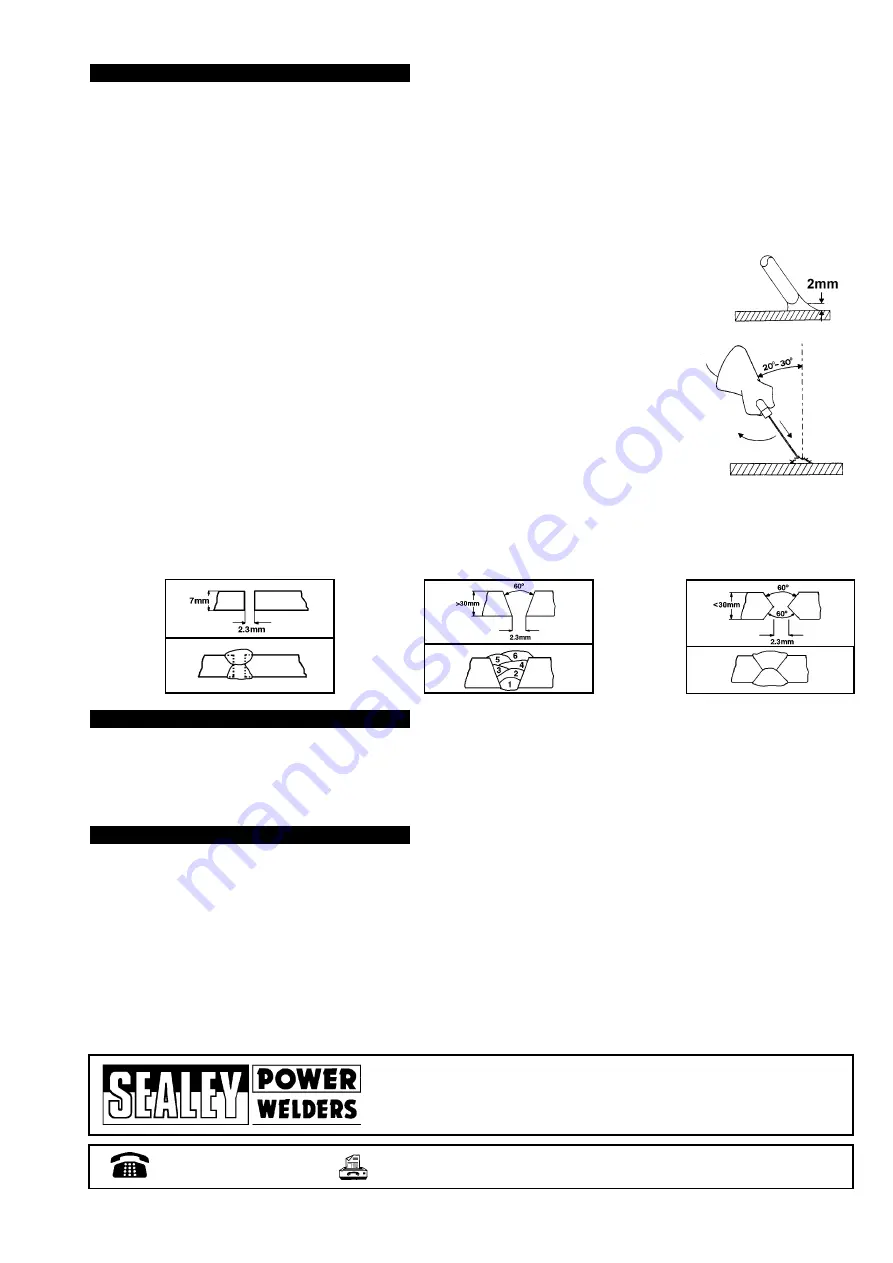
5.6.1
Metal up to
7mm thick,
keep pieces 2-
3mm apart. A
2nd run can go
underneath for
extra strength.
5.6.2.
Thickness of
up to 30mm,
make a single
butt joint, filling
up the space
with several
layers of weld.
5.6.3.
Over 30mm,
you need a
double V butt
joint fill up the
space with
several layers
of weld.
5.6. VARIOUS WELDING METHODS
p
p
WARNING! Ensure the welder is disconnected from the electrical mains power supply before attempting any service or maintenance.
6.1.
Keep the welder clean and dry at all times. Use a dry cloth to clean the unit.
6.2.
Keep all electrodes clean and ensure all cables are in good condition.
6.3.
Use authorised service agent for any other maintenance or service requirements.
01284 757500
01284 703534
E-mail:
sales@sealey.co.uk
NOTE:
It is our policy to continually improve products and as such we reserve the right to alter data, specifications and component parts without prior notice.
IMPORTANT:
No liability is accepted for incorrect use of this equipment
WARRANTY:
Guarantee is 12 months from purchase date, proof of which will be required for any claim.
INFORMATION:
Call us for a copy of our latest catalogue on 01284 757525 and leave your full name and address including your postcode.
Sole UK Distributor,
Sealey Group,
Bury St. Edmunds, Suffolk.
A few minutes practice will ensure that you get used to this and enable you to compensate accordingly.
If the electrode sticks, you may be holding it too close to the work piece. Pull sharply to the left, and then to
the right to free the electrode. After welding, chip off the slag with a chipping hammer (fig 4).
Wear goggles.
Disconnect welder from the mains power supply before resetting the electrode holder.
p
p
WARNING! Use pliers to remove the hot consumed electrodes or to move the hot welded pieces.
IMPORTANT - THERMOSTATIC CONTROL:
Your welder is cooled by the circulation of air. As you use larger welding rods you will experience a temporary
current shut off. This is to protect your transformer from overheating. The larger the welding rod, the greater
the current required, consequently, the hotter the machine will become and the quicker it will cut out.
Fig 4
IMPORTANT.
Should you have no welding experience, we recommend you seek training from an expert source to ensure your personal health & safety.
You must familiarise yourself with welding applications and limitations, and specific potential hazards peculiar to welding. Good Arc welding may be achieved only
with continued, supervised practice. For example:
p
p
WARNING! If you have no welding experience, we recommend you seek supervised training from an expert source.
5. 1. Ensure the machine is turned off from the mains power supply.
5. 2. Create a complete circuit by joining the earth clamp to a point on the workpiece that has been cleanly ground to provide good contact.
DO NOT join the clamp to other surfaces such as a wooden bench or painted surface, as there would be no current induction.
5. 3. The other end of the earth lead must be connected to the machine.
5. 4. Insert the electrode into the electrode holder. Ensure there is a good connection, the other end must be connected to the machine.
Ensure welding surfaces are kept clean and free from grease, or oil.
5. 5. Set amperage by regulating control wheel according to visual scale relating to amperage/electrode diameter. This is on top, or side of machine.
YOU ARE NOW READY TO WELD
p
p
WARNING! Remember to wear a full face welding mask, gauntlets and protective clothing, and
ensure you have read, understood and apply safety instructions. Wear goggles whilst chipping slag.
DO NOT
switch on the power supply until you are ready to start welding. Practice on scrap metal first.
Place the face mask in front of your face, then tap the electrode lightly to strike an arc and maintain a steady
gap between the end of the electrode and the work piece of approximately 2mm (fig 3). DO NOT hit the
electrode on workpiece as this may damage the stick. Withdraw with a clean movement at the end of the run.
5. OPERATING INSTRUCTIONS
Fig 3
Arc Welders - (0051) - (3) - 070601


