WARNING! Before use ensure you have read, understood and apply Section 1 safety instructions.
WARNING! Ensure you prepare vehicle correctly before attempting to use the Transmission Jack.
5.1.
POSITIONING JACK BENEATH LOAD.
Before use ensure the transmission weight and size does not exceed the capacity of the jack.
5.1.1. Ensure the vehicle from which the gearbox is to be removed is correctly positioned, handbrake applied
and raised to allow the transmission jack to be positioned correctly.
5.1.2. Ensure there are no other persons around or under the vehicle.
5.1.3. Ensure saddle is in its lowest position and use handle to transport and centrally position jack beneath
vehicle transmission.
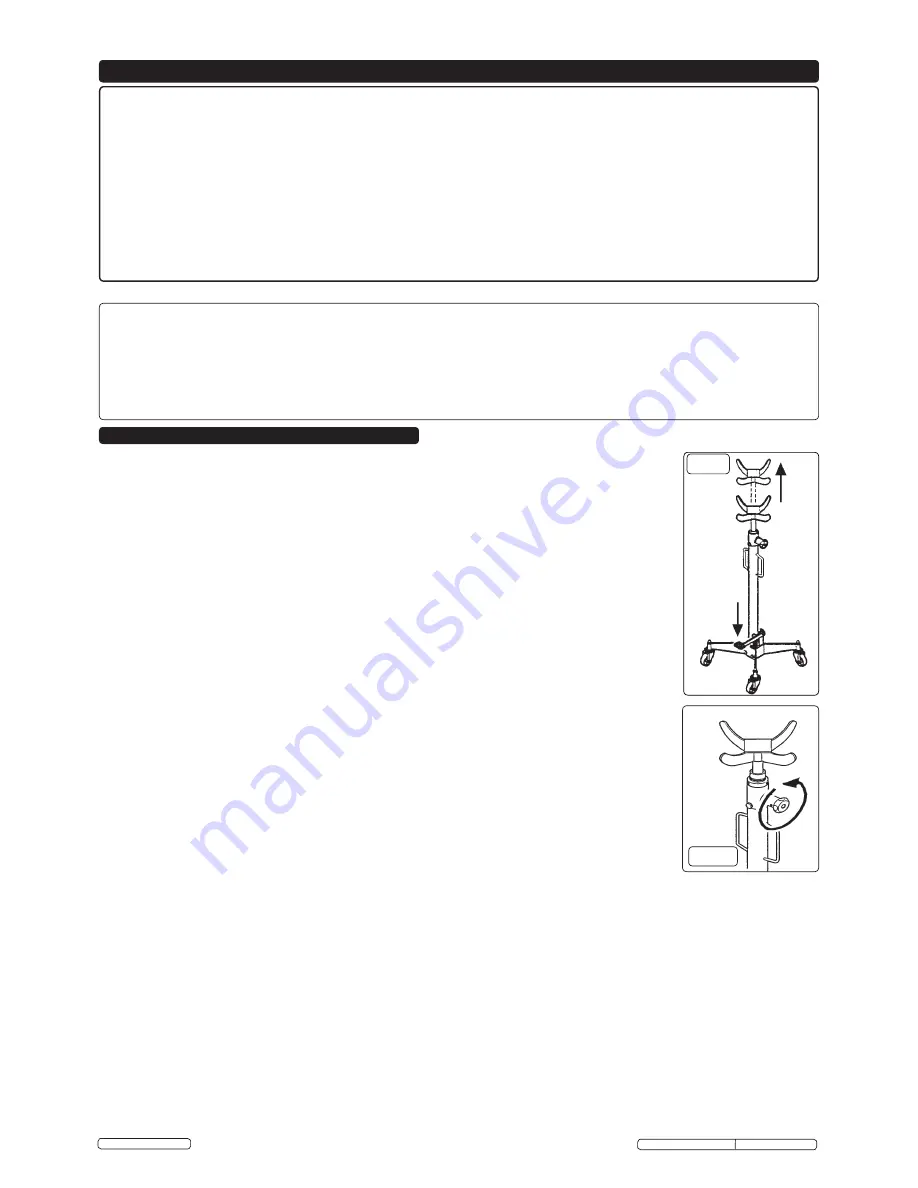
5.1.4. Pump the jack foot pedal and the saddle will rise (fig 2).
5.1.5. When saddle is just beneath the transmission re-adjust alignment if necessary to centralise the saddle.
5.2.
LOWERING THE LOAD.
WARNING! Ensure the load is central and stable on the jack saddle and load is fixed in place
before attempting to lift, lower, or transport. SLOWLY
turn the release valve knob anti-clockwise
(fig 3) to
GENTLy
lower saddle to the lowest minimum height before attempting to transport load.
IMPORTANT:
The unit is fitted with a “Dead Man” release valve. The quicker the valve knob is turned
the more rapid the jack’s descent. Ensure the jack’s descent is slow and controlled to avoid the risk of
sudden dropping which could be dangerous. The valve will automatically return to the closed position
when the knob is released.
5.3.
TRANSPORTING THE LOAD.
WARNING! Ensure you have read, understood and apply Section 1 safety instructions.
5.3.1. Ensure the jack saddle is fully lowered and load is fixed in place before attempting to lift, lower, or transport.
5.3.2.
Transport the load over level and solid ground, preferably concrete, and ensure the floor is swept clean
beforehand
.
5.3.3. Be diligent in continually monitoring the load in transit. Keep all other persons at a safe distance.
DANGER! DO NOT use on tarmacadam, or any soft surface as jack may sink or topple. Serious
personal or fatal injury may result.
DANGER! If jack tips or leans STOp whAT yOuR ARE DOING. MOVE QuICKLy TO A SAFE
DISTANCE. DO NOT TRy TO hOLD OR STEADy JACK.
Note:
This jack may be used with appropriate adaptors in order to handle such components as rear axle units and transfer cases that
are within the weight limitations of the jack.
5.4.
RE-INSTALLING A GEARBOX.
To transport, reposition beneath a vehicle, and raise a load up, reverse the procedures outlined above.
5. OPERATING INSTRUCTIONS
4.1. IMPORTANT: Before EACh use, check jack is in sound working order, use following list to form a habitual pre-check
procedure. Check unit for the following: Damage, Distortion, Leaning, Worn or missing components. The following must
also be checked:
WARNING! DO NOT use jack if any suspect part is found, or if believed to have been subjected to abnormal load
or shock. Immediately remove from service and contact your authorised service agent.
5.. . . . . All nuts and bolts
6.. . . . . All seals
7.. . . . . Jack main frame
1.. . . . . Saddle base
2.. . . . . Piston rod
3.. . . . . Cylinder/Hydraulic unit
4.. . . . . Stopper rings and cotter pins
8.. . . . . Foot pumps
9.. . . . . Swivel caster wheels
10.. . . . Transport handle
4.2. IMPORTANT:
Before using the jack for the first time, purge the hydraulic circuit in order to eliminate any air, that may have accumulated in the
system during transit, as follows:
4.2.1. Open the release valve by turning knob anti-clockwise and hold the valve open.
4.2.2. Operate the foot pedal 15 to 20 times.
4.2.3. Release the valve (which will turn clockwise to close the valve).
4. PRE-USE CHECK LIST
IMPORTANT
fig 3
fig 2
Original Language Version
300ETJ.V2, 500ETJ.V2 Issue: 1 - 25/06/12
© Jack Sealey Limited


