

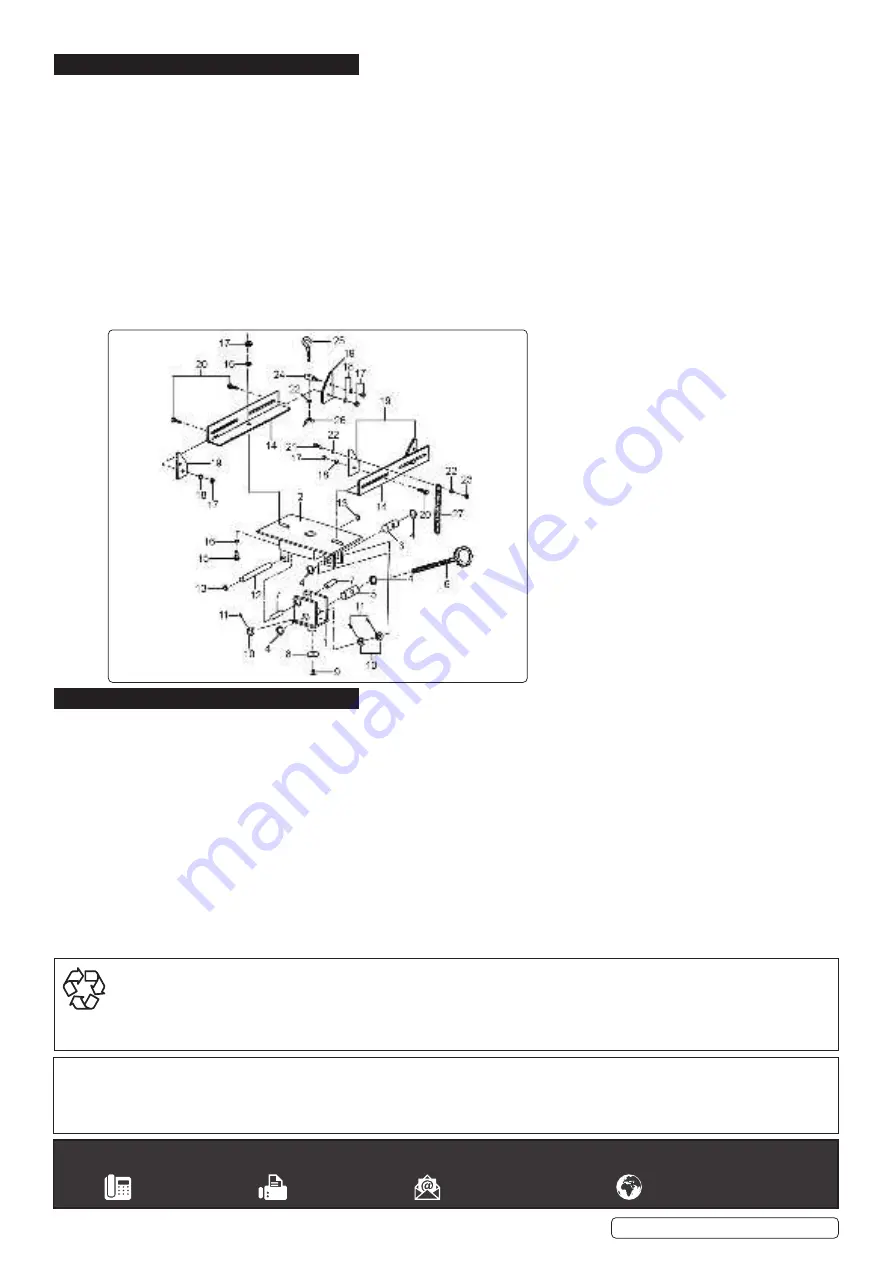
4. ASSEMBLY
Refer to Parts list
WARNING!
Failure to assemble the cradle correctly may result in serious damage and/or personal injury.
4.1.
Unpack the product and check contents against the parts listed. Should there be any damaged or missing parts contact your supplier
immediately.
Note:
Items (2, 3, 4, 6, 10, 11) and (1, 5, 4) are pre-assembled.
4.2.
Remove one nut (10) from screw rod (6), and thread screw rod (6) through adjustment pin (5), re-fit nut (10).
4.3.
Position saddle base (1) underneath saddle plate (2) and thread pivot shaft (12) through from one side ensuring a collar (7) is
inserted either side of the saddle base (1) and inside of the saddle plate brackets. Secure with a retaining ring (13) at each end of pivot
shaft (12). The three nuts (10) should be positioned near the end of the screw rod (6) closely fitted either side of the shaft (5) and
locked onto the screw rod (6) by tightening the screws (11).
4.4.
Attach saddle angle brackets (14) to the saddle plate (2) with long bolts (15), washers (16) and nuts (17).
4.5.
Attach saddle angle plates (19) to saddle angle brackets (14), using bolts (20), washers (18) and nuts (17).
4.6.
Attach chain (27) to one saddle angle plate (19) with bolt (21), washer (22) and nut (23).
4.7.
Attach hook pin (24) to one saddle angle plate (19) with washer (18) and nut (17).
4.8.
Attach hook screw (25) to the hook pin (24) with washer (22) and wing nut (26).
5. OPERATION
5.1.
With the jack fully lowered, remove existing fixed saddle from jack and fit the ADT200 in it’s place. Secure it with nut (9) and washer (8).
5.2.
Adjust the pitch and tilt of the saddle to assist in safely supporting and transporting the transmission unit.
5.3.
The cradle may be tilted forwards, backwards and from side to side, by operating the screw rod (6) and/or by turning the cradle on the
jack saddle.
5.4.
Always position saddle angle brackets (14) and saddle angle plates (19) to best support and locate the transmission, ensure all nuts and
bolts are retightened. Before moving jack and transmission, ensure that restraint chain is in place and tensioned.
5.5.
Periodically lubricate the cradle pivot points and the adjusting bolts.
Original Language Version
© Jack Sealey Limited
Sealey Group, Kempson Way, Suffolk Business Park, Bury St Edmunds, Suffolk. IP32 7AR
01284 757500
01284 703534
sales@sealey.co.uk
www.sealey.co.uk
ENVIRONMENT PROTECTION
Recycle unwanted materials instead of disposing of them as waste. All tools, accessories and packaging should be sorted, taken to
a recycling centre and disposed of in a manner which is compatible with the environment. When the product becomes completely
unserviceable and requires disposal, drain any fluids (if applicable) into approved containers and dispose of the product and fluids
according to local regulations.
Note
: It is our policy to continually improve products and as such we reserve the right to alter data, specifications and component parts without prior
notice.
Important
: No Liability is accepted for incorrect use of this product.
Warranty
: Guarantee is 12 months from purchase date, proof of which is required for any claim.
ADT200 Issue:2 (H,3,F) 15/03/22


