Original Language Version
© Jack Sealey Limited
5.2.
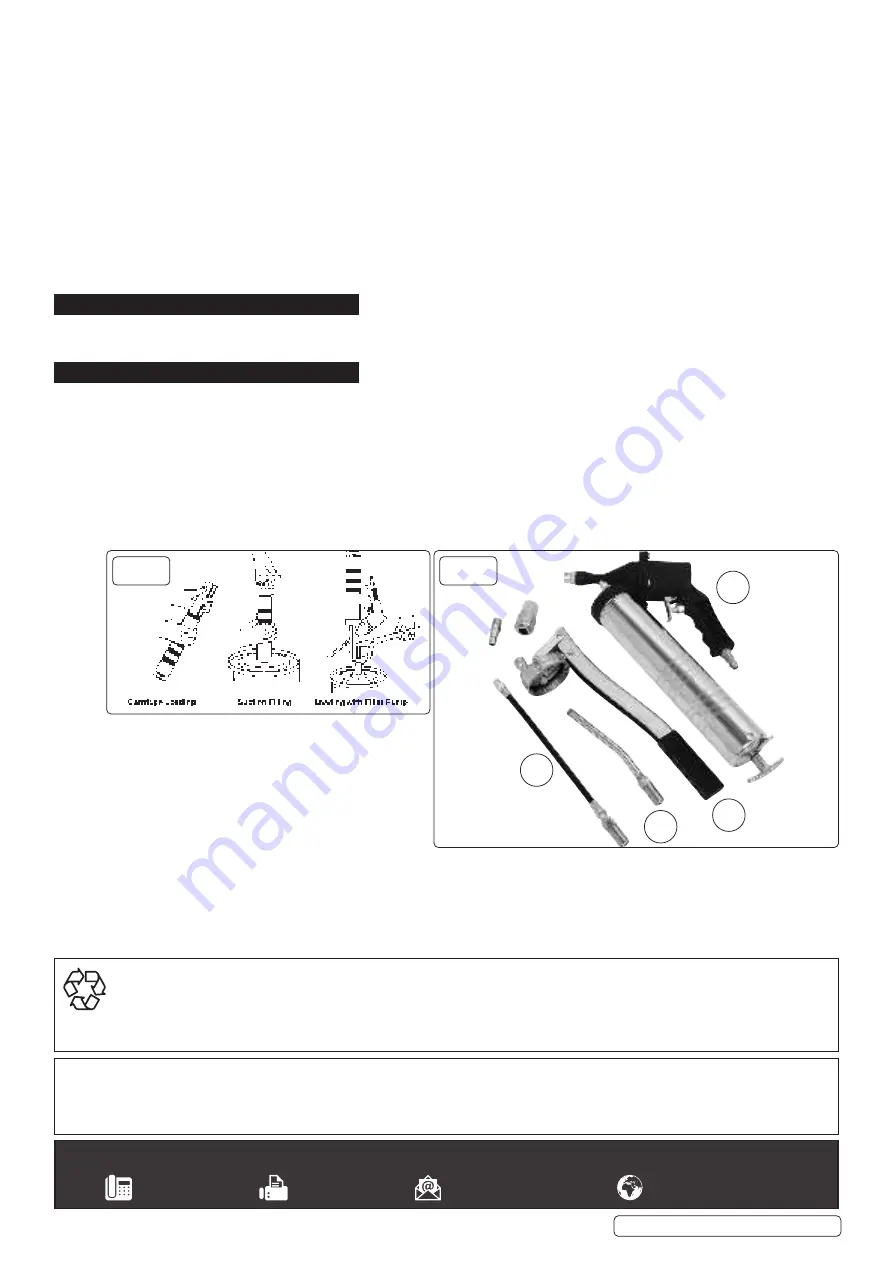
CARTRIDGE LOADING
(fig.2)
5.2.1.
Remove the gun head from the grease canister.
5.2.2.
Fully draw back the plunger handle.
5.2.3.
Insert the open end of the cartridge into the grease canister and push it all the way in. Remove the seal or pull tab end from the cartridge.
5.2.4.
Reassemble the gun head to the container tube. Press the catch plate and release the plunger rod. Push down on the plunger handle.
5.3.
SUCTION FILLING
(fig.2)
5.3.1.
Remove the gun head from the grease canister.
5.3.2.
S
ubmerge the open end of the grease canister into grease bucket by approximately 50mm (2”) and slowly pull the plunger handle out fully.
5.3.3.
Reassemble the gun head to the container tube. Press the catch plate and release the plunger rod. Push down on the plunger handle.
5.4.
LOADING WITH FILLER PUMP
(fig.2)
5.4.1.
Fully draw back the plunger handle.
5.4.2.
I
nsert filler plug into filler pump socket.
5.4.3.
O
perate the filler pump to fill the container tube.
5.4.4.
D
isconnect the grease gun from the filler pump.
5.4.5.
Press the catch plate and release the plunger rod. Push down on the plunger handle.
6. OPERATION
6.1.
If selecting manual grease gun (fig.3.2), swop the canister from the air operated gun (fig.3.1).
6.1.1.
S
crew in the grease delivery tube (fig.3.3 or fig.3.4) and tighten with a 12mm spanner.
7. MAINTENANCE
.
WARNING!
Disconnect gun from air supply before changing accessories, servicing or performing maintenance.
Replace or repair
damaged parts.
Use genuine parts only.
Unapproved parts may be dangerous and will invalidate the warranty.
7.1.
Lubricate the air tool daily with a good grade of air tool oil such as Sealey ATO/500 or ATO/1000. If the compressed air system has no
oiler, a few drops of oil can be poured into the air inlet of the gun each day.
7.2.
When not in use, disconnect from air supply, clean and store in a safe, dry, childproof location.
Note:
Faults in the compressed air system may cause loss of power or erratic action. Reduced compressor output, excessive drain on the
air line, moisture or restrictions in air pipes or the use of hose connectors of incorrect size may reduce the air supply.
Grit or gum deposits in the tool will reduce power and may be removed by flushing out the gun with gum solvent oil or an equal mixture of
SAE 10 oil and kerosene
.
fig.2
Sealey Group, Kempson Way, Suffolk Business Park, Bury St Edmunds, Suffolk. IP32 7AR
01284 757500
01284 703534
sales@sealey.co.uk
www.sealey.co.uk
ENVIRONMENT PROTECTION
Recycle unwanted materials instead of disposing of them as waste. All tools, accessories and packaging should be sorted, taken to
a recycling centre and disposed of in a manner which is compatible with the environment. When the product becomes completely
unserviceable and requires disposal, drain any fluids (if applicable) into approved containers and dispose of the product and fluids
according to local regulations.
Note
: It is our policy to continually improve products and as such we reserve the right to alter data, specifications and component parts without prior
notice.
Important
: No Liability is accepted for incorrect use of this product.
Warranty
: Guarantee is 12 months from purchase date, proof of which is required for any claim.
fig.3
1
2
3
4
A
K46KIT Issue 2 23/11/21


