background image

5.5. 


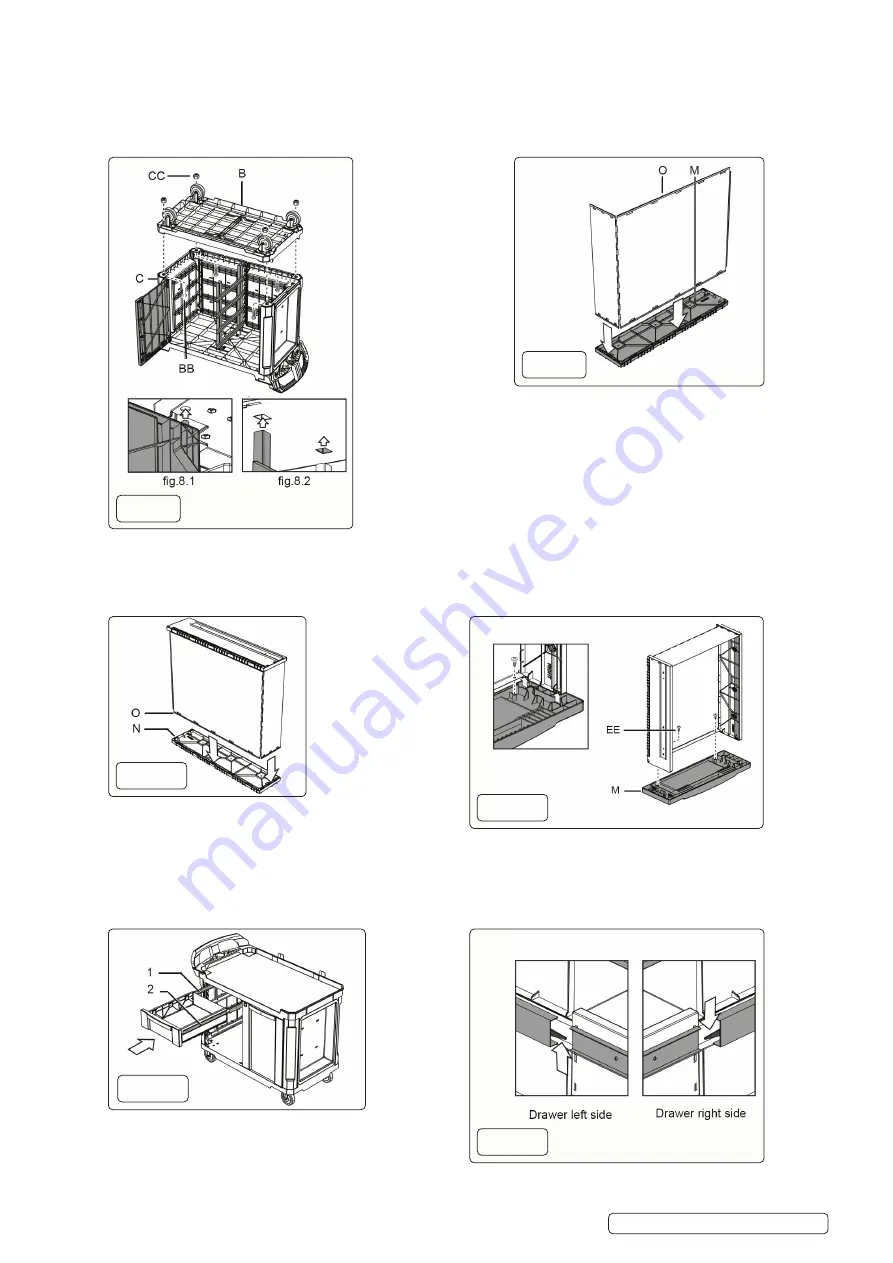
Assemble the base (fig.8.B) onto the legs (fig.8.C) using four nuts (fig.8.CC) and four bolts (fig.8.BB). (fig.8). Align drawer pin pivot  


(fig.8.1) and centre support (fig.8.2).

5.6. 


Insert drawer base (fig.9.O) into left hand drawer side (fig.9.M) (fig.9). Push firmly against a hard surface to snap drawer base into  


drawer side.

NOTE: 

  Follow indicator on inside of drawer front for drawer direction and drawer side (R/L).

NOTE: 

  Ensure drawer side is fully engaged with the drawer base.

5.7. 


Insert the drawer base (fig10.O) into the right hand drawer side (fig.10.N). Push firmly against a hard surface so that the base fixes into  


the drawer side (fig.10).

5.8. 


Take previously assembled drawer and attach to drawer front (fig.11.M). Attach using screws (fig.11.EE) (fig.11).

NOTE:

  Ensure all location clips are fully engaged from drawer sides to drawer front.

5.9. 


To install the drawers (fig.12, fig.13), extend the drawer slides (fig.12.1) and insert the brackets (fig.12.2) on each side of the drawer  


into the slots on the slides ensuring correct alignment. Close the drawer to set slides in position.

5.10. 

T

o remove drawers (fig.13), fully open empty drawer. Push down on the right release lever while pushing up the left release lever. Pull  


drawer outward while holding both levers until drawer is released. 

   fig.8

   fig.9

   fig.10

   fig.11

   fig.12

   fig.13

AP47PWS       Issue 1     11/03/2020

Original Language Version

© Jack Sealey Limited

Summary of Contents for AP47PWS

Page 1: ...utions and instructions discussed in this instruction manual cannot cover all possible conditions and situations that may occur It must be understood that common sense and caution are factors which cannot be built into this product but must be applied by the operator 2 INTRODUCTION Durable mobile workstation with four drawers and cupboard Sheet metal drawers with structural foam fronts run on ball...

Page 2: ...t panel with slides fig 5 G into side of assembly at handle end NOTE Panel fit at this stage will be loose NOTE Ensure full engagement between panel fig 3 F and fig 3 G into tray fig 5 A NOTE Slide overhang on side panel fig 1 G to face workstation opening fig 5 5 3 Install centre support fig 6 H with drawer slides facing matching slides in end panel fig 6 G fig 6 Slide overhang to face workstatio...

Page 3: ...e base fixes into the drawer side fig 10 5 8 Take previously assembled drawer and attach to drawer front fig 11 M Attach using screws fig 11 EE fig 11 NOTE Ensure all location clips are fully engaged from drawer sides to drawer front 5 9 To install the drawers fig 12 fig 13 extend the drawer slides fig 12 1 and insert the brackets fig 12 2 on each side of the drawer into the slots on the slides en...

Page 4: ...aste All tools accessories and packaging should be sorted taken to a recycling centre and disposed of in a manner which is compatible with the environment When the product becomes completely unserviceable and requires disposal drain any fluids if applicable into approved containers and dispose of the product and fluids according to local regulations Note It is our policy to continually improve pro...

Reviews: