AXLE STANDS (PAIR)
2.5, 5, 7.5, 10,12 TONNE CAPACITY PER STAND
MODEL NO’S:
AS3000.V3, AS5000.V2, AS5000M.V2,
AS7500.V2, AS10000, AS12000
Thank you for purchasing a Sealey product. Manufactured to a high standard, this product will, if used according to these instructions,
and properly maintained, give you years of trouble free performance.
IMPORTANT:
PLEASE READ THESE INSTRUCTIONS CAREFULLY. NOTE THE SAFE OPERATIONAL REQUIREMENTS, WARNINGS & CAUTIONS. USE
THE PRODUCT CORRECTLY AND WITH CARE FOR THE PURPOSE FOR WHICH IT IS INTENDED. FAILURE TO DO SO MAY CAUSE DAMAGE AND/OR
PERSONAL INJURY AND WILL INVALIDATE THE WARRANTY. KEEP THESE INSTRUCTIONS SAFE FOR FUTURE USE.
1. SAFETY
WARNING!
DO NOT OVERLOAD AXLE STANDS BEYOND RATED CAPACITY. OVERLOADING CAN CAUSE DAMAGE TO, OR FAILURE OF,
THE AXLE STANDS. POSITION LOAD ON CENTRE OF CRUTCH/SADDLE ONLY. ALWAYS USE STANDS IN PAIRS ON HARD
LEVEL SURFACE CAPABLE OF SUSTAINING THE LOAD. USE OF STANDS ON OTHER THAN HARD LEVEL SURFACES CAN
RESULT IN LOAD INSTABILITY AND POSSIBLE LOSS OF LOAD. DO NOT USE ON TARMACADAM. FAILURE TO FOLLOW
THESE INSTRUCTIONS MAY RESULT IN DAMAGE TO AXLE STANDS, LOSS OF LOAD RESULTING IN PROPERTY DAMAGE,
SERIOUS PERSONAL INJURY OR LOSS OF LIFE.
▲
DANGER! GREAT CARE MUST BE TAKEN TO ENSURE YOU LOWER THE VEHICLE (OR OTHER LOAD)
SLOWLY AND CAREFULLY ONTO THE CENTRES OF THE CRUTCH/SADDLE OF THE AXLE STANDS.
9
Use only as specified by the manufacturer.
9
Ensure the load does not exceed the maximum capacity as marked on the axle stand, per pair.
9
Use no more than a single pair of stands either on the front, rear or one side of the vehicle. Use in pairs.
9
No alterations or modifications shall be made to this product.
9
Use on a hard, level surface, e.g. concrete. Do not use on uneven ground or tarmacadam.
9
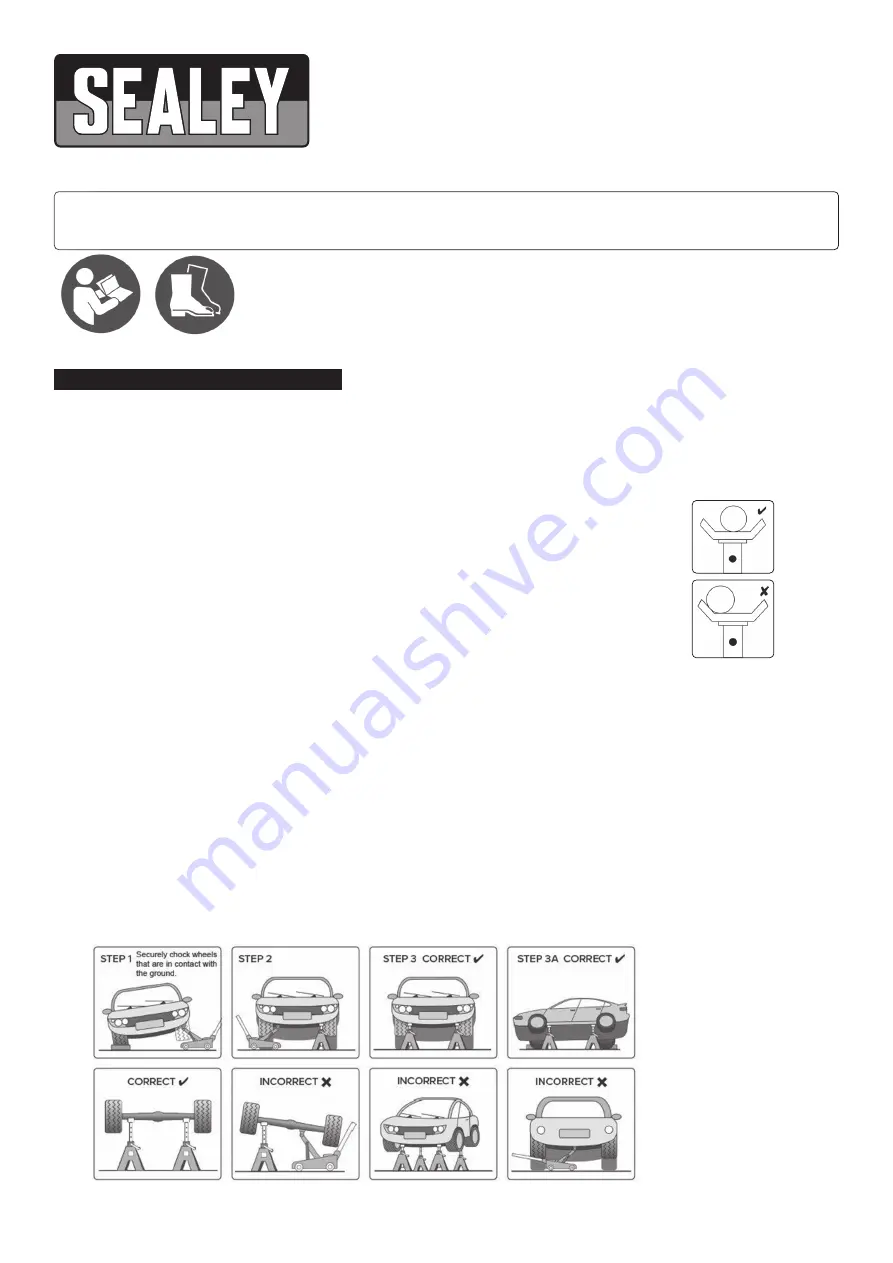
Securely chock wheels in contact with the ground. Before jacking and placing the stands, apply vehicle
handbrake (put automatics in ‘Park’).
9
Make sure that each stand is securely located under a strong point on the vehicle; consult the vehicle manufacturer’s handbook for
guidance. Ensure that height adjust locking mechanism is fully located before applying any load to the axle stand.
9
Ensure that the load is located centrally on the saddle, and that the weight is directed through the vertical axis of the stand.
9
Exercise extra care when using with a three wheeled vehicle or a trailer. Refer to vehicle manufacturer’s instructions.
9
Once vehicle is supported, ensure that the vehicle and stands are stable before starting work. Ensure that it is not possible for the
vehicle to move before commencing any work.
9
Inspect stands before each use.
DO NOT
use if they show signs of damage.
DO NOT
use if it is suspected that they have been overloaded.
9
Before commencing any work or going beneath the vehicle, undertake a risk assessment. Ensure that a responsible person is aware
of the work about to be undertaken.
9
Replace any labels on the axle stand should they become unreadable. This applies in particular to any warning or operation instruction
labels. If replacement labels are required, contact your Sealey stockist.
8
DO NOT
use axle stands on the highway, or anywhere else if it is deemed to be unsafe.
8
DO NOT
push or twist the vehicle/load whilst it is supported on stands.
8
DO NOT
mix components between stands. Use only as supplied.
8
DO NOT
allow children or animals in the vicinity of a vehicle supported on axle stands.
8
DO NOT
leave a vehicle on axle stands in an area that could be considered a hazard to others or property.
9
FOLLOW STEPS 1, 2, AND 3 TO CORRECTLY PLACE VEHICLE / LOAD ONTO AXLE STANDS.
AS3000.V3,AS5000.V2,AS5000M.V2,AS7500.V2,AS10000, AS12000 Issue 5 (H) 17/11/21
Original Language Version
© Jack Sealey Limited
Refer to
instructions
Wear safety
footwear


