
2. INTRODUCTION
The One-Battery-Fits-All range has been carefully selected with the professional tradesman in mind. Slim, compact and lightweight designs, due
largely to the lithium-ion battery technology, punch well above their weight, delivering power and performance for most tradesmen’s requirements.
Weight for weight Li-ion batteries give an all-round better performance than standard Ni-Cd/Ni-MH cells.
• Li-ion maintains a higher energy density level (generally twice that of a Ni-Cd cell) giving more battery power per gram.
• Has a flat discharge curve - performing better for longer.
• Li-ion has no memory effect - these batteries can recover from a deep discharge with no tendency to reduce overall capacity.
• Li-ion technology is lightweight and therefore perfect for the tradesman or high demand user.
Selecting the right tools from this range could not be more simple. Purchase a tool combination kit, then add your own selection of power tools and
accessories to build your own tool profile. No need to worry about battery compatibility - one battery fits all.
3. SPECIFICATION
Model No:
. . . . . . . . . . . . . . . . . . . . . . . . . . . . . . . . . .
CP6004
. . . . . . . . . . . . . . . . . . . . . . . . . . . . . . . . . . . . . . . . .
CP6014
Battery: . . . . . . . . . . . . . . . . . . . . . . . . . . . . . . . . . . . . 14.4V 2Ah Li-ion . . . . . . . . . . . . . . . 14.4V 2Ah Li-ion (Not Supplied)
No Load Speed: . . . . . . . . . . . . . . . . . . . . . . . . . . . . . 0-340/0-1500rpm . . . . . . . . . . . . . . . . . . . . . . . . . . . 0-340/0-1500rpm
Drilling Capacities:
Wood: . . . . . . . . . . . . . . . . . . . . . . . . . . . . . . . . . . . . . Ø10mm . . . . . . . . . . . . . . . . . . . . . . . . . . . . . . . . . . . . . . . . . Ø10mm
Metal: . . . . . . . . . . . . . . . . . . . . . . . . . . . . . . . . . . . . . Ø6mm . . . . . . . . . . . . . . . . . . . . . . . . . . . . . . . . . . . . . . . . . . . Ø6mm
Concrete . . . . . . . . . . . . . . . . . . . . . . . . . . . . . . . . . . . Ø10mm . . . . . . . . . . . . . . . . . . . . . . . . . . . . . . . . . . . . . . . . . Ø10mm
Chuck Size:. . . . . . . . . . . . . . . . . . . . . . . . . . . . . . . . . 10mm. . . . . . . . . . . . . . . . . . . . . . . . . . . . . . . . . . . . . . . . . . . . .10mm
Maximum Torque: . . . . . . . . . . . . . . . . . . . . . . . . . . . . 26Nm . . . . . . . . . . . . . . . . . . . . . . . . . . . . . . . . . . . . . . . . . . . . . 26Nm
Replacement Battery: . . . . . . . . . . . . . . . . . . . . . . . . . CP60BP . . . . . . . . . . . . . . . . . . . . . . . . . . . . . . . . . . . . . . . . . CP60BP
Weight: . . . . . . . . . . . . . . . . . . . . . . . . . . . . . . . . . . . . 1.16kg . . . . . . . . . . . . . . . . . . . . . . . . . . . . . . . . . . . . . . . . . . . . . . . . .
4. CHARGING
4.1.
Battery Pack Removal and Replacement
4.1.1. Switch the machine off before removing the battery pack.
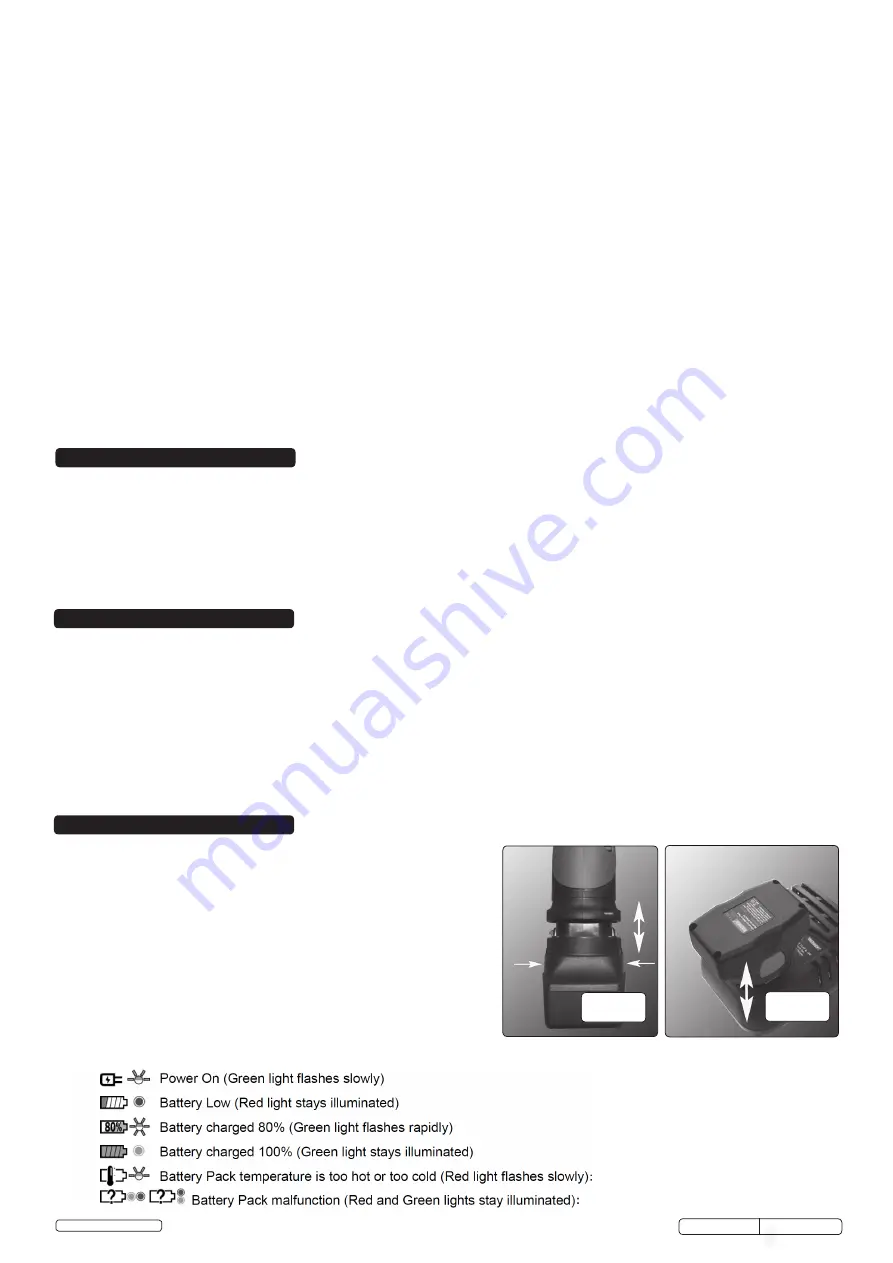
4.1.2. Press the battery latches in and withdraw the battery pack (fig.1).
4.1.3. To replace the battery pack, push the stem into the drill until the latches
engage. The battery pack can only be inserted in the correct orientation.
4.2.
Battery Charging
Batteries that have been out of use for some time or are new may not
accept a full charge. This is not a battery fault; the battery may need to be
discharged and charged a couple of times to restore full capacity.
4.2.1. Connect the charger to the electric power supply. A flashing green LED
will show.
4.2.2. Insert the battery into the charger (fig.2). A steady red light will show.
4.2.3. When the battery is 80% full, the green LED will flash.
4.2.4. When fully charged, a steady green LED will show.
4.2.5. The battery is ready for use.
4.2.6. The LED indications are:
fig.1
fig.2
1.1. GENERAL SAFETY.
Maintain the
drill and battery in good condition. Check moving parts alignment on a regular basis.
Replace or repair damaged parts. Use an authorised service agent and recommended parts only. Unauthorised parts may be
dangerous and will invalidate the warranty.
Ensure the drill is switched off before installing the battery pack.
Keep the drill and charger clean for best and safest performance.
Remove ill fitting clothing. Remove ties, watches, rings and other loose jewellery and contain long hair.
Evaluate your working area before using the drill; e.g. ceilings, floors and enclosures may contain electrical items or water piping.
Ensure battery pack is correctly inserted into the drill handle and latched in place before attempting to switch on drill.
Secure loose work pieces with a clamp, vice or other adequate holding device.
Avoid unintentional starting.
Wear approved safety eye protection (standard spectacles are not adequate).
Maintain correct balance and footing. Ensure the floor is not slippery and wear non-skid shoes.
Be aware that this drill does not need to be plugged into the mains power.
Keep chuck direction switch in the locked position until the drill is required for use.
Keep children and unauthorised persons away from the working area.
DO NOT
use the drill where there are flammable liquids, solids or gases, such as paint solvents, etc.
DO NOT
allow children to operate the drill.
DO NOT
operate the drill if any parts are missing as this may cause failure and/or personal injury.
DO NOT
hold unsecured work piece in your hand.
DO NOT
leave the drill operating unattended.
DO NOT
carry the drill with your finger on the power switch. Keep chuck direction switch in the locked position.
DO NOT
use the drill for a task it is not designed to perform.
DO NOT
operate the drill when you are tired or under the influence of alcohol, drugs or intoxicating medication.
DO NOT
get the drill or battery charger wet or use in damp or wet locations.
Allow temperature to stabilise.
Contact dealer or service agent
.
© Jack Sealey Limited
Original Language Version
CP6004, CP6014 Issue: 1 - 11/11/15