NOTE:
It is our policy to continually improve products and as such we reserve the right to alter data, specifications and component parts
without prior notice.
IMPORTANT:
No liability is accepted for incorrect use of this equipment.
WARRANTY:
Guarantee is 12 months from
purchase date, proof of which will be required for any claim.
INFORMATION:
For a copy of our latest catalogue and promotions call us on
01284 757525 and leave your full name and address, including postcode.
Motor fails to run.
- Battery needs recharging.
- Faulty wiring to motor.
- Recharge battery.
- Remove battery, disassemble
handle and check wiring for loose
connections.
Grease gun fails to dispense
grease.
- Grease tube is out of grease.
- Loss of prime.
- Check valve is not functioning.
- Check that the tube contains
grease.
- Repeat priming operation.
- Remove check valve, clean and
inspect the valve seat.
The construction files for these products are held by the Manufacturer and may be
inspected, by a national authority, upon request to Jack Sealey Ltd.
For Jack Sealey Ltd. Sole importer into the UK of Sealey Power Products.
Signed by Tim Thompson
12 June 2007
4. TROUBLESHOOTING
CONDITION
POSSIBLE CAUSE(S)
CORRECTIVE ACTION
Grease gun continues to lose
prime.
- Air may be trapped in locations
throughout the grease tube ass’y
after bulk filling.
- Grease tube follower may be
binding.
- Empty grease tube ass’y, refill and
repeat priming operation.
- Replace grease tube ass’y.
Battery fails to charge.
- Charger may not have power.
- Battery may be dead.
- Check the mains charger is
providing power.
CPG12V.V2 - 1 - 120607
3.5
BULK FILLING
3.5.1 Press the catch plate to release the plunger handle.
3.5.2 Connect a low pressure bulk greasing unit to the bulk filler nipple at the top of
the gun and fill until plunger is fully extended.
3.5.3 Press and hold the catch plate and push the plunger handle down until some
resistance is felt.
3.5.4 Open the pressure release valve until grease appears.
3.6 PRIMING THE GUN
3.6.1 Before loading the gun with a cartridge or filling via a grease bucket, it is ideal
to prime the gun.
3.6.2 To prime the gun simply pack grease into the cavity located at the entrance of
the gun assembly (where the grease tube screws into the gun) and operate the
trigger, this will induce the intake of grease into the gun assembly.
3.7
OPERATION
3.7.1 To operate the gun simply push the grease outlet onto the the grease nipple
and operate the trigger until the desired amount of grease has been dispersed.
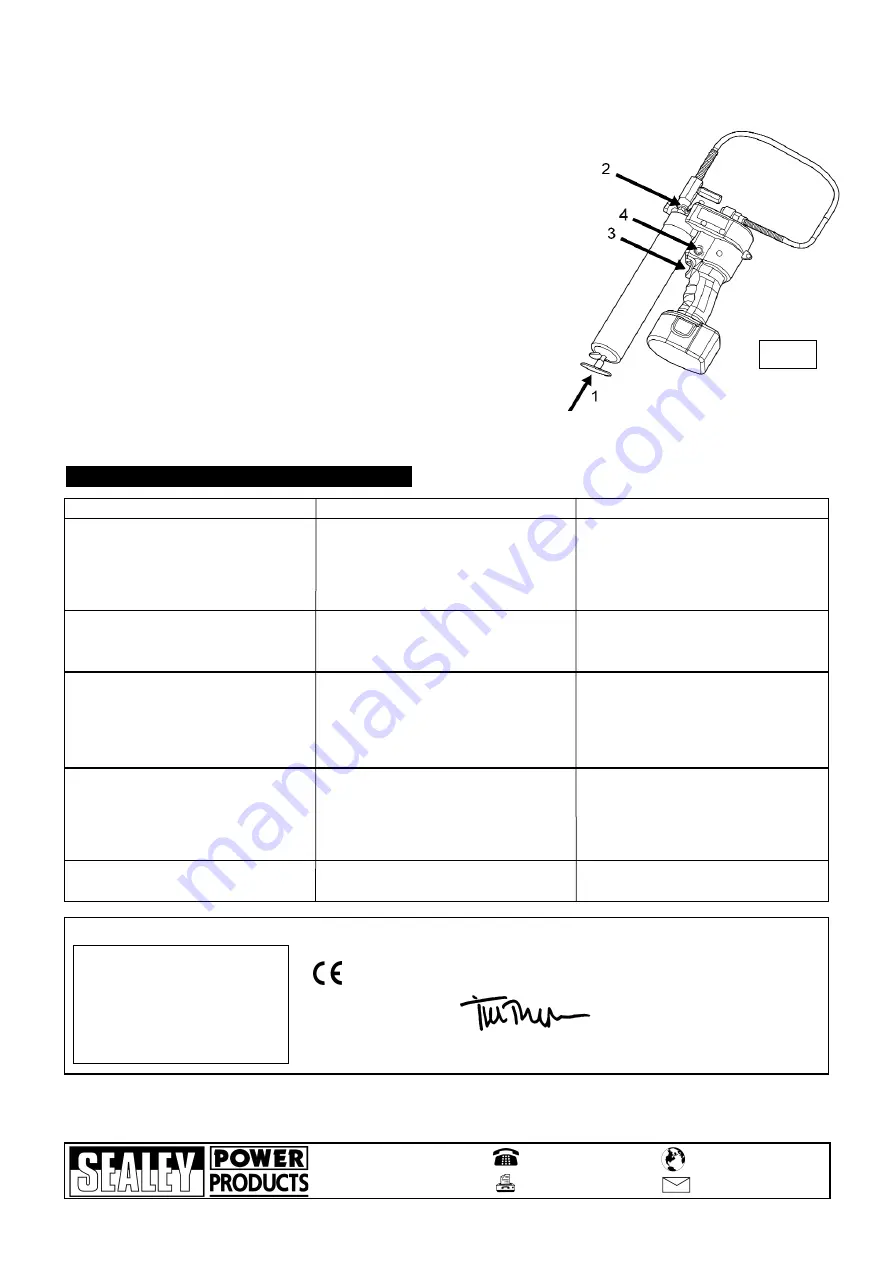
3.7.2 If you encounter air pockets during operation simply exert force on the plunger
(Fig 4.1), press the pressure release valve (Fig 4.2) and operate trigger (Fig 4.3)
in short, sharp bursts until grease begins to flow from the nozzle.
3.7.3 When the grease gun is not in use turn the locking button (Fig 4.4) to the “lock”
position
3.7.4 To check the remaining battery power, press and hold down the LED display
button on the top of the grease gun. A gauge will appear on the display, showing
the percentage of battery charge left.
Declaration of Conformity
We, the sole importer into the UK, declare that the products listed here are in conformity with the following standards and directives.
RECHARGEABLE GREASE GUN &
CHARGER
Models: CPG12V.V2
98/37/EC Machinery Directive
73/23/EEC Low Voltage Directive
93/68/EEC Marking Directive
89/336/EEC EMC Directive
2002/95/EC RoHS Directive
2002/96/EC WEEE Directive
01284 757500
01284 703534
sales@sealey.co.uk
Sole UK Distributor
Sealey Group,
Bury St. Edmunds, Suffolk.
www.sealey.co.uk
Web
Fig 4
Pressure release valve opens to
discharge grease.
- Blocked line.
- Blocked bearing.
-Blocked grease fitting.
- Check lines, pipe joints and
grease fittings and remove any
obstructions.


