3. CONTENT & ASSEMBLY
2. INTRODUCTION & SPECIFICATION
3.1.
Unpack the equipment and check for missing or damaged items. In the event of a fault contact the supplier.
Items
1. Extractor unit and stand assembly
2. Extractor nozzle (A)
3. Exhaust ducting (C)
4. Jubilee clip
5. 4 screws and washers (loosely fitted in housing)
3.2.
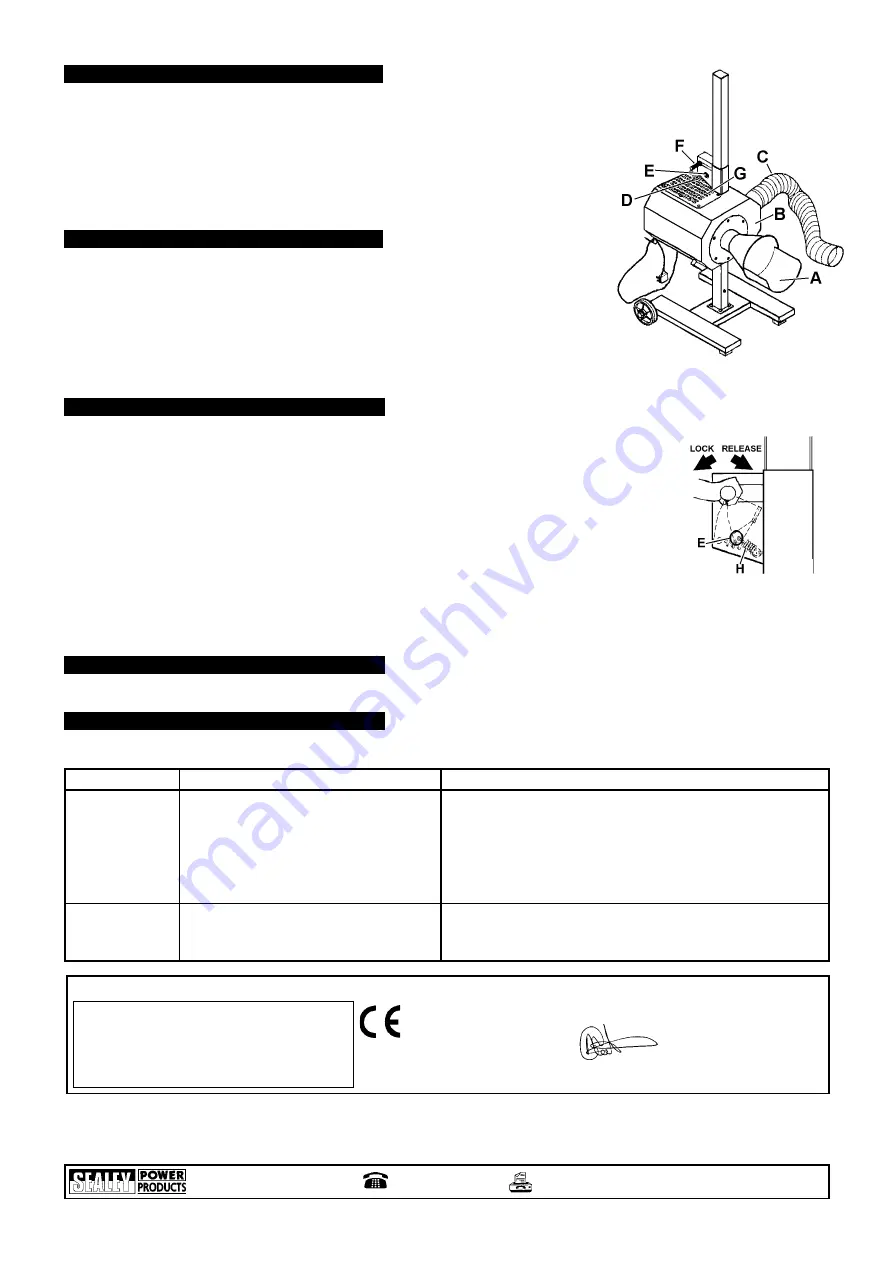
Attach extractor nozzle (fig.1.A) to housing (B) with the four screws and washers. Fit exhaust ducting (C) with jubilee clip.
The EFS/93.V2 is a wheeled exhaust extractor for garages and workshops. It is suitable for a range of vehicles from
small cars and motorcycles to commercials of up to approximately 10 tonnes GVW. The unit is supplied with
6 metres of exhaust ducting and a cut-away extractor nozzle which provides access to exhausts which are
behind the bumper line.
fig. 1
Specification
Motor . . . . . . . .230V 1ph 0.55kW
Extraction rate . . . . . . . . .900m
3
/h
Extraction height . .120 to 600mm
Weight . . . . . . . . . . . . . . . . .36kg
PROBLEM
CAUSE
SOLUTION
Extractor does
not start
The unit does
not extract
efficiently
1. No supply
2. Wiring defect
3. Fuse blown
1. Blockage (paper, plastic etc.)
2. Fan to motor shaft lock screw loose
1. Check power supply.
2. Check plug and On/Off switch connections - remove protective
grid (fig.1.G) to access switch wiring.
3. a) Check plug fuse.
b) Remove protective grid (fig.1.G), open the two fuse holders
and check unit fuses. Replace any blown fuse with identical
type only (10 x 38mm 4 amp).
1. Remove extractor nozzle (fig.1.A) and clear blockage from fan.
2. Remove extractor nozzle (fig.1.A) and tighten screw.
6. TROUBLE-SHOOTING
01284 757500
E-mail:
sales@sealey.co.uk
01284 703534
Sole UK Distributor, Sealey Group,
Bury St. Edmunds, Suffolk.
NOTE:
It is our policy to continually improve products and as such we reserve the right to alter data, specifications and component parts without prior notice.
IMPORTANT:
No liability is accepted for incorrect use of product.
WARRANTY:
Guarantee is 12 months from purchase date, proof of which will be required for any claim.
INFORMATION:
For a copy of our latest catalogue call us on 01284 757525 and leave your full name and address, including postcode.
Declaration of Conformity
We, the UK distributor, declare that the product listed below is in conformity with the following standards and directives.
The construction file for this product is held by the Manufacturer and may be inspected on
request by contacting Jack Sealey Ltd.
For Jack Sealey Ltd. Sole distributor of Sealey Power Products.
EXHAUST FUME EXTRACTOR
Model EFS/93.V2
98/37/EC Machinery Directive
73/23/EEC LV Directive
89/336/EEC EMC Directive
Signed by Mark Sweetman
1st September 1999
4. OPERATION
p
WARNING! Before operation the extractor ensure that you have read, understood and apply the safety
instructions in Section 1
.
4.1.
To move the extractor, stand behind it, grasp the top of the column and pull towards you so that the
unit runs on the rear wheels.
4.2.
Place the extraction nozzle (fig.1.A) close to the vehicle exhaust pipe, adjusting the extractor height as
necessary by rotating grip (fig.1.F) as shown in fig.2 to release and lock the slide. The mechanism is held
in the locked position by a spring (fig.2.H). This spring should be checked, through aperture (figs.1 & 2.E),
to ensure it is attached at both ends and undamaged before unlocking slide. If the spring is faulty it must
be rectified/replaced before further use.
4.3.
Route the exhaust ducting (fig.1.C) to outside the building, keeping the ducting as straight and level
as is practical. Note that the ducting is relatively easily damaged and should be routed, as far as possible, away from walkways etc.
4.4.
Connect to the mains supply and turn on extractor at switch (fig.1.D).
Note:
Take care to ensure that there is no possibility of paper, plastic etc. being sucked into the extractor.
5. MAINTENANCE
5.1.
The extractor requires no specific maintenance other than to keep it clean and free from damage.
fig. 2
p
WARNING! Disconnect the unit from the mains power before servicing or performing any maintenance.
EFS/93.V2 - (1) - 140103


