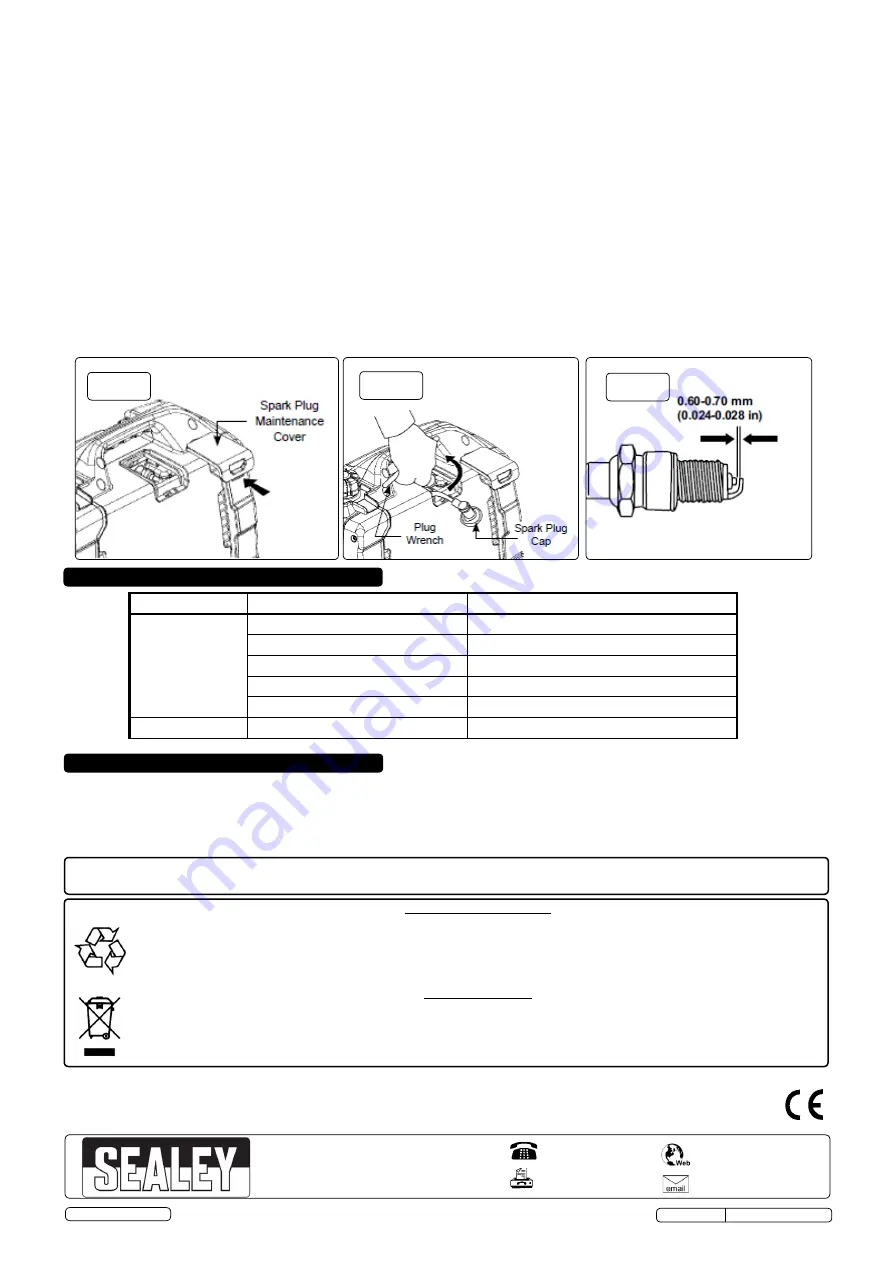
fig.13
fig.14
fig.15
8. TROubLESHOOTING
9. TRaNSPORT & STORaGE
Problem
Cause
Remedy
Engine will not start
Insufficient fuel
Check and refill fuel tank
Fuel / Ignition switch in 'OFF' position
Switch to 'ON'
Engine oil is low
Check and top up oil
Spark plug fouled
Clean or replace spark plug
Incorrect starting technique
Read section 5 for correct technique
No power generated Circuit breaker in 'OFF' position
Reset to 'ON'
9.1.
Always transport and store the generator in an upright position.
9.2.
Ensure that the fuel switch and ignition switch are placed in the 'OFF' position.
9.3.
When the engine has cooled, turn the fuel cap breather to the 'OFF' position to avoid the risk of fuel spillage.
9.4.
When not in use, store the generator in a cool, dry location out of the reach of children and away from sources of ignition.
9.5.
If being stored for a long period, drain the fuel tank.
Parts support is available for this product. To obtain a parts listing and/or diagram,
please log on to www.sealey.co.uk, email sales@sealey.co.uk or telephone 01284 757500.
Environmental Protection
Recycle unwanted materials instead of disposing of them as waste. All tools, accessories and packaging should be
sorted, taken to a recycling centre and disposed of in a manner which is compatible with the environment.
When the product becomes completely unserviceable and requires disposal, drain off any fluids (if applicable)
into approved containers and dispose of the product and the fluids according to local regulations.
WEEE Regulations
Dispose of this product at the end of its working life in compliance with the EU Directive on
Waste Electrical and Electronic Equipment (WEEE). When the product is no longer required, it must be disposed
of in an environmentally protective way. Contact your local solid waste authority for recycling information.
NOTE: It is our policy to continually improve products and as such we reserve the right to alter data, specifications and component parts without prior notice.
IMPORTANT:
No liability is accepted for incorrect use of this product.
WARRANTY:
Guarantee is 12 months from purchase date, proof of which will be required for any claim.
INFORMATION:
For a copy of our latest catalogue and promotions call us on 01284 757525 and leave your full name and address, including postcode.
01284 757500
01284 703534
sales@sealey.co.uk
Sole UK Distributor, Sealey Group,
Kempson Way, Suffolk Business Park
,
Bury St. Edmunds, Suffolk,
IP32 7AR
www.sealey.co.uk
Original Language Version
© Jack Sealey Limited
G1050I, G2000I Issue: 1 - 06/06/14
7.3.
SPaRK PLuG
RECOMMENDED SPARK PLUG: A7RTC or equivalent.
To ensure proper engine operation, the spark plug must be properly gapped and free of deposits.
7.3.1.
Remove the spark plug maintenance cover (fig.13).
7.3.2.
Remove the spark plug cap (fig.14).
7.3.3.
Clean any dirt from around the spark plug base.
7.3.4.
Use the wrench to remove the spark plug.
7.3.5.
Visually inspect the spark plug. Discard it if the insulator is cracked or chipped. Clean the spark plug with a wire brush if it is to be
reused.
7.3.6.
Measure the plug gap with a feeler gauge. The gap should be 0.60-0.70mm (0.024-0.028”). Correct as necessary by
bending the side electrode carefully (fig.15).
7.3.7.
Install the spark plug carefully, by hand, to avoid cross-threading.
7.3.8.
After a new spark plug has been seated by hand, it should be tightened 1/2 turn with a wrench to compress its washer.
If a used plug is being reinstalled, it should only require 1/8 to 1/4 turn after being seated.
7.3.9.
Reinstall the spark plug cap on the spark plug securely.
7.3.10. Reinstall the spark plug maintenance cover.


