4. AIR SUPPLY
4.1.
AIR SUPPLY
WARNING!
Ensure the air supply is clean and does not exceed 90 psi while operating the riveter. Too high an air pressure and
unclean air will cause excessive wear, and may be dangerous, causing damage and/or personal injury.
4.1.1.
Ensure the riveter air valve (or trigger) is not depressed before connecting to the air supply.
4.1.2.
You will require an air pressure between 70-90psi, and an air flow according to the specification above.
4.1.3.
Drain the air tank daily. Water in the air line will damage the riveter and invalidate your warranty.
4.1.4.
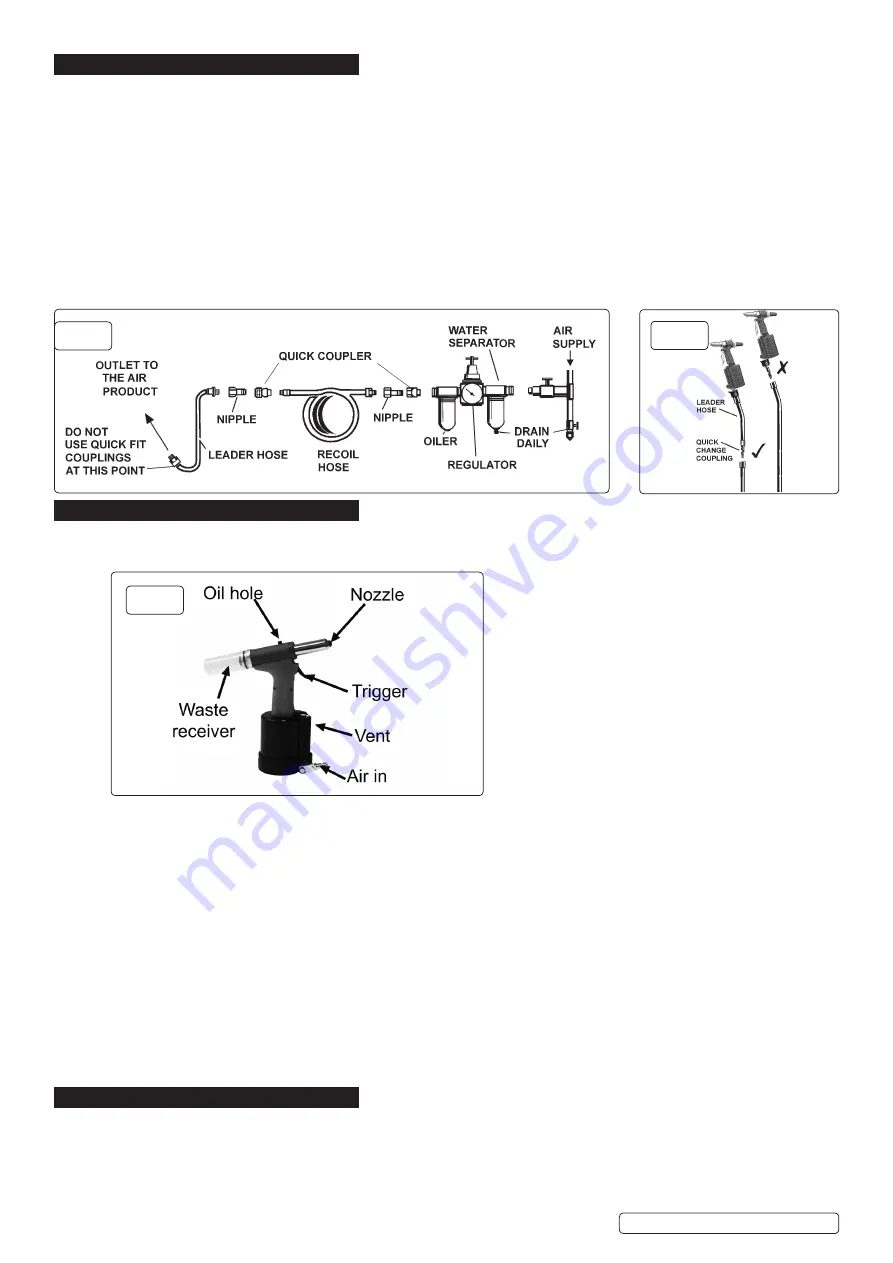
Clean air inlet filter weekly. Recommended hook-up procedure is shown in fig.1.
4.1.5.
Line pressure should be increased to compensate for unusually long air hoses (over 8 metres).
4.1.6.
The minimum hose diameter should be 1/4” I.D. and fittings must have the same inside dimensions.
4.1.7.
Keep hose away from heat, oil and sharp edges. Check hoses for wear, and make certain that all connections are secure.
4.2.
COUPLINGS
4.2.1.
Vibration may cause failure if a quick change coupling is connected directly to the air tool. To overcome this, connect a leader hose -
Sealey model number AH2R or AH2R/38 - to the riveter. A quick change coupling may then be used to connect the leader hose to the
air line
recoil hose. See figs.1 & 2.
5. OPERATION
WARNING!
Ensure you have read, understood and apply the safety instructions. This tool is designed for riveting metal, primarily in
workshops and garages. We do not recommend it for any other use.
5.1.
CHECK OIL LEVEL BEFORE EVERY USE.
Top up if required (follow steps in 5.2). Failure to do so could result in damage to the tool.
5.2.
TOPPING UP HYDRAULIC OIL
5.2.1.
Disconnect the tool from the air line.
5.2.2.
Use a 4mm hex. key to loosen and remove the threaded plug from the body.
5.2.3.
Use the supplied syringe to carefully top up the oil level to the bottom of oil hole.
5.2.4.
Use a 4mm hex. key to replace and tighten the threaded plug into the body.
5.3.
CHANGING NOZZLES
5.3.1.
Disconnect the tool from the air line.
5.3.2.
Using the spanner supplied and, bracing the shaft with another suitable spanner, loosen and remove the current nozzle.
5.3.3.
Adjust the shaft by screwing it either in or out such that the replacement nozzle can be engaged fully into the threaded housing.
5.4. OPERATION
5.4.1.
Be sure to select the correct nozzle and rivet for the job.
5.4.2.
Insert the rivet into the nozzle.
5.4.3.
Direct the nozzle at the pre-drilled hole and squeeze the trigger.
5.4.4.
If rivet spindle does not automatically fall into waste receiver tilt tool backwards.
8
DO NOT
allow waste receiver to become so full that rivet spindles cannot be removed from the tool as this may cause a jam requiring
disassembly.
6. MAINTENANCE
WARNING! Ensure you disconnect the tool from the air supply system before attempting any service or maintenance.
6.1.
Maintain the tool with care. Keep it oiled for optimum performance.
6.2.
Lubricate the air tool daily with a high quality air tool oil, (Sealey model no. ATO/500 or ATO/1000).
6.3.
Store the tool in a safe, dry, secure environment.
6.4.
FACTORS THAT MAY INHIBIT PERFORMANCE:
Loss of power or erratic action may be caused by reduced compressor output, an excessive drain on the air line, moisture or
fig.1
GSA312 Issue 1 21/02/19
Original Language Version
© Jack Sealey Limited
fig.2
fig.3


