3. ASSEmBLY & PREPARATION
3.1. Assembly.
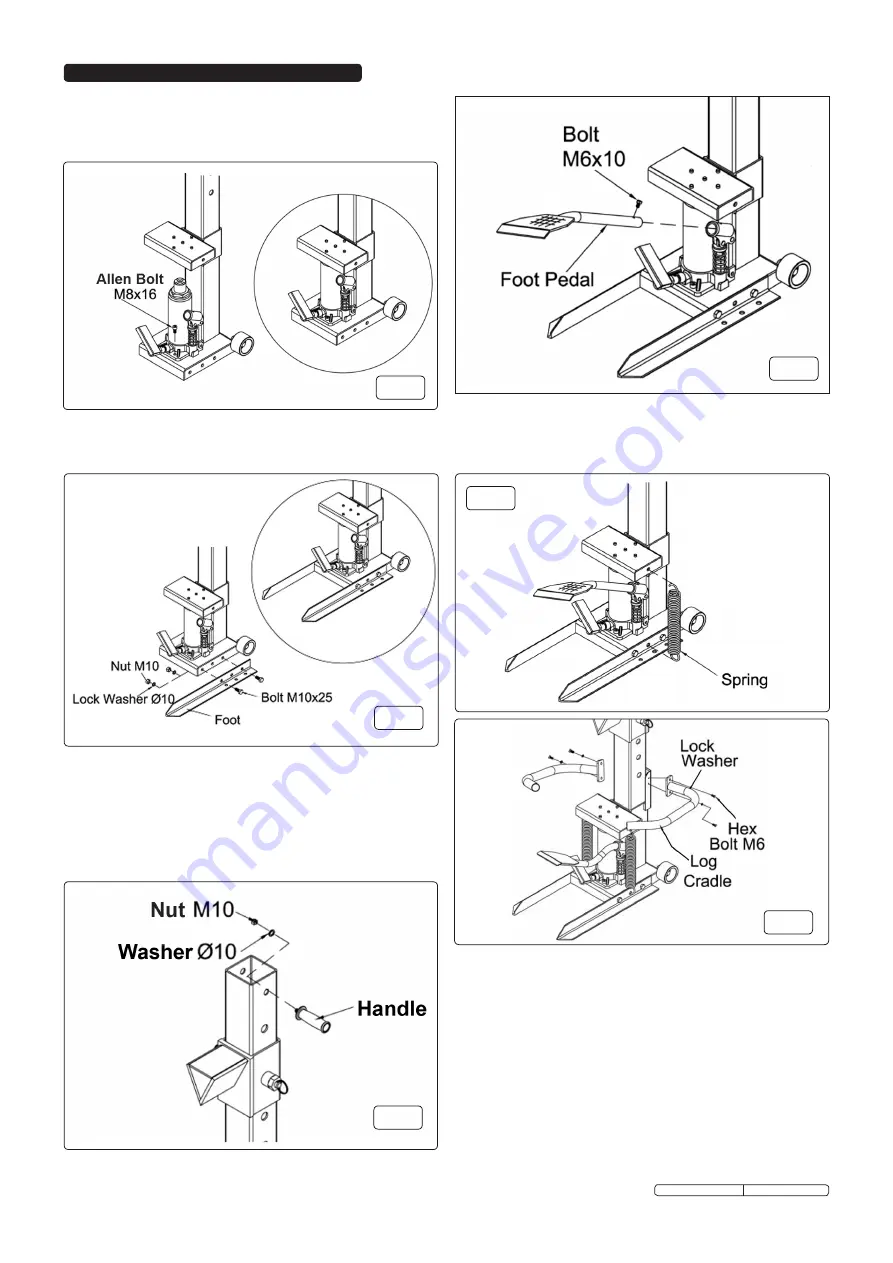
3.1.1. Attach the hydraulic pump to the base by using two m8 allen
bolts
(fig.1)
.
3.2. Transportation.
carefully tip the log splitter backwards onto it's wheels, using
the handles to transport it short distances.
3.3. Work site preparation.
Plan the work site beforehand to ensure a safe working
environment and to save effort by positioning the logs so they
can easily be reached. ensure that the log splitter is
positioned on firm and level ground. locate site so that the
split wood can be stacked or loaded directly into a suitable
vehicle or trailer.
When cutting up wood for splitting, bear in mind the capacity
of the splitter, which is between 300mm and 600mm in 50mm
steps. decide which length is most appropriate and cut the
wood slightly shorter than the set length.
Original Language Version
ls575VH Issue: 1 - 24/11/09
3.1.3. Attach the two feet to the bottom of the main post, secure
each foot using two m10 bolts, two lock washers Ø10 and
two m10 nuts. Bolt through the two outer holes
(fig.2)
.
3.1.4. slide the wedge assembly over the main post and locate
the pins into one of the sets of locating holes
(fig.3)
.
3.1.5. Attach the two handles to the top of the log splitter, one
handle per side. secure each handle using a lock washer Ø10
and a m10 nut
(fig.3)
.
3.1.2. slide the log support over the main post and down onto the
hydraulic pump unit
(fig.1)
.
3.1.6. Attach foot pedal by inserting into the hydraulic pump socket.
tighten bolt to secure the foot pedal in place
(fig.4)
.
3.1.7. Attach the two springs into the centre holes of the feet.
then attach the other ends of the springs to the log support
.
(fig.5)
.
3.1.8. Attach the two log cradle arms to the splitter using four m6
bolts and four lock washers
(fig.6)
.
fig.1
fig.2
fig.3
fig.5
fig.6
fig.4


