background image

Unpack the lift and check contents with the parts list. Should there be any damaged or missing parts contact your supplier immediately. 

 

WARNING!

 Keep your hands away from moving parts.

3.1. 

Assembly.

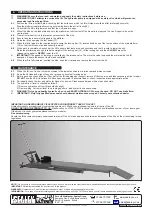
MC455 comes largely assembled, follow the diagram below to attach the front wheel mount, handle etc. Check all fixings to ensure none are 

loose. Check that the locking mechanism (13) operates freely, so as the table is raised, the lock drops down into the locking position.


3.2. 

Before first use.

3.2.1.  Leave the pump for one hour, to allow the oil to settle, before purging the system.

Note:

  Failure to allow sufficient time for the oil to settle could result in air remaining in the oil. In this event, the pump will not purge  


completely first time and a second purge will be required.

3.2.2.  Purge the hydraulic circuit to eliminate any air in the system, by fully pressing the release valve pedal and pumping the lift pedal  


(17) 15 to 20 times.

3.2.3.  Test the lift, unladen, by raising it to full height and then lowering it. Depress release valve pedal slowly to control the rate of descent.

3.  ASSEMBLY

Foot Pedal

Release Pedal

Front Wheel 

Support

Strap Hooks

Safety Lock

Anti-Roll Locks

Original Language Version

MC455    Issue: 2 - 01/06/11

Summary of Contents for MC455

Page 1: ... and free from unrelated materials and ensure that there is adequate lighting Also ensure that the floor is level and strong enough preferably concrete to take the weight of the lift and the bike DO NOT operate the lift on tarmacadam as the surface may be unstable Keep the lift clean for best and safest performance The maximum bike weight is 450kg DO NOT exceed this rated capacity Remove ill fitti...

Page 2: ...r one hour to allow the oil to settle before purging the system Note Failure to allow sufficient time for the oil to settle could result in air remaining in the oil In this event the pump will not purge completely first time and a second purge will be required 3 2 2 Purge the hydraulic circuit to eliminate any air in the system by fully pressing the release valve pedal and pumping the lift pedal 1...

Page 3: ...efore each use check all parts If any part of the lift is damaged or suspect remove lift from service and take necessary action to repair DO NOT use the lift if it is believed to have been subjected to abnormal load or shock Inspect and take appropriate action 5 4 Periodically check the ram and piston for signs of corrosion Clean exposed areas with a clean oiled cloth 5 5 The hydraulic oil level i...

Page 4: ...2 EC Machinery Directive 2000 14 EC Outdoor Noise Emissions Directive 2006 95 EC Low Voltage Directive 2002 96 EC WEEE Directive 2004 108 EC EMC Directive 2002 95 EC RoHS Directive 93 68 EEC CE Marking Directive 97 23 EC Pressure Equipment Directive And the following harmonised standard s National technical standards and specifications if applicable Technical file compiled by Jack Sealey Ltd Signe...

Page 5: ... ...

Reviews: