adjustable gear wheel (5) through the front brace into the other end of pole (6), and secure using screw (6A), washers (6B), spacers
(6c) and nuts (6d).
note: some buckles may require positioning onto the extension pole (7) before securing.
4.9.
Press on the foot pedal and remove the safety pin, release the pedal to lock the assembly into position.
4.10.
slide Handle (8) onto the end of the extension pole (7) and secure with knob (4).
4.11.
insert the short arms (2) and long arms (1) into the buckles and lock into the required position with knobs
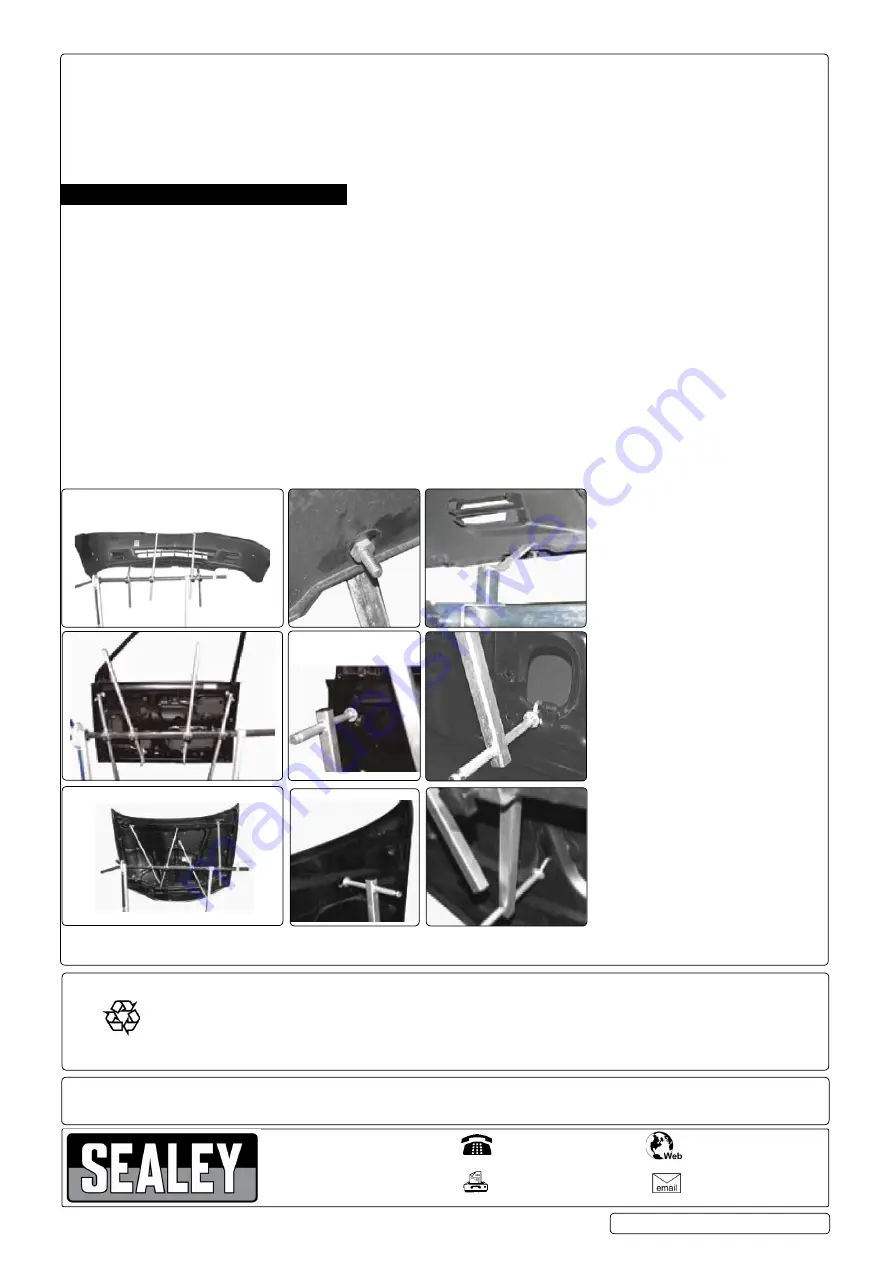
5. Mounting solutions
5.1.
due to the universal nature of this unit and its capabilities to mount many types of automobile parts, mounting instructions must be
given in a
general manner. When mounting any part you must first determine what would be the safest way to secure the automobile
part to the panel stand.
5.2.
Begin by examining the specific part that
is being mounted and look for holes on the part that will allow the long arm or short arm to
be inserted into.
5.3.
select holes that are as close to the size of
the hook/straight mount for best support.
5.4.
select holes at the furthest point on the part
being mounted for better support.
the arms can be set at an angled position for wider range/support and can be used separately or in conjunction.
5.5.
the long Arms have a hook on one side and straight mount on opposite side. depending on size of hole selected to mount part,
select which will secure part best.
5.6.
the short Arms have holes at the end which can be used to secure part being mounted. if part being mounted has a lip/tab with
hole, align the hole on the Prop Arm with the hole on the lip/tab and secure by using a nut & bolt (not included).
5.7.
Begin mounting process by deciding length necessary for long Arm/short Arm.
secure arms into place by tightening knobs.
5.8.
mount part onto Arm. Before proceeding to next step, assure that part is secure and weight is well distributed and will not cause
stand to tip over.
5.9.
mount bottom of part to Arm. follow instructions in step 5.2.
5.10.
Assure that part is mounted securely. test by slowly rotating part. readjust if required.
NOTE:
It is our policy to continually improve products and as such we reserve the right to alter data, specifications and component parts without prior notice.
iMpoRtant:
no liability is accepted for incorrect use of this product.
WaRRanty:
Guarantee is 12 months from purchase date, proof of which will be required for any claim.
sole uK distributor, sealey Group.
Kempson Way, suffolk Business Park,
Bury st. edmunds, suffolk.
iP32 7Ar
www.sealey.co.uk
sales@sealey.co.uk
01284 757500
01284 703534
mK62 | issue 1 10/08/16
Original Language Version
© Jack sealey limited
environmental protection
recycle unwanted materials instead of disposing of them as waste. All tools, accessories and packaging should be
sorted, taken to a recycling centre and disposed of in a manner which is compatible with the environment.
When the product becomes completely unserviceable and requires disposal, drain off any fluids (if applicable)
into approved containers and dispose of the product and the fluids according to local regulations.
Bumper
door
Bonnet


