IT IS VERY IMPORTANT TO ENSURE THAT THE GUN IS CORRECTLY CLEANED AFTER EACH USE.
Disconnect from the air supply before attempting any cleaning, other than flushing, or maintenance.
5.1.
Cleaning the gun
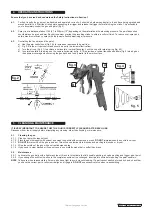
5.1.1 Clean out pot with clean solvent.
5.1.2 Flush the gun thoroughly with solvent and clean the nozzle with solvent and a brush.
DO NOT
immerse/soak the nozzle in solvent.
5.1.3
DO NOT
immerse the entire gun in solvent. This will cause lubricants to dissolve and packing to dissolve or dry out.
5.1.4 Wipe the outside of the gun with a solvent-dampened rag.
5.1.5 If you need to clear blocked orifices, only use a non metallic probe that is softer than brass.
5.2. Maintenance
5.2.1 Lubricate the gun daily with a light machine oil. Be sure to lubricate the fluid needle packing, air valve packing and trigger pivot point.
5.2.2 If you change the nozzle size, ensure the complete nozzle set is exchanged. Insert paint nozzle before putting the paint needle in.
NOTE
Take care when re-assembling. Screw parts hand tight to avoid cross-threading. If a part cannot easily be turned by hand, check that
you have the correct part, or unscrew, realign and try again.
DO NOT
use excessive force when re-assembling.
5. CLEANING & MAINTENANCE
4. OPERATING INSTRUCTIONS
Ensure that you have read and understood the Safety Instructions in Section 1
4.1.
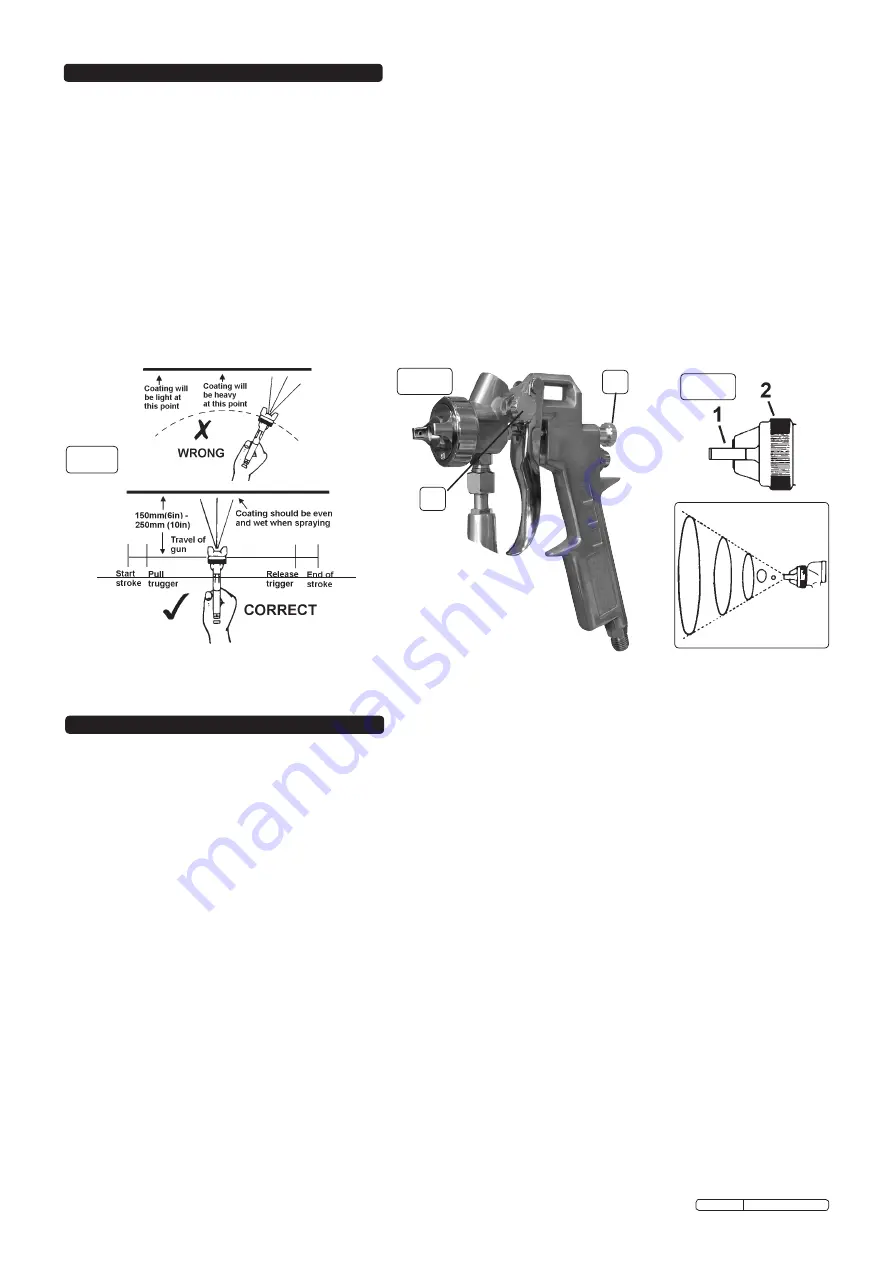
For best results the gun must be handled and operated correctly. It should be held perpendicular to the surface being sprayed and
moved parallel to it. Start the stroke before squeezing the trigger and release the trigger before finishing the stroke. This will enable
you to accurately control the gun and paint (fig. 2).
4.2.
Spray from a distance of about 150 (6") to 250mm (10") depending on the material and the atomizing pressure. The paint deposited
should always be even and wet. Each stroke must overlap the preceding stroke to obtain a uniform finish. To reduce over-spray and
obtain maximum efficiency, spray with the lowest effective atomizing air pressure.
4.3.
Controlling the fan spray and the paint:
a) Use the paint control knob (fig. 3.A) to increase or decrease the paint flow.
b) Fig. 3.B is the air input control and should be set to the lowest effective flow.
c) Turn the air cup (fig. 4.1) to achieve a horizontal or vertical fan spray. Lock the cup with retaining ring (fig. 4 2).
d) In normal operation, the wings on the cup are horizontal as fig. 4. This provides a vertical fan-shaped pattern (fig. 5) which gives
the optimum coverage when moving the gun back and forth, parallel to the work surface.
fig.2
fig.3
A
B
fig.4
fig. 5
Original Language Version
SSG2.V2 Issue: 2 - 18/01/10