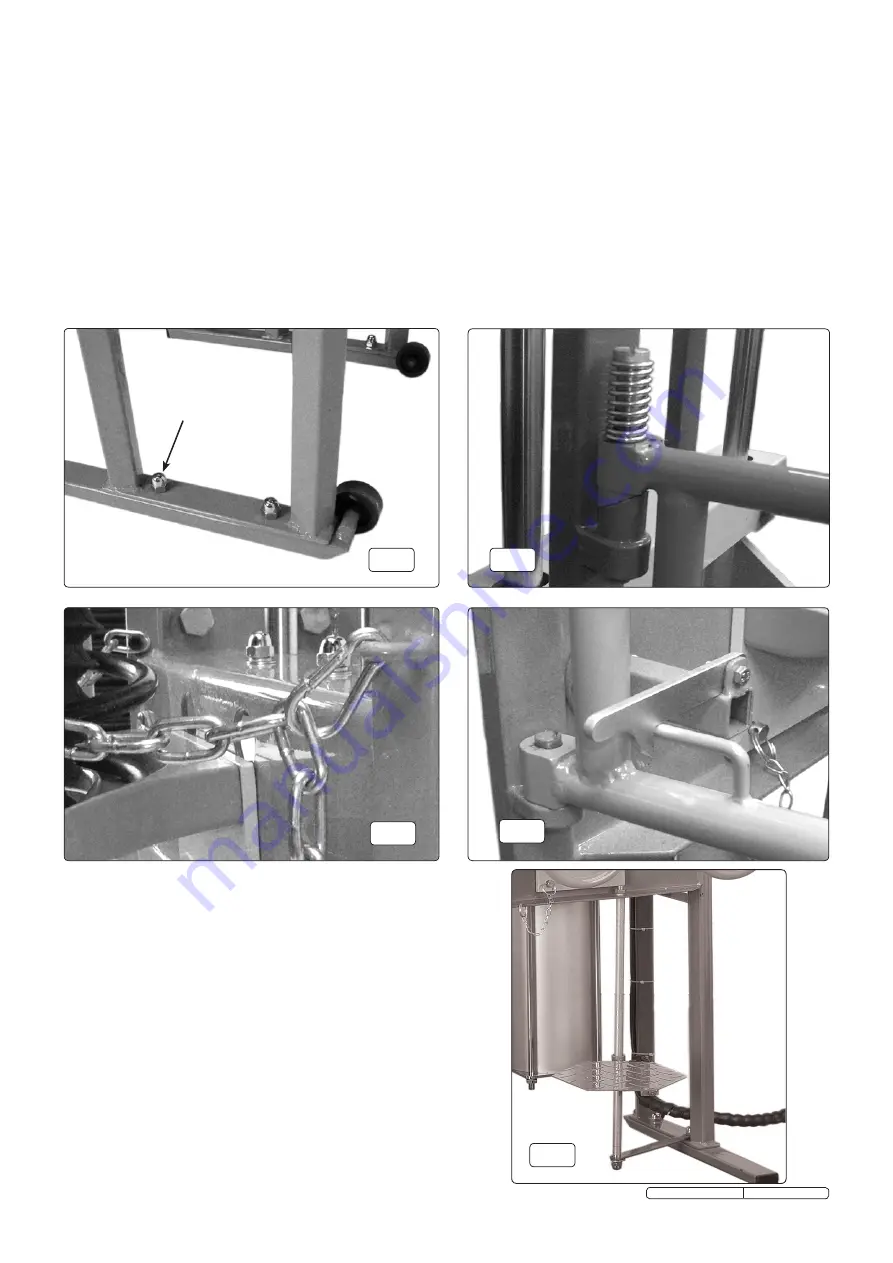
4.1.4. fix the guard lock to the front of the unit using four cross headed bolts, see fig.4 for positioning.
4.1.5. fit the guard by dropping it onto the bottom pivot and then fitting the large pin and spring into the top pivot holes and
fitting a nyloc nut (fig.2). some pressure will be needed to push down on the pin to allow the nut to be fitted.
4.1.6. fit the chain to the left hand side using nut and bolt to fix in place. remove the clip from the end of the chain and clip
it onto the hook on the other side of the compressor, the chain can then be fixed to the clip at the appropriate link as
required (fig.3).
4.1.7. fit the locating platform by threading it onto the long metal rod and securing it by fitting and tightening the knob.
the top of the rod fits through the hole in the frame and is held in place using a domed nut and washer. the bottom of
the rod is secured by attaching the metal arm to it and securing with a nut. then undo the domed nut previously
fitted (fig.1), and fit the metal arm over the bolt and refit the domed nut. tighten all nuts in turn ensuring that the
metal rod hangs vertically from the frame and also squarely to the metal arm (see fig.5).
4.1.8. fit the handle to the top of the unit using two domed nuts, spring washers and washers to secure in place.
4.1.9. there are pre-drilled holes in the feet if the unit needs to be bolted to the floor permanently.
4.1.10. Hang two of the brackets/attachments to the sides of the frame and locate the third bracket onto the compressor
using the locking pin to hold it in position (fig.7).
4.1.11. Position the unit in a suitable location near an air line feed.
fit long
bolt here
fig.1
fig.4
fig.3
fig.2
4.2.
the recommended air hook-up procedure is shown in fig.6.
4.2.1. ensure foot control lever is in the ‘off’ position before
connecting to the air supply.
4.2.2. A maximum air pressure of 116psi (8bar) is required to
operate at full capacity.
4.2.3.
WARNING!
ensure the air supply is clean and does not
exceed 116psi (8bar) whilst operating the compressor.
too high an air pressure and unclean air will shorten the
product life due to excessive wear, and may be
dangerous causing damage and/or personal injury.
4.2.4. drain the air tank daily. Water in the air line will damage
the ram.
4.2.5. clean compressor air inlet filter weekly.
4.2.6. line pressure should be increased to compensate for
unusually long air hoses (over 8 metres).
4.2.7. Keep hose away from heat, oil and sharp edges. check
hose for wear, and make certain that all connections
are secure.
Original Language Version
re300 Issue: 1 - 30/11/09
fig.5


