NOTE:
It is our policy to continually improve products and as such we reserve the right to alter data, specifications and component parts without prior notice.
IMPORTANT:
no liability is accepted for incorrect use of this product.
WARRANTY:
Guarantee is 12 months from purchase date, proof of which will be required for any claim.
INFORMATION:
for a copy of our latest catalogue and promotions call us on 01284 757525 and leave your full name and address, including postcode.
01284 757500
01284 703534
sales@sealey.co.uk
Sole UK Distributor, Sealey Group,
Kempson Way, Suffolk Business
Park
,
Bury St. Edmunds, Suffolk,
IP32 7AR
www.sealey.co.uk
Web
Original Language Version
RE012 Issue: 1 - 20/09/12
© Jack Sealey limited
5. MAINTENANCE
5.1.
check condition of the suction cups regularly, if damaged, replace them using genuine parts only.
5.2.
Always keep the suction cups clean and free of oil and grease. clean them regularly with a non-aggressive cleaner.
5.3.
In order to preserve elasticity, do not expose suction cups to sunlight over an extended period of time.
5.4.
Keep the tool in a clean, serviceable condition, using a slightly dampened cloth to clean it. Ensure dry before storage.
4.1
Suction Cup Method
4.1.1
Ensure that the panel to be worked on is dry, clean and free of grease.
4.1.2
Select the appropriate size suction cup, remove the protective cover from the cup nipple and the slide hammer female
thread plug. Screw the suction cup nipple into the slide hammer port.
4.1.3
Ensure the pressure relief valve is sealed by rotating the thumb screw clockwise until finger tight.
4.1.4
Position the suction cup over the dent and press it gently onto the body panel.
4.1.5
Pump the vacuum pump plunger using the palm of your hand and finger grip handle, the suction cup will form a partial
vacuum. When the vacuum cup is firmly attached to the body panel the dent pulling process can follow. An indication of
vacuum force is provided by a graduated annular ring painted red on the pump plunger, a visual warning of any vacuum
loss whilst in operation.
4.1.6
Release the pump plunger, grip the fixed handle with one hand and fist grip the sliding hammer with the other.
Keep
fingers inside handle shroud and hammer tapered flanges
. Using the inertia of the sliding hammer against the anvil,
pull the dent out. do not apply excessive force to the slide hammer; the force required will be learnt from experience and
safe working practices.
4.1.7
When finished, release the vacuum relief valve by turning counter clockwise until the air equalizes. At the same time
remove the puller from the body panel.
4.2
Hook Method
4.2.1 decide on the least invasive or most practical panel attachment type. for example a small drilled hole into which a length
of studding with a hook or hole could be attached. tack welding a hooked wire to the panel may be preferred.
4.2.2
Screw fix the dent puller hook to the female thread end of the slide hammer. Hook to the panel to be repaired. Grip either
the fixed handle or the pump barrel with one hand and grip the sliding hammer with the other.
Keep
fingers inside
handle shroud and hammer tapered flanges
. Using the inertia of the sliding hammer against the anvil, pull the dent
out.
Do not
apply excessive force to the slide hammer; the force required will be learnt from experience and safe working
practices.
4. OPERATION
Parts support is available for this product. to obtain a parts listing and/or diagram, please log on to www.sealey.co.uk,
email sales@sealey.co.uk or phone Sealeys on 01284 757500.
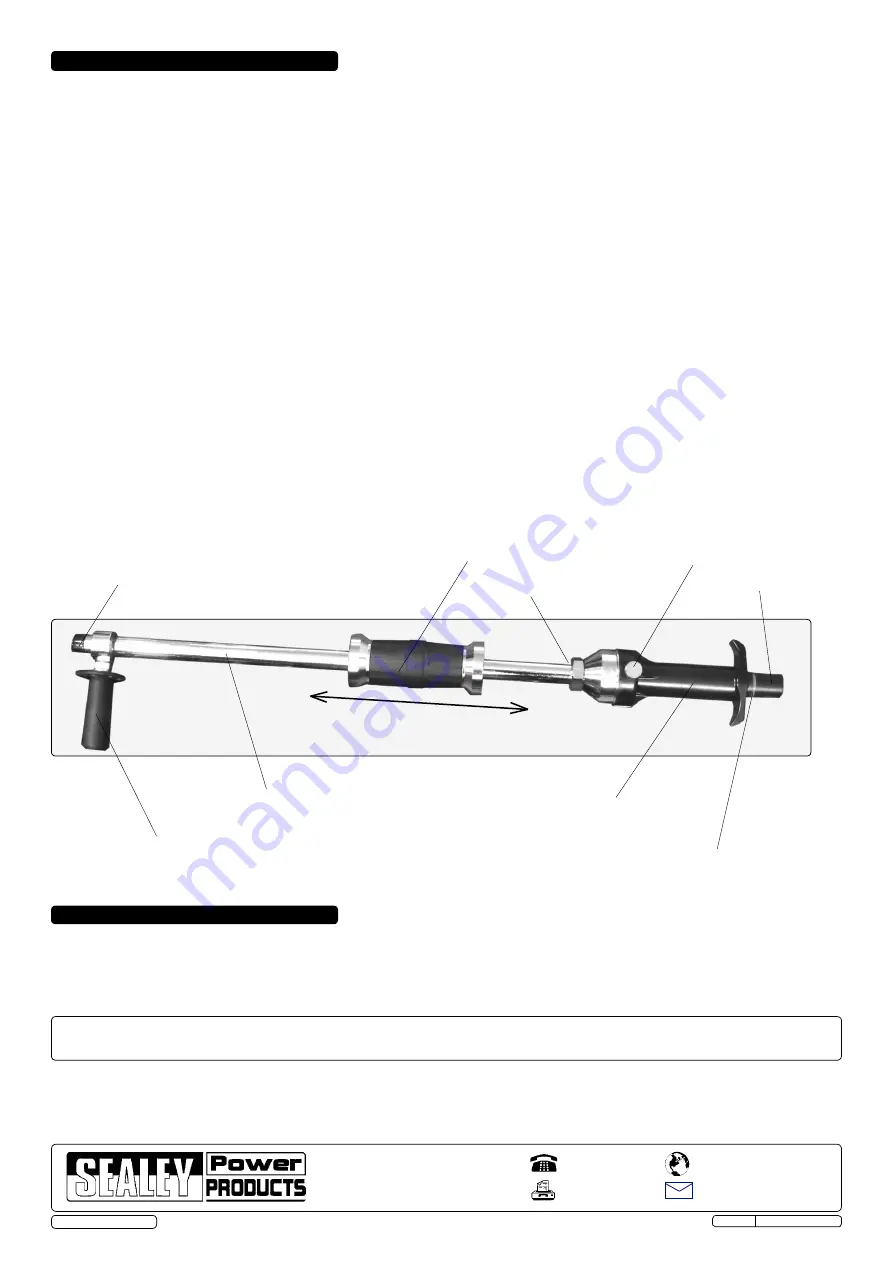
fixed position handle
Soft grip sliding hammer
Pressure relief valve
Vacuum pump plunger
Vacuum indicator
Suction cup and hook adaption female thread
Hammer assembly operating parts
Pump barrel/steadying handle
Anvil
Hammer guide and airway tube


