
4.2.
USING THE 30WATT SOLDERING IRON
4.2.1.
The 100 Watt soldering gun is primarily intended for electrical and electronic use. Its main advantage is its ability to heat up within 20
seconds of pressing the trigger. The tip temperature will reach 300
O
C so care must be taken with delicate electronic components
that may be damaged if excessively heated.
4.2.2.
Duty cycle.
The gun has a duty cycle of 12 seconds continuous soldering which should be followed by a 48 second rest. If the trigger
is held for less than 12 seconds the necessary rest period needed will be correspondingly less.
WARNING!
Do not try to lock the trigger by any means as this will overheat the tip and the transformer causing permanent damage
which will invalidate your guarantee.
4.2.3.
Preparing the gun.
Prepare the gun by ‘tinning’ the tip with a thin layer of solder. If any difficulty is experienced getting the solder to
take to the tip use a proprietary tip tinner/cleaner.
4.2.4.
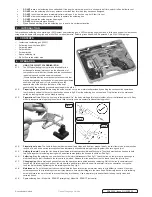
Holding/preparing the work.
Ensure that the items to be joined are clean and securely held together. The stand provided can be
used for this purpose (See fig.1) Where possible a good joint will more easily obtained if the items to be joined are tinned separately
first.
4.2.5.
Soldering.
Press and hold the trigger for approximately 20 seconds to get the tip to full temperature. Bring the tip of the gun and the
solder to the joint simultaneously. Leave the iron on the joint just long enough to melt the solder so that it flows onto the two parts to
be joined. Remove the gun and release the trigger. Leave the joint to cool. When the gun is not in use but still hot ensure that when it
is put down the tip is not touching or close to any material that will melt or is inflammable.
4.2.6.
Changing tips.
Disconnect the gun from the mains and wait until the gun is completely cold. Loosen the two screws holding the tip.
Remove the tip and insert the new one. Tighten the screws. (If the old tip is difficult to remove, grip it with a pair of pliers and pull it out.
Do not use pliers to insert the new tip as the plating may be damaged.)
4.2.7.
Maintenance.
Do not allow solder to accumulate where the tip enters the gun as this may make the tip difficult to remove. Do not
get solder deposits on the tip retaining screws as this may prevent a screwdriver fitting into the cross head. Periodically, use a
proprietary tip cleaner/tinner to keep the gun clean an correctly tinned.
4.2.8.
Spare tips for gun: - Model No. SD02 (Card of two.)
4.3.
USING THE SOLDER SUCKER.
4.3.1.
The solder sucker can be used where a joint has to be unsoldered or where excess solder has been deposited and needs to be reduced.
4.3.2.
‘Prime’ the sucker by pushing the plunger down until it latches. Bring the soldering iron or gun to the joint and melt the solder. As soon as
the solder is liquid place the tip of the sucker into the solder or as close as possible and press the button on the body of the sucker.
(See fig.4). The plunger will rise by spring action giving a sucking action at the tip. Remove the sucker immediately to avoid being in
contact with the hot tip of the soldering iron/gun.
4.3.3.
Empty the excess solder from the body of the sucker by unscrewing the tip and tapping/shaking to dislodge the solder particles.
NOTE:
It is our policy to continually improve products and as such we reserve the right to alter data, specifications and component parts without prior notice.
IMPORTANT:
No liability is accepted for incorrect use of this product.
WARRANTY:
Guarantee is 12 months from purchase date, proof of which will be required for any claim.
Sole UK Distributor, Sealey Group.
K
empson Way, Suffolk Business Park,
B
ury St. Edmunds, Suffolk.
IP32 7AR
www.sealey.co.uk
sales@sealey.co.uk
01284 757500
01284 703534
Web
Environmental Protection
Recycle unwanted materials instead of disposing of them as waste. All tools, accessories and packaging should be sorted,
taken to a recycling centre and disposed of in a manner which is compatible with the environment.
WEEE Regulations
D
ispose of this product at the end of its working life in compliance with the EU Directive on Waste Electrical and Electronic
Equipment (WEEE). When the product is no longer required, it must be disposed of in an environmentally protective way.
Contact your local solid waste authority for recycling information.
S
DK300K | Issue 3(L) 03/06/16
Original Language Version
© Jack Sealey Limited


