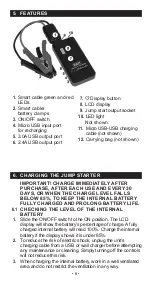
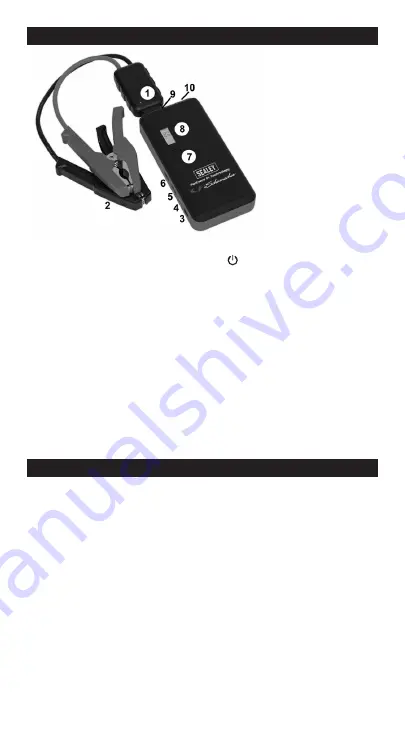
background image

• 6 •

5.  FEATURES

6.  CHARGING THE JUMP STARTER

IMPORTANT! CHARGE IMMEDIATELY AFTER 

PURCHASE, AFTER EACH USE AND EVERY 30 

DAYS, OR WHEN THE CHARGE LEVEL FALLS 

BELOW 85%, TO KEEP THE INTERNAL BATTERY 

FULLY CHARGED AND PROLONG BATTERY LIFE. 

6.1 

CHECKING THE LEVEL OF THE INTERNAL 

BATTERY

1. 

Slide the ON/OFF switch to the ON position. The LCD 

display will show the battery’s percentage of charge. A fully 

charged internal battery will read 100%. Charge the internal 

battery if the display shows it is under 85%.

2. 

To reduce the risk of electric shock, unplug the unit’s 

charging cable from a USB or wall charger before attempting 

any maintenance or cleaning. Simply turning off the controls 

will not reduce this risk.

3. 

When charging the internal battery, work in a well ventilated 

area and do not restrict the ventilation in any way.

1. 

Smart cable green and red 

LEDs.

2. 

Smart cable/  

battery clamps

3. 

ON/OFF switch

4. 

Micro USB input port  

for recharging

5. 

3.0A USB output port

6. 

2.4A USB output port

7. 

 Display button

8. 

LCD display

9. 

Jump start output socket

10. 

LED light

Not shown:

11. 

Micro USB-USB charging     

  cable (not shown)

12. 

Carrying bag (not shown)

Summary of Contents for SL67S

Page 1: ...E THIS OWNER S MANUAL AND READ BEFORE USE This manual will explain how to use the unit safely and effectively Please read and follow these instructions and precautions carefully MODEL NO SL67S Jump Starter Power Pack 800A Peak Power Lithium ...

Page 2: ... 5 CONNECTING TO A BATTERY 5 FEATURES 6 CHARGING THE JUMP STARTER 6 OPERATING INSTRUCTIONS 7 MAINTENANCE INSTRUCTIONS 9 STORAGE INSTRUCTIONS 10 TROUBLESHOOTING 10 SPECIFICATIONS 11 SAFETY SYMBOLS Refer to instruction manual Warning Electricity Warning Explosive material Wear eye protection ...

Page 3: ...ecommended or sold by Sealey for the SL67S may result in a risk of fire electric shock or injury to persons or damage to property 1 6 To reduce the risk of damage to the electric plug or cord pull by the adaptor rather than the cord when disconnecting the unit 1 7 Do not operate the unit with damaged cables or clamps 1 8 Do not operate the unit if it has received a sharp blow been dropped or other...

Page 4: ...ozen battery 2 5 To prevent sparking NEVER allow clamps to touch together or contact the same piece of metal 2 6 Consider having someone nearby to come to your aid when you work near a lead acid battery 2 7 Read the Material Safety Data Sheet available from www sealey co uk In the event of an accident seek medical attention 3 PREPARING TO USE THE UNIT WARNING RISK OF CONTACT WITH BATTERY ACID BATT...

Page 5: ...hassis If the negative post is grounded to the chassis as in most vehicles see step 4 6 If the positive post is grounded to the chassis see step 4 7 4 6 For a negative grounded vehicle connect the POSITIVE RED clamp from the jump starter to the POSITIVE POS P ungrounded post of the battery Connect the NEGATIVE BLACK clamp to the vehicle chassis or engine block away from the battery Do not connect ...

Page 6: ...he display shows it is under 85 2 To reduce the risk of electric shock unplug the unit s charging cable from a USB or wall charger before attempting any maintenance or cleaning Simply turning off the controls will not reduce this risk 3 When charging the internal battery work in a well ventilated area and do not restrict the ventilation in any way 1 Smart cable green and red LEDs 2 Smart cable bat...

Page 7: ... jump starter without a battery installed in the vehicle will damage the vehicle s electrical system NOTE The internal battery must have a charge of at least 40 to jump start a vehicle 1 Turn the ignition OFF 2 Plug the battery clamp cable into the jump starter s output socket 3 Lay the DC cables away from any fan blades belts pulleys and other moving parts Make sure all of the vehicle s electrica...

Page 8: ...crank the engine If it does not turn over repeat the procedure Extremely cold weather may require two or three battery warmings before the engine will start IMPORTANT DO NOT attempt to jump start your vehicle more than three consecutive times If the vehicle will not start after three attempts consult a service technician 8 After the engine starts unplug the battery clamps from the jump starter soc...

Page 9: ...D light press and hold the display button until the light turns off 5 Slide the ON OFF switch to the OFF position 6 Recharge the unit as soon as possible after each use 8 MAINTENANCE INSTRUCTIONS 1 After use and before performing maintenance unplug and disconnect the unit 2 Use a dry cloth to wipe all battery corrosion and other dirt or oil from the battery clamps cords and the outer case 3 Do not...

Page 10: ...heck connections Verify the charge level of the jump starter is at least 40 Do not attempt to jump start your vehicle more than three consecutive times If the vehicle still does not start consult a qualified service technician When cable is connected only to the battery Solid Red LED Green LED off beeps once per second The vehicle battery voltage is lower than 10 5V User can connect to the jump st...

Page 11: ...ing Red and Green flashing LEDs no beep Reverse charging protection Solid Red LED Green LED off rapid beeping Short circuit protection Solid Red and Green LEDs no beep Auto shut off due to inactivity Disconnect and reconnect clamps to the vehicle battery Solid Red and Green LEDs beeps once per second Temperature protection NOTE When the condition is corrected the smart cable will automatically res...

Page 12: ...be sorted taken to a recycling centre and disposed of in a manner which is compatible with the environment When the product becomes completely unserviceable and requires disposal drain any fluids if applicable into approved containers and dispose of the product and fluids according to local regulations Note It is our policy to continually improve products and as such we reserve the right to alter ...

Page 13: ...Technical file compiled by Jack Sealey Ltd Being the responsible person appointed by the manufacturer Signed Date Name Position Place Bury St Edmunds Jump Starter Power Pack 800A Peak Power Lithium SL67S v1 2014 30 EU EMC Directive 2011 65 EU RoHS Directive References to harmonised standard s EN 55032 2015 EN 61000 3 2 2014 EN 61000 3 3 2013 EN 55024 2010 A1 2015 25 July 2018 Steve Buckle Marketin...

Reviews: