6.2.
mounting the tyre
9
Before mounting the tyre, check that the rim and tyre have the same dimension.
6.2.1.
clean up any oil or rust from the rim, select the inner or outer clamp, then lock the rim on the turntable.
6.2.2.
spread the lubrication liquid or soap liquid around the lip of the tyre. tilt the tyre against the rim and keep the front end upwards.
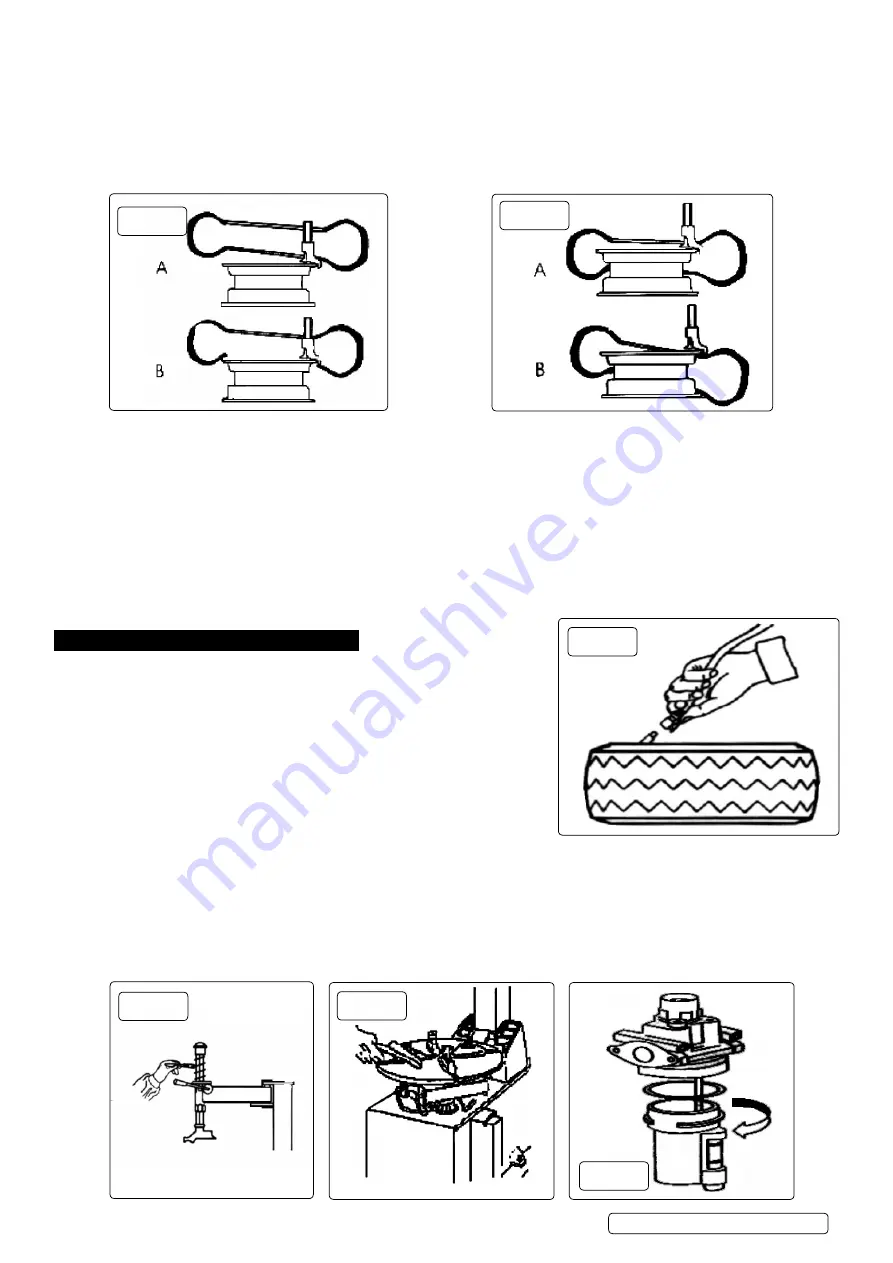
Operate the column tilt pedal fig.2.8 to make the column return to the down position. Move the demounting head to firmly contact the
rim fig.22. Position the left of the tyre lip above the tail of the demounting tool and the right under the hump fig.26.
6.2.3.
Press down the right side of the tyre as hard as possible and operate the turntable pedal fig.2.11 to rotate the turntable clockwise to guide
the lip into the wheel.
6.2.4.
if an inner tube is required, raise up the demounting head and insert the tube into position.
6.2.5.
mount the demounting head again. Adjust the position of the upper lip. operate the turntable rotation pedal to rotate the tyre. At this
moment, continue pressing the lip. if the tyre deforms release the pedal at once. rotate turntable in the opposite direction if required.
restore the tyre to its original condition and try to mount again.
6.3.
Standard Inflation
Warning!
Take care when inflating Tyre.
6.3.1.
check the air supply to see if the air connection is oK.
6.3.2.
The machine is equipped with an inflation gauge for monitoring the inflation of the tyre and the inflation pressure.
6.3.3.
remove turntable clamps from the tyre.
6.3.4.
Connect the inflation hose with the tyre air valve fig.28.
6.3.5.
During inflation, check the pressure indicated on the pressure gauge dose not exceed the scope specified by the manufacturer.
the machine is equipped with a pressure regulating vale to prevent the pressure exceeding 3.5 bar. this can be adjusted dependent on
requirements.
7. maintenance & rePair
9
only trained personnel should maintain this machine. to correctly use the tyre
changer and prolong its working life, it is necessary to periodically maintain and
repair according to the instruction manual.
9
disconnect power and air supply before any maintenance.
release any residual air in system.
7.1.
the following should be done on a monthly basis.
7.1.1.
Keep the machine and working area clean.
7.1.2.
Clean the hexagonal shaft and horizontal arm fig.29.
7.1.3.
use machine oil to lubricate.
7.1.4.
clean the turntable jaws and its guides and use the lithium base oil to lubricate
fig.30,
7.1.5.
Periodically check the lubrication oil level in the oil lubricator. if the oil level is
lower than the oil scale, refill with SAE30 fig.31.
7.1.6.
Periodically drain the water in the water separator.
7.1.7.
Check and adjust the tension of the drive belt. Adjust nuts A and B to obtain the correct tension fig.32.
7.1.8.
check for any loose bolts.
7.2.
adjustment of the gap between the demounting tool and rim
Vertical gap: adjust the hexagonal lock plate.
7.2.1.
isolate the air supply and remove the vertical hexagonal shaft protective cover.
7.2.2.
if the gap is too big, you can adjust the upper and lower nut at the front end of the hexagonal lock plate downwards. if the gap is too
small, adjust the upper and lower nut fig.33.1/fig.33.2 at the front end of the hexagonal lock plate upwards.
fig.27
fig.28
tc10 | issue 1 02/02/18
Original Language Version
© Jack sealey limited
fig.26
fig.29
fig.30
fig.31


