8.
MAINTENANCE
9.
TROUBLESHOOTING
s
DANGER! Unplug the inverter from the mains power supply before connecting or disconnecting cables or performing maintenance or service. Direct
contact with the inverter circuit is dangerous.
8.1
To avoid a build up of dust inside the machine which may block or restrict the ventilation system, periodically remove the covers and remove the dust with a
low pressure air jet or vacuum cleaner. Replace covers immediately. Under no circumstances should the machine be operated with the covers removed.
8.2
TORCH. Avoid resting the the torch and its associated cable on any hot surfaces. If the insulation is damaged in any way the torch must not be used.
8.3
Periodically check the condition of the gas tubing and the connections.
8.4
In the event of any problems of unsatisfactory weld performance please first go through the troubleshooting procedure shown below. If this does not solve
the problem the Inverter must be taken to a qualified and authorised service agent for repair. Contact your local Sealey dealer for service.
9.1
Yellow fault indicator is illuminated.
When this LED illuminates the machine will be blocked and one of three alarm conditions will appear on the display.
AL 1
Failure in the primary power supply.
If the supply voltage drops below 190V AC or rises above 260V AC the machine is turned off.
Reconnect the inverter to a more stable supply of 230V AC. ( Mains voltages over 280V AC will damage the inverter. )
Short circuit has occurred.
If a short circuit has occurred lasting more than 1.5 seconds ( e.g. during the striking of the arc ) the inverter is
switched off.
In this case, wait for the inverter to restart automatically.
AL 2
Inverter has overheated.
One of the safety thermostats has triggered due to the machine overheating. Leave the machine to cool to normal
temperature at which point it will reset itself automatically. Do not restart the inverter until the reason for overheating has been understood and
solved. ( see below )
9.2
Overheating.
This may occur for one of the following reasons : -
a) Inverter casing is full of dust making cooling system inefficient.
Clean as described in section 8.1.
b) Fan not working.
Have fan renewed by authorised service agent.
c) Electrode does not match the collet and collet body fitted within the torch.
Obtain and fit the correct size of torch components for the electrode selected.
d) Bad connection in welding cable and/or work clamp has made poor connection with workpiece.
Check and clean all connections..
9.3
Poor weld quality.
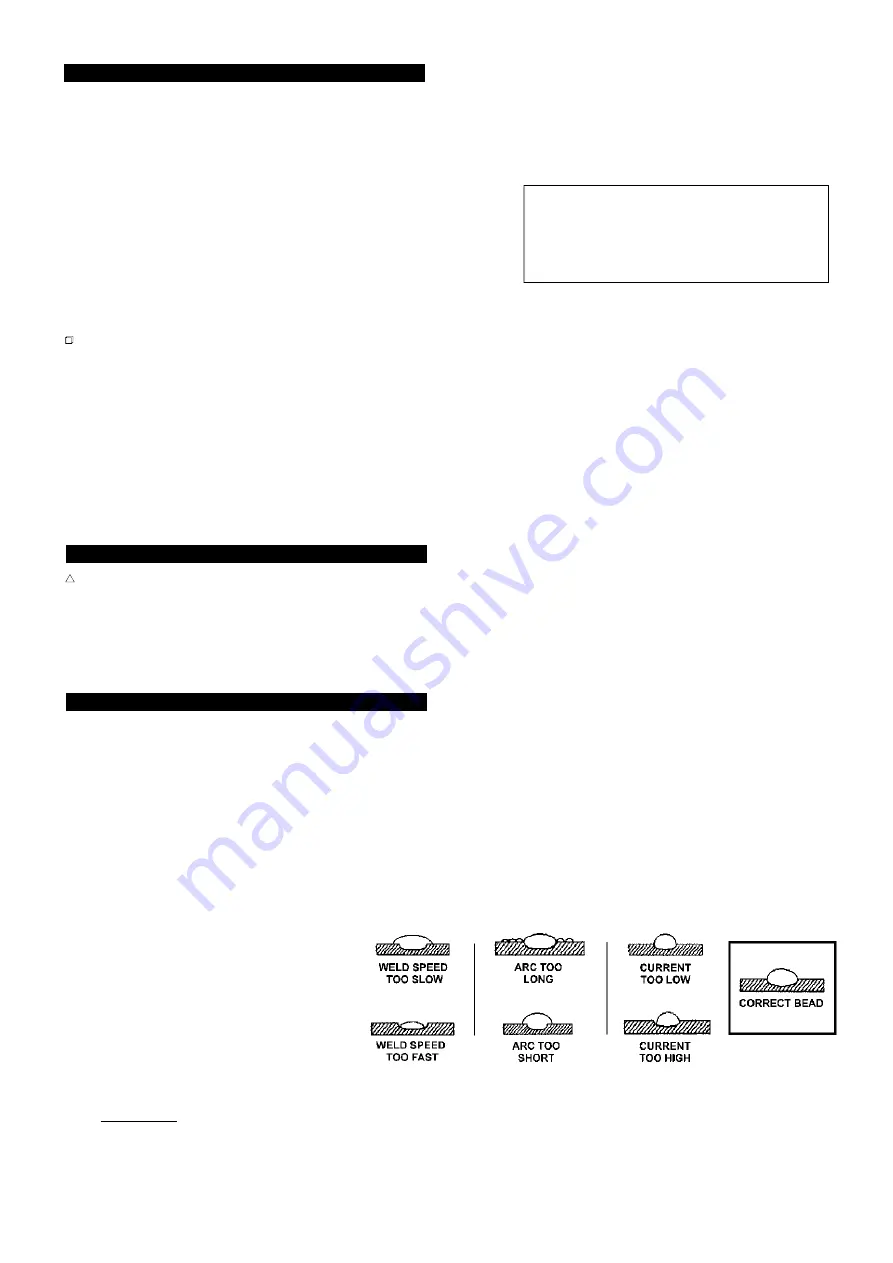
a) Refer to arc weld bead diagrams to the right and also
to AC welding parameters in fig.10.
b) Check condition of electrode. It should be ground
to the correct shape as seen in fig.7 and
should be symmetrically conical.
c) Check that correct gas flow is being used.
d) Check that correct ceramic nozzle is fitted to torch.
9.4
Difficulty in striking an arc.
This is usually due to the electrode not being in good
condition. Grind to correct shape or replace.
9.5
Incompatible settings.
In some instances the machine will not work due to the fact that a combination of settings has been chosen that are electrically
incompatible. In such instances no damage can be caused to the machine but it will be necessary to review and alter the settings to a more appropriate combination.
ARC WELDING
9.6
Burning through thin metal:
On very thin sheet, e.g. car body work, the lowest amperage setting may be too fierce. In this case revert to TIG welding.
9.7
Machine cuts out:
Refer to fault indicator information above.
9.8
Difficulty in striking an arc:
a). The electrode is damp. Heat it up to 60º - 70º before using.
b). Wrong type of rod.
7.1
The TIG175HF will also perform ordinary ARC welding ( without gas ) using coated electrodes.( You will need optional ARC Accessory Kit INV/25 )
7.2
Please note that the way the welding cables are connected to the inverter for ordinary ARC welding may be different to the way the cables are
connected for standard TIG welding. Whilst most stick electrodes are connected to the positive terminal certain types need to be connected to the
negative terminal. It is therefore essential that the user refers to the electrode manufacturers instructions to ensure that the correct polarity is
selected.
( Refer to section.3.2 regarding cable connection. )
7.3
The mechanical characteristics of the weld will be determined not only by the current used but also by other factors such as the diameter and quality of the
electrode itself as well as the arc length, the speed of welding and the orientation of the
electrode to the work surface. Unused electrodes should also be protected from moisture
as a damp electrode will affect the quality of the weld.
7.4
The table to the right gives a general guide to the minimum and maximum welding
currents to be used with the different diameter electrodes.
7.5
Depending on the diameter of the electrode the current used will have to be varied
depending on the orientation of the workpiece itself. Higher current values will be used for
flat welding whereas the current will have to be reduced for vertical or overhead welding.
7.6
ARC FORCE. When using the optional remote control with two potentiometers ( See INV/TIG/7 in section 3.4.2 on remote controls.) an additional parameter
of arc force becomes available. Arc force relates to the dynamic behaviour of the machine. Higher values of arc force result in higher penetration and enable
welding in any position using basic electrodes. By contrast, lower values of arc force result in a softer arc without sparks using rutile electrodes.
p
WARNING: Use welding head shield to protect eyes and avoid exposing skin to ultraviolet rays given off by electric arc. Wear safety welding gauntlets.
If difficult welds are to be performed and the welding parameters are unknown, it is advisable to carry out several trial runs on test pieces in order to
determine the right welding current.
7.7
SWITCH ON
the welder only when you are satisfied that the welder is correctly connected and the work to be done is fully prepared.
Setting the controls.
7.8
Select the arc welding mode using the upper miniature toggle switch on the left of the front panel.
7.9
Select the welding current parameter and set it to the required value by rotating the encoder knob until the display shows the correct value.
7.10
Striking the arc.
Strike the electrode tip on the workpiece as if you were striking a match. ( Do not hit the electrode on the work piece as this
could damage the electrode and make strike up difficult. )
7.11
Welding.
As soon as the arc is ignited try to maintain a distance from the workpiece equal to the diameter of the electrode in use and maintain this distance
throughout the duration of the weld. Remember that the angle of the electrode as it advances should be 20 to 30
O
from a vertical line over the workpiece.
( See guide to weld bead characteristics in Section 10, Troubleshooting.)
7.12 At the end of the weld bead, move the electrode backwards in order to fill the weld crater and then quickly lift the electrode from the weld pool in order to
extinguish the arc.
7.13
SWITCH OFF
the welder after use.
7.
ARC WELDING PROCEDURE
Electrode diameter
Welding current
(mm)
Min.
-
Max.
1.6
25
-
50
2
40
-
80
2.5
60
-
110
3.2
80
-
140
4
120
-
200
TIG175HF - 1 - 061003


