background image

High precision auto-ranging multimeter. Conforms with EN61010-1 

CATIII 600V safety requirements for electrical equipment for 

measurement, control, and laboratory use. Features temperature 

measurement capability, max/data hold and auto power off 

function. Double moulded housing with soft grip case and large. 

Practical probe and lead storage and integral upright stand for use 

on the workbench.

Measures:

• AC and DC Voltage

• AC and DC Current

• Resistance

• Diode Test

• Continuity Buzzer

• Temperature


2. FEATURES


WARNING!  

NEVER apply voltage or current to the multimeter that exceeds the specified maximum as shown below:


Input Limits

Function

Maximum Input

V AC

600V AC

V DC

600V DC

mA DC/AC

200mA 

A DC or A AC

10A DC/AC

(30 seconds max every 15 minutes)

Resistance, Diode, 

Temp, Continuity

500V DC/AC

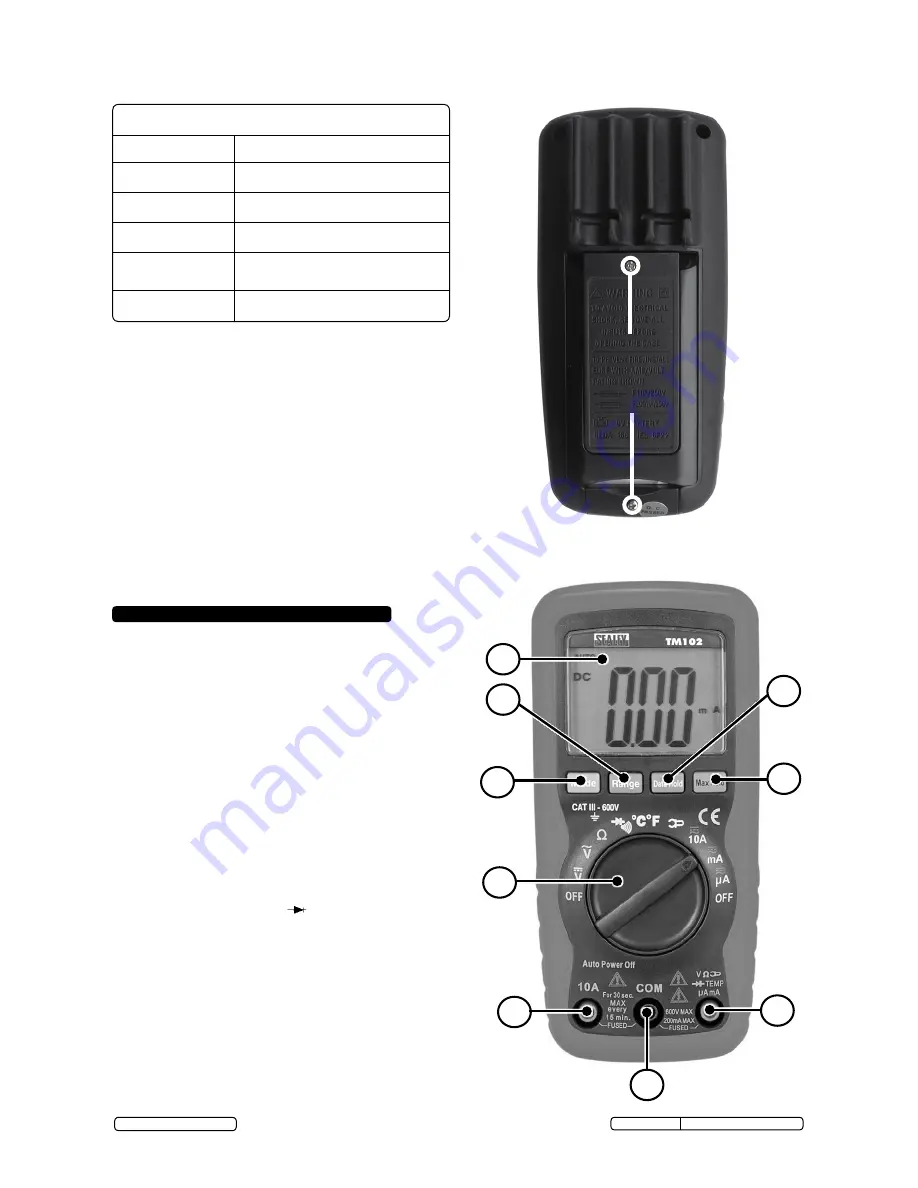
1. 

  LCD Display

2. 

  Function Switch

3. 

  10A Jack 

4. 

  COM Jack

5. 

  Positive Jack

6. 

  Mode Switch

7. 

  Range Switch

8. 

  Data Hold Switch

9. 

  MAX. Hold Switch

1
7

8

9

6

2

3

4

5

SYMBOLS AND ANNUNCIATORS

•))) 

Continuity Test


Diode Test

µ 

Micro (Amps)

Milli (Volts, Amps)

Kilo (Ohms)

Ω 

Ohms

VDC  Volts Direct Current

VAC  Volts Alternating Current

ADC  Amps Direct Current

BAT 

Battery Test

1.4.   BATTERY INSTALLATION

 WARNING! 

 To avoid electric shock, disconnect the test leads  


from any source of voltage before removing the battery cover.


Disconnect the test leads from the meter.


Open the battery cover by loosening the two screws using a    


Phillips head screwdriver. Remove old battery (if applicable)


and insert the new battery into battery holder, observing the    


correct polarity. Fit the battery cover back in place. Secure it   


with the screws.

 WARNING!

 To avoid electric shock, do not operate the meter  


until the battery cover is in place and fastened securely.


NOTE!

 If your meter does not work properly, check the fuses   


and battery to make sure that they are still good and that they  


are properly inserted.

REMOVE SCREWS 

TO ACCESS 

BATTERY AND 

FUSES

TM102        Issue No: 2(I)- 19/06/14

Original Language Version

 © Jack Sealey Limited

Summary of Contents for TM102

Page 1: ...re the multimeter carefully in a safe dry childproof location out of direct sunlight Storage temperature range 20 C to 60 C ALWAYS turn off the power and disconnect the test leads before opening the cover to replace the fuse or batteries The warnings cautions and instructions referred to in this manual cannot cover all possible conditions and situations that may occur It must be understood that co...

Page 2: ...tch 8 Data Hold Switch 9 MAX Hold Switch 1 7 8 9 6 2 3 4 5 SYMBOLS AND ANNUNCIATORS Continuity Test Diode Test µ Micro Amps m Milli Volts Amps k Kilo Ohms Ω Ohms VDC Volts Direct Current VAC Volts Alternating Current ADC Amps Direct Current BAT Battery Test 1 4 BATTERY INSTALLATION WARNING To avoid electric shock disconnect the test leads from any source of voltage before removing the battery cove...

Page 3: ...gits 2000µA 1µA 1 5 reading 3 digits 20 00mA 10µA 200 0mA 100µA 10A 10mA 2 5 reading 5 digits Function Range Resolution Accuracy AC Current Auto ranging for uA mA Overload Protection 0 2A 250V and 10A 250V Fuse Frequency Range 50 to 60Hz Maximum Input 200mA dc or 200mA ac rms on uA mA ranges 10A dc or ac rms on 10A range 200 0µA 0 1µA 1 5 reading 5 digits 2000µA 1µA 1 8 reading 5 digits 20 00mA 10...

Page 4: ...u have selected Change to a higher range 4 1 MODE SWITCH Selects different Modes according to function selected 4 2 RANGE SWITCH The multimeter will automatically select the appropriate range for the measurement being taken using Auto Ranging To manually select a range 4 2 1 Press the RANGE switch The AUTO display indicator will turn off 4 2 2 Press the RANGE switch to cycle through the available ...

Page 5: ...o the negative COM jack 4 7 2 For current measurements up to 2000µA DC set the function switch to the µA position and insert the red test lead banana plug into the µA jack 4 7 3 For current measurements up to 200mA DC set the function switch to the mA range and insert the red test lead banana plug into the mA jack 4 7 4 For current measurements up to 10A DC set the function switch to the 10A range...

Page 6: ...nsert the red test lead banana plug into the positive Ω jack 4 9 3 Touch the test probe tips across the circuit or component under test It is best to disconnect one side of the component under test so the rest of the circuit will not interfere with the resistance reading 4 9 4 Read the resistance in the display AutoRanging will select the correct range or manually select the desired range see 4 2 ...

Page 7: ... guidelines REMOVE SCREWS TO ACCESS BATTERY AND FUSES Under the Waste Batteries and Accumulators Regulations 2009 Jack Sealey Ltd are required to inform potential purchasers of products containing batteries as defined within these regulations that they are registered with Valpak s registered compliance scheme Jack Sealey Ltd s Batteries Producer Registration Number BPRN is BPRN00705 FIG A TM102 Is...

Reviews: