TP201 ISSUE NO:2 - 011209
Original Language Version
4. SET-UP AND OPERATION
2. INTRODUCTION
Air Consumption .................................................... 12cfm
Recommended air pressure .......................... 72 - 100psi
Capacity.................................................................... 90ltr
Adaptors .................... A(6.5,8.5,10.5) B(M10,M12,M14)
3. SPECIFICATION
Stainless steel fuel drainer with venturi type suction. 90ltr
Capacity tank suitable for petrol or diesel. Supplied with
suction tubes and adaptors for breaking into vehicle fuel
system. CE Certified (971231EC).
4.1
Assemble Handle.
Remove the screws from the tubular handle supports and insert the ends of the handle into the two short
lengths of tube. See fig.2. Align the threaded holes in the handle with the two holes in each support tube and secure each side with
the two screws previously removed.
4.2
Earth Bonding Straps.
Attach one clamp on each earth bonding strap to a suitable point on the unit ensuring that it has metal to
metal contract and is secure. Attach the clamp from one strap to the vehicle’s chassis, away from any potential fuel vapour, and the
clamp from the other strap to a suitable earthing point. When the bonding straps are not being used wrap the wires around the
black cable tidies attached to the handle.
4.3
IMPORTANT. The operator must not leave the unit unattended during draining and should observe the fuel level in the
sight tube on the side of the TP201 tank and shut the unit down when it is full.
4.4
Carburettor engine vehicles.
Fuel can be transferred from carburettor engined vehicles through the carburettor’s fuel inlet pipe.
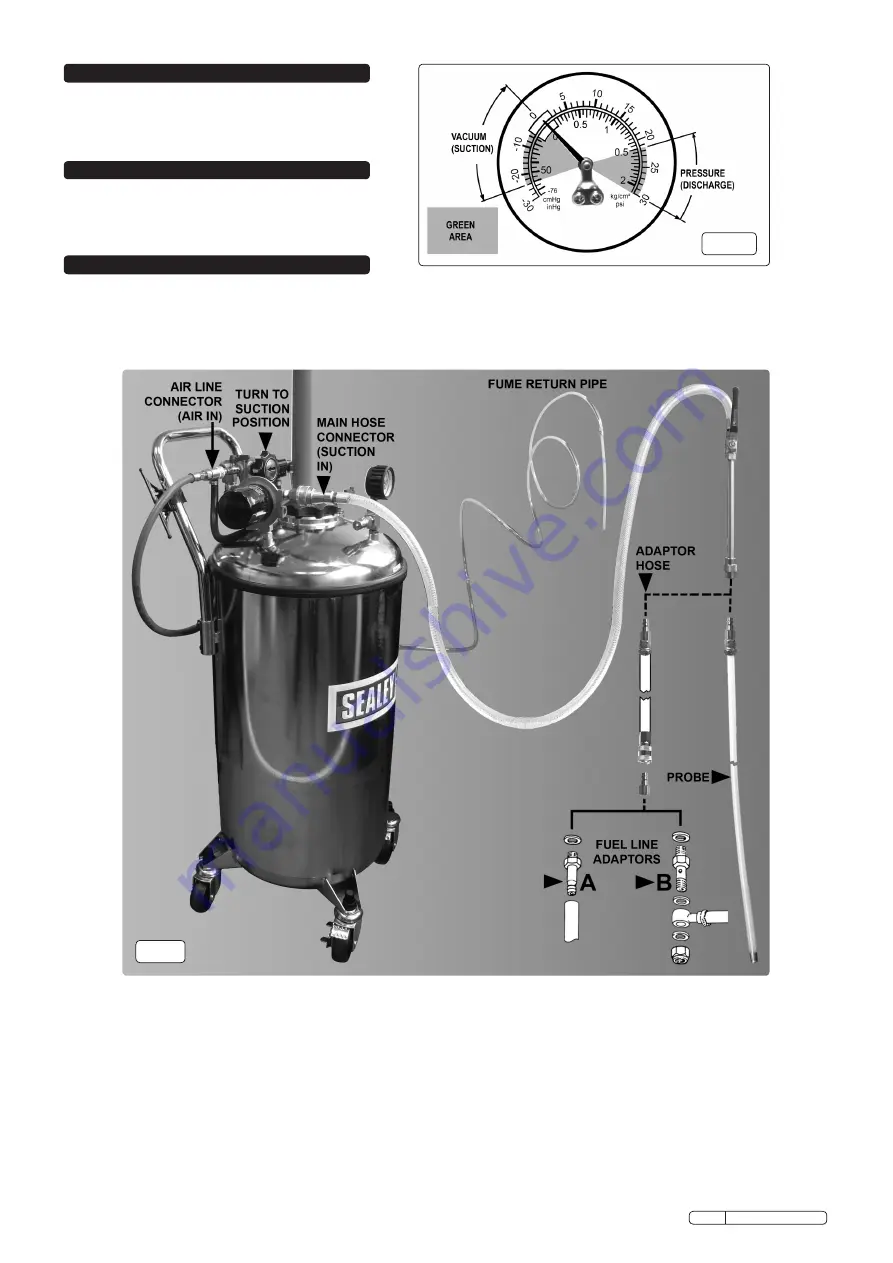
If this is necessary, use one of the six adaptors supplied. See type ‘A’ above and fig.4A. Choose the correct diameter adaptor for
the fuel line in question.
4.4.1.
Screw the adaptor and washer into the quick coupling adapter (fig.2) and then connect that into the end of the adaptor hose.
4.4.2.
Plug the male fitting on the other end of the adaptor hose into the quick connector on the end of the main hose. See above.
4.4.3.
Plug the female fitting on the other end of the main hose into the quick connector mounted on the filter bracket. See above and fig.3-4.
fig.2
fig.1
The TP201 is only to be used for pumping fuel from either a diesel or petrol vehicle. Any other use can be dangerous and will invalidate the
warranty. The unit should be reserved for only one type of fuel. Do not mix different fuels in the unit unless the unit is being used to drain a
tank where fuels have been inadvertently mixed, in which case the unit should be reserved exclusively for this purpose. Bring the unit near the
vehicle when ready to begin transferring fuel. Draining can be carried out in different ways depending on the vehicle’s configuration. Before
beginning the draining process, ensure you have read and understood the safety warnings and guidelines listed in Section 1 of these instructions.


