background image

Instruction Manual

DC300/DC310

Digital Underwater 
Camera Set

D

I

G

I

T

A

L

Summary of Contents for DC300/DC310

Page 1: ...Instruction Manual DC300 DC310 Digital Underwater Camera Set D I G I T A L ...

Page 2: ...batteries when battery power status indicator on camera is down to one bar Turn camera power or LCD monitor OFF when not using camera to preserve battery power Always use freshly charged batteries Rechargeable batteries can dis charge at room temperature up to 10 per day Store batteries in plastic bag or container in refrigerator or cool dry place 4 Use only the following brands of SD memory cards...

Page 3: ...ipment does cause harmful interference to radio or television reception detectable by turning the equipment in question off and on the user is encouraged to try to correct the interference by one or more of the following measures Reorient or relocate the receiving antenna Increase the distance between the equipment and the receiver Connect the equipment to an outlet on a different circuit than tha...

Page 4: ...ter If you are using the AC power adapter unplug the adapter from the AC power outlet after you have disconnected the camera Then contact your local SeaLife authorized service facility Do not continue to use the camera as this may cause a fire or an electrical shock Be careful when handling wet camera Camera and batteries may become very hot Do not use the camera if any foreign objects have entere...

Page 5: ... as on a wobbly table or sloping surface where the camera may fall or tip over and cause injury Do not place camera charger or batteries in damp or dusty locations This may cause a fire or an electrical shock Do not place this camera in a location affected by oil fumes steam seaspray rain such as a boat deck damp clothes cooking stove or humidifier This may cause a fire or an electrical shock Do n...

Page 6: ...ways remove the batteries or unplug the camera from the AC power adapter for safety If you are using the AC power adapter unplug the adapter from the AC power outlet after you have disconnected the camera Failure to do so could result in a fire Do not use batteries other than those specified for use with your camera The use of unsuitable batteries may result in the batteries splitting or leaking a...

Page 7: ... Land Sea are registered trademarks of Pioneer Research Other names and products may be trademarks or registered trademarks of their respective owners NOTICE Please start by reading the important messages below first 1 The bundled driver software design specifications and user s manual that packaged with the camera are subject to change without notice 2 The accessories that come with the camera ma...

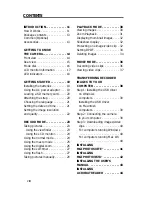
Page 8: ... the digital zoom 26 Using the self timer 27 Using the flash 27 Taking pictures manually 29 PLAYBACK MODE 30 Viewing images 30 Zoom Playback 31 Displaying thumbnail images 32 Slideshow display 32 Protecting one image video clip 32 Setting DPOF 34 Deleting images 34 MOVIE MODE 36 Recording video clips 36 Viewing video clips 37 TRANSFERRING RECORDED IMAGES TO YOUR COMPUTER 38 Step 1 Installing the U...

Page 9: ...49 LAND SEA EXPOSURE PROGRAM 49 FORMAT 50 BEEP 50 POWER OFF 50 RESET TO DEFAULT 51 DATE TYPE 51 DATE SETUP 51 DATE IMPRINT 52 VIDEO OUT 52 LANGUAGE 52 CONNECTING THE CAMERA TO OTHER DEVICES 53 CAMERA SPECIFICATIONS 54 Underwater Housing Instructions 55 MUST DO for Housing 56 Main O Ring 58 SeaLife ReefMaster Underwater Housing 59 Rear View 60 Rear View Advanced 61 Set Up 62 Cleaning 64 Great Pictu...

Page 10: ...mbination of the pre flashes and main flash ensures the optimal exposure setting for the camera The reach of the inner camera s flash is limited to 3 so we highly recommend you get the SeaLife External Flash for the brightest most colorful pictures Flash mode In order to reduce underwater backscatter spots that show up in pictures caused by tiny particles in the water and get more vivid colors we ...

Page 11: ...e With a little experimenting you will quickly be on your way towards great digital pictures to share with your friends and family Your computer It s easy to connect the camera to your computer to download pictures edit pictures and print or email pictures Download The USB connection will quickly transfer pictures from your camera to your computer Please refer to the detailed instructions on page ...

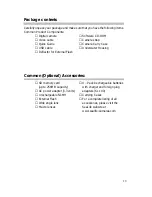
Page 12: ...se USB cable Underwater Housing Deflector for External Flash Common Optional Accessories SD memory card 4 Pack Rechargeable batteries up to 256MB capacity with charger and foreign plug AC power adapter 3 3 volts adapters SL 190 4 rechargeable NI MH Carrying Cases External Flash For a complete listing of all Wide angle lens accessories please visit the Macro lenses SeaLife website at www sealife ca...

Page 13: ...switch 5 Flash 6 Lens 7 Strap eyelet 8 Jack cover 9 DC IN jack 10 USB connector 11 Self timer light Focus switch Macro Land 2 3 55cm to 90cm underwater n a Portrait Land 3 6 90cm to 1 8m underwater n a Landscape Seascape Land 6 to infinity 1 8m to infinity underwater 3 5 to infinity 107 cm to infinity ...

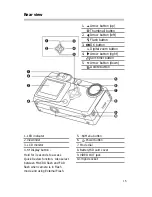
Page 14: ...AR flash when camera is in Flash mode and using External Flash 5 Menu button 6 Power button 7 Mode dial 8 Battery SD card cover 9 VIDEO OUT jack 10 Tripod socket 15 Rear view 1 Arrow button up Thumbnail button 2 Arrow button left Flash button 3 OKOK button Digital zoom button 4 Arrow button right Self timer button 5 Arrow button down Delete button ...

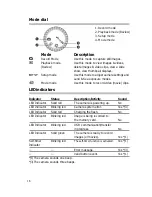
Page 15: ...dicators Indicator Status Description Activity Sound LED Indicator Solid red The camera is powering up No LED Indicator Blinking red Camera system error Yes 3 LED Indicator Solid red Charging the flash No LED Indicator Blinking red Image is being recorded to the memory card No LED Indicator Blinking red USB communication transfer in progress No LED Indicator Solid green The camera is ready to reco...

Page 16: ...t Cloudy Sunset Tungsten Fluorescent 8 External Flash Exposure Modes Macro For correct image exposure inside 2 feet 60cm shooting distance when using External Flash FAR For correct image exposure beyond 6 feet 1 8m shooting distance when using External Flash 9 Possible number of shots at the current size and quality settings 10 Image size 2048 x 1536 pixels 1024 x 768 pixels 640 x 480 pixels 11 Im...

Page 17: ...rs are displayed when playing images back 1 Battery level Full battery power Medium battery power Virtually no battery power 2 Protect indicator 3 DPOF indicator 4 Folder number and image number 5 Card indicator These indicators are displayed when playing video clips back 1 Movie mode 2 Battery level Full battery power Medium battery power Virtually no battery power 3 Count 4 Folder number and ima...

Page 18: ... using the batteries for an extended period of time remove them from the camera to prevent leaks or corrosion Never use manganese batteries Never use different types of batteries together or mix old and new batteries Using the AC power adapter optional accessory 1 Make sure the camera is off 2 Open the DC IN jack cover and connect one end of the AC power adapter to the DC IN jack on the camera 3 C...

Page 19: ...battery SD card cover To remove the SD memory card make sure the camera is off Open the battery SD card cover Press lightly on the edge of the memory card and it will eject To prevent valuable data from being accidentally erased from an SD card you can slide the write protect tab on the side of the SD memory card to LOCK To save edit or erase data on an SD memory card you must unlock the card Atta...

Page 20: ...h Español Portugués Italiano and Setting the date and time Follow these steps to set the correct date and time 1 Turn mode dial to Setup mode 2 Select Date Setup from menu option 3 Enter the values of the year month day and time fields by using the button Press OK after all field is set To increase a value press the button To decrease a value press the button It is necessary to set the date time a...

Page 21: ...ower on the camera 2 Press the button on the rear side of the camera The Record menu appears 3 Select Image size or Quality by using the button 4 Press the button Select the image size or image quality you prefer by using the button 5 Press OK to confirm To exit the menu screen press the button The table below shows the approximate shots that you can take at each setting based on 8MB internal memo...

Page 22: ... turned on when Digital Zoom is used Using the viewfinder 1 Open the lens cover 2 Turn the mode dial to the mode 3 Turn the camera on by pressing the button 4 Compose your shot in the viewfinder 5 Check camera ready light is green 6 Press and hold the shutter button until camera takes picture 7 The picture you took will appear on the LCD display for 3 seconds with the message Delete this If you pr...

Page 23: ...function Using the LCD monitor for an extended period of time may reduce the number of shots you can take To conserve battery power and increase the number of shots you can take turn the LCD monitor off and use the viewfinder instead Always use the image LCD for macro shots to avoid parallax error The LCD monitor must be on when Digital zoom is to be used Setting Seascape focus for Land Sea pictur...

Page 24: ...y result in parallax error For land pictures taken at 3ft shooting distance take pictures in portrait and macro focus setting and compare the results After a macro shot is taken DO NOT FORGET to reset the lens to the landscape position We do not recommend setting focus to macro for underwater pictures Use Landscape Seascape focus for underwater We do not recommend setting to focus to portrait for ...

Page 25: ...tton 3 Press OK to activate 2X digital zoom function The 2X icon appears on the LCD monitor To cancel the digital zoom function press OK again 4 Press the shutter button to capture a zoomed image You can only set the digital zoom at the resolution of 1600x1200 pixels digital zoom is not available at the resolution of 800x600 pixels When you play back a digitally zoomed image the image size is 800x...

Page 26: ...e camera takes an image To cancel self timer photography at any time press the shutter button to disrupt the sequence Flash setting can only be changed in Land or Sea Exposure modes not in External Flash mode In External Flash exposure mode the camera s flash will always fire After one shot is taken the self timer mode is turned to off Using the flash The flash is designed to function automaticall...

Page 27: ...g the red eye Select this mode when taking pictures of people and animals in low light conditions Fill Flash on The flash will always fire regardless of the surrounding brightness Select this mode for recording images with high contrast backlighting and deep shadows Also known as forced flash Flash Off The flash will not fire Select this mode when taking images in a place where flash photography i...

Page 28: ...nu To take pictures manually 1 Open the lens cover turn the mode dial to mode and power on the camera 2 Press the button 3 Move to Exposure White balance or ISO by using the button 4 Press the button to enter the sub menu 5 Change the settings by using the button and then press OK 6 Compose the picture 7 Press the shutter button For more details on how adjusting the above settings effect the pictu...

Page 29: ...the button To view the previous image press the button To view the next image press the button Pressing the button displays detailed information about the picture such as image size ISO speed time and date If there is no image stored in the internal memory or on the memory card NO IMAGES message will appear on the LCD monitor You can also view your images on the TV screen Connect one end of the vi...

Page 30: ... to the mode and power on the camera 2 Select the image that you want to view by using the button 3 Enlarge the image by pressing OK Pressing OK once magnifies the image to 2X Pressing it again magnifies the image to 4X 4 To view the different portion of the enlarged image press the button 5 To return to the regular display from 4X enlarged status press OK again ...

Page 31: ...lide show function enables you to play your images back automatically in sequential order as a slide show This is a very useful and entertaining feature for reviewing recorded images and for presentations 1 Turn the mode dial to mode and power on the camera 2 Press the button and move to Slide show by using the button 3 Press the button 4 Set the playback interval by using the button and then pres...

Page 32: ...e button to select One image and then press the button Once the image video clip is protected the protection icon will display on the protected image video clip To protect all images select All images in this step 5 Select Lock by pressing the button and then press OK Once the image video clip is protected the protection icon will display on the protected image video clip Removing protection from ...

Page 33: ...ssing the button and then press OK The DPOF icon will appear on the DPOFsetimage The DPOF menu options Quantity sets image quantity from 0 9 Deleting images video clips To delete one image video clip at a time use the button on the rear side of the camera To delete all images video clips at once go to Delete all in the Playback menu To delete one image video clip at a time 1 Turn the mode dial to ...

Page 34: ...ress the shutter button when DELETE THIS is displayed To delete all images video clips at once 1 Turn the mode dial to mode and power on the camera 2 Press the button on the rear side of the camera 3 Select Delete all by using the button 4 Press the button 5 Select Yes by using the button and then press OK A progress bar displays showing the process of deletion After that No image pops up Turn the...

Page 35: ...s LCD and the LCD monitor 2 You can start recording a video clip by pressing the shutter button The elapsed time displays on the LCD monitor while recording a video clip To stop recording press the shutter button again In movie mode resolution quality macro self timer cannot be set or activated In movie mode the flash mode is automatically set to OFF If the low light message appears on the LCD use...

Page 36: ... the button Pressing OK or the button while playing back the video clip will change the status as follows The zoom function cannot be activated while playing the video clip back To play the video clip back on the computer we recommend that you use the QuickTime Player This software is free of charge compatible with Mac and Windows computers and can be downloaded from the Apple Web site at www appl...

Page 37: ...39 Step 2 Connecting the camera to your computer see page 39 Step 3 Downloading images video clips see page 40 System requirements System requirements Windows Macintosh CPU Pentium 166 MHz processor PowerPC G3 G4 or higher OS Windows 98 98SE Me 2000 XP OS 8 6 or later Memory 32MB RAM 32MB RAM 64MB recommended 64MB recommended Free Space on 128 MB hard disk space 128 MB hard disk space Hard Disk Re...

Page 38: ...er the com puter will automatically recognize the camera and load its own USB drivers 1 Insert the CD ROM packaged with the camera into the CD ROM drive 2 Select and double click Digital Camera Driver Installer 3 Select Install Location and click Install 4 Follow the on screen instructions to complete the installation and restart your computer Step 2 Connecting the camera to your computer 1 Connec...

Page 39: ...e folder s Select the images that you want then choose copy from the Edit menu Open the destination location and choose Paste from the Edit menu You may also drag and drop image files from the camera to a desired location For computers running Mac OS Open the untitled disk window and the hard disk or the destination location Drag and drop from the camera disk to the desired destination It is recom...

Page 40: ...s amazing program To install MGI PhotoSuite 1 Insert the CD ROM packaged with the camera into the CD ROM drive The welcome screen appears 2 Click Install MGI PhotoSuite Follow the on screen instructions to complete the installation To use MGI PhotoSuite to edit and retouch your recorded images please refer to the on line help of this software as a guide For Windows 2000 XP users make sure to insta...

Page 41: ...interface will let even a novice get great results in minutes To install MGI PhotoVista 1 Insert the CD ROM packaged with the camera into the CD ROM drive The welcome screen appears 2 Click Install MGI PhotoVista Follow the on screen instructions to complete the installation To use MGI PhotoVista to create spectacular 360 panoramic images please refer to the on line help of this software as a guid...

Page 42: ...at you have Acrobat Reader installed on your computer For Windows users 1 Insert the CD ROM that came with the camera into your CD ROM drive The welcome screen appears 2 Click Install User s Manual Follow the on screen instructions to complete the installation For Mac users 1 Insert the CD ROM packaged with the camera into your CD ROM drive 2 Select and double click Manual 3 Select and double clic...

Page 43: ...stall Acrobat Reader Follow the on screen instructions to complete the installation For Mac users 1 Insert the CD ROM that came with the ca mera into your CD ROM drive 2 Select and double click Acrobat Reader 3 Select and double click the language you prefer 4 Double click Reader Installer 5 Follow the on screen instructions to complete the installation ...

Page 44: ... scene automatically However when the sub ject is too dark or too bright you can manually adjust the camera to make the subject appears brighter or darker This is called EV compensa tion The EV compensation of your camera can be adjusted from 1 8EV to 1 8EV To select the EV compensation you wish first press the button Then increase or decrease the EV compensation depending on what you need by usin...

Page 45: ... tungsten lighting condition Fluorescent records under fluorescent lighting condition Digital zoom You can take shots with the digital zoom by activating the digital zoom function To enable this option first press the button Then select On by using the button and press OK ISO The ISO speed decides the sensitivity to the lights The higher the ISO number is the more sensitive it is to the lights Whe...

Page 46: ... or decrease the LCD brightness depending on what you need by using the or the button and press OK Movie menu You can use the Movie menu to adjust expo sure white balance ISO speed or LCD bright ness To access the Movie menu turn the mode dial to mode and then press the button Scroll through the menu options by using the button For more information about Exposure White balance ISO or LCD bright ne...

Page 47: ...e video clip in PLAYBACK MODE Delete all Refer to Delete images video clips in PLAY BACK MODE Slide show Refer to Slide show display in PLAYBACK MODE LCD brightness Refer to LCD brightness in the Record menu DPOF Refer to Setting DPOF in PLAYBACK MODE Copy to card This feature allows you to copy your images from the camera s internal memory to a memory card However you can only do this when the me...

Page 48: ... unique camera offers the option to set the exposure program for land or sea underwater use Land select LAND mode when using camera on land above water Sea select SEA mode when using camera inside underwater housing underwater Flash select FLASH mode when using camera inside underwater housing with one or two external flash es Camera is not waterproof and requires the use of the underwater housing...

Page 49: ... period of time while the camera is powered on the camera will switch to an idle mode and even tually turn itself off to conserve power Inactivity period Inactivity period Camera status batteries AC power adapter 60 seconds 60 seconds stay idle 3 minutes 30 minutes shut off If the camera is idle re activate the camera by pressing any button or switch the mode dial If the camera has powered off you...

Page 50: ...compensation 0 0 Slide show delay 3 seconds Auto power off 3 minutes Beep On LCD Monitor On Digital Zoom Off Date Imprint Off Date type You can select the date type that is imprinted on your image To set the date type first press the button Then select one date type you prefer by using the button and press OK Y M D D M Y M D Y Date setup After removing the batteries from the camera the date and ti...

Page 51: ...To set this option first press the button Then select the button and press OK NTSC select this format when located in the U S A Canada Japan Korea Taiwan Central America or Mexico PAL select this format when located in Australia Austria Belgium China Denmark Finland Germany Great Britain Holland Italy Kuwait Malaysia New Zealand Singapore Spain Sweden Switzerland Thailand or Norway Language This o...

Page 52: ...53 CONNECTING THE CAMERA TO OTHER DEVICES ...

Page 53: ...Manual 1 8 1 8EV 0 3EV step Exposure Program Land Sea or External Flash White balance Auto Manual Daylight Cloudy Sunset Tungsten Fluorescent Compressed format JPEG Motion JPEG for video clip Standards JPEG EXIF 2 1 DPOF 1 1 DCF 1 1 M JPEG Interface DC IN jack USB connector VIDEO OUT jack NTSC or PAL Operating environment Operation 0 C 40 C 15 90 humidity Storage 20 C 80 C 10 95 humidity Power 2 x...

Page 54: ... power shutter and LCD on off for Dive Easy housing Accessory mount for adding one or two external flash es Snap on lens port to quickly attach macro or wide angle lens Leak check window let s you see if housing leaks while underwater DC310 SeaLife Reefmaster Advanced Housing SL113 All the above DC300 features plus 9 button controls and Mode dial Controls power shutter LCD on off menu and navigati...

Page 55: ...fully close lid to seal housing Make sure O ring does not slip out of the groove when sealing Press lid firmly and tightly down into housing to ensure a waterproof seal 5 Never let any moisture or dirt get inside housing when opening Only open and load the housing in dry cool air such as inside an air conditioned room 6 For great underwater pictures you need Clear water conditions control your buo...

Page 56: ...ean o ring before every use Replace o ring if damaged If O ring needs to be replaced contact the SeaLife Service Center at 856 866 9192 Open view of housing The housing uses one O ring to form a waterproof seal Contact SeaLife Service Center if O ring is damaged and requires replacement ...

Page 57: ...s become trapped under O ring If O ring must be removed use the other end of the cleaning brush to lift up O ring and remove Carefully inspect O ring for cuts and damage If this O ring is removed make sure it is carefully replaced Do not twist or stretch O ring O ring must be pushed into it s groove Be careful not to pinch O ring when closing housing Each button assembly has an O ring to keep a wa...

Page 58: ...59 SeaLife ReefMaster Underwater Camera Housing Front View ...

Page 59: ...L113 External Flash Exposure control When camera is set to External Flash mode press the LCD button to select between Macro Flash for optimal exposure of pictures inside 2 shooting distance Far Flash for optimal exposure beyond 6 shooting distance Monitor frame for attaching optional sunshade ...

Page 60: ... Select between Record Playback Movie and Set Up modes Left Flash Up thumbnails Right Timer OK External Flash Exposure control When camera is set to External Flash mode press the LCD button to select between Macro Flash for optimal exposure of pictures inside 2 shooting distance Far Flash for optimal exposure beyond 6 shooting distance ...

Page 61: ...extend housing lid beyond its stop point or damage may occur to the hinge area 2 Carefully inspect O ring for damage and make sure O ring is firmly seated in its groove If O ring is damaged and requires replacement contact SeaLife Service Center For service details see page 58 3 Clean the housing glass lens port using clean dry cotton cloth It is recommended to apply anti fog solution to the insid...

Page 62: ...ra power on 2 Press the shutter button on the top of the housing to take a test picture 3 The power or shutter button should have a smooth action and return to its original resting position after pressing It is normal to feel some resistance when pressing the power and shutter button 4 Press and hold power button to turn camera power off It is recommended to leave camera power off until you re rea...

Page 63: ...the housing may cause fogging 5 If you must open the housing while on the dive boat make sure you and the housing are perfectly dry before opening the housing Do not allow the inside of the housing or the camera to get wet Cleaning housing after use 1 The sealed housing must be thoroughly cleaned with fresh water before opening Never let salt water dry on housing Salt crystals may damage the O rin...

Page 64: ...ns use your stretched out arm as a measuring tool to keep your minimum shooting distance of 2 feet 0 6 meters When not using Macro lens maintain a minimum shooting distance of 3 5 feet 1 meter Remember that light does not travel very far underwater so the closer you are to your subject the more colorful the pictures will be For the best most colorful pictures we advise using the optional External ...

Page 65: ...nity Field of view about 50 larger The above shooting distance only apply to the DC200 and DC310 digital camera with focus set to Seascape SeaLife film cameras will have different shooting distances The 8X and 16X Macro lenses are sold in a set that also includes the extendable and collapsible distance measuring device Macro Wand Set item SL959 7 Use the SeaLife External Flash to enhance color and...

Page 66: ...y Ni MH battery exposed to water or moisture See specific warning on battery Lithium Lithium AA batteries are suitable for the SeaLife digital camera AA Lithium batteries typically will last 5 times longest cost the most and are not recharge able Standard and High Energy Alkaline Do not use alkaline batteries like Duracell Coppertop since they may only last about 10 minutes in the SeaLife Digital ...

Page 67: ... underwater pictures in 40 Minutes 4 Wait for 2 hours then repeat step 2 and step 3 5 Then repeat 3 Extreme conditions designed to test the power consumption in the most extreme operating conditions 1 Turn camera on Set to External FLASH mode Put in housing close housing 2 Take picture intervals as quickly as possible display always ON FLASH always fires Battery Life during Life during Type NORMAL...

Page 68: ...tion Camera driver not installed Install camera driver CD page 39 No Video Connection Improper connection to TV Connect video cable to video IN jack of TV or VCR and change TV VCR to video in channel Poor Video connection Video cable not fully inserted into camera or TV Make sure video cable is completely inserted into video jack of camera until it clicks Also check that connection to TV VCR is co...

Page 69: ... only approved quality SD cards Reformat SD card will delete pictures Defective internal memory Reformat memory this will delete pictures in memory Using camera with low battery power Replace with freshly charged batteries Image number indicator does not count down This may occur depending on actual memory available N A Housing leaks water O ring not clean or is damaged Perfectly clean main O ring...

Reviews: