background image

Using the Optional Power Adapter

1. Open the connector cover and connect one end of the power adapter to the 

DC 6V IN port as illustrated. 

2. Connect the other end of the power adapter to a power outlet.

Use only the specified batteries or AC power adapter specified for use with 
this camera.  The use of other power sources may cause a fire.

Loading the CompactFlash™ Card (optional accessory)

The camera has 8MB of internal memory used to store pictures in 
memory.  You can also use CompactFlash memory cards to store more
pictures.

To load the CF card, perform the following:

1. Make sure to turn off the camera. 

2. Open the CF card slot cover and then insert a CF card as indicated by the arrow.

3. Close the CF card slot cover. The lower LED on back of camera will light up green 

indicating that the CF card is inserted correctly.

Inserting CF card with power on may permanently damage the memory card and result in lost images.

Insert CF card slowly and straight, but not with force.

Setting the Date and Time (not shown)

With camera power turned ON switch to LAND & SEA and the Setup menu appears. Use the (

/

) button

to select DATE/TIME.  Press the OK button to change DATE/TIME.  The cursor skips to the data field.  Use
the arrow buttons (

/

) to adjust DATE/TIME.  Press OK button to move to next DATE/TIME field.  For more

details, please refer to page 26.

9

PIONEERmanREV  11/19/01  6:00 PM  Page 9

Summary of Contents for Reefmaster DC100

Page 1: ...PIONEERmanREV 11 19 01 6 00 PM Page 1 ...

Page 2: ...ure up to 10 per day Store batteries in plastic bag or container in refrigerator or cool dry place 4 Follow the correct computer connect sequence to download pictures Only for Windows 98 you need to install the driver using the enclosed CD You need to install the Photo Suite Imaging Software only if you do not want to use your existing picture editing software First power up computer and connect U...

Page 3: ...terference to radio or television reception detectable by turning the equipment in question off and on the user is encouraged to try to correct the interference by one or more of the following measures Reorient or relocate the receiving antenna Increase the distance between the equipment and the receiver Connect the equipment to an outlet on a different circuit than that which the receiver is conn...

Page 4: ...d Turn the camera off and then disconnect the power source batteries or AC power adapter If you are using the AC power adapter unplug the adapter from the AC power outlet after you have disconnected the camera Then contact your local SeaLife authorized service facility Do not continue to use the camera as this may cause a fire or an electrical shock Be careful when handling wet camera Camera and b...

Page 5: ...ot attempt to modify this camera This may cause a fire or an electrical shock Do not remove the camera casing This may cause an electrical shock Internal inspection maintenance and repairs should only be carried out by your local authorized SeaLife service facility Do not touch camera charger or AC adapter during a thunderstorm if you are using the AC power adapter This may cause an electrical sho...

Page 6: ...use a fire Always use the camera and its accessories in well ventilated locations Handle the camera carefully and do not bump the camera into any hard object Handling the camera roughly may cause a malfunction Do not move the camera while it is attached to AC adapter USB or video cable If you are using the AC power adapter unplug the adapter from the AC power outlet after you have switched off the...

Page 7: ...g batteries into the camera check the polarity markings on the battery and to ensure that you insert the battery correctly Incorrect battery polarity may result in the batteries splitting or leaking and causing a fire injury or damaging of the battery compartment Remove the batteries if the camera will not be used for an extended period of time The batteries may leak and cause a fire injury or dam...

Page 8: ...the Power Supply 8 Loading the CompactFlash Card 9 Setting the Date and Time 9 Digital Camera Instructions Basic Operations 10 How to record an image 10 Digital zoom 10 Tips for picture taking 11 How to playback images 12 How to view image information and thumbnails 13 How to examine image details 13 How to delete images 14 How to set the focus 15 How to set the image resolution and quality 15 Res...

Page 9: ...o the Computer 29 Driver Installation 29 Downloading Images 29 Editing and Processing images 30 Using MGI PhotoVista 31 Additional Information 34 Names and Functions 34 LED Messages 37 Specification 38 Underwater Housing Instruction 39 Using and cleaning underwater housing 47 Great Pictures Made Easy 48 How to use charger 51 Battery selection guide 53 Trouble Shooting 55 Cautions Obey cautions in ...

Page 10: ...When using the SeaLife External Flash you must set the camera to the External Flash Mode The External Flash Mode does not use a Pre Flash since this would cause the external flash to fire during the pre flash and not during the primary flash If you are taking close up pictures in very low light or even total darkness with the SeaLife Macro lenses and you experience over flashing from a reflective ...

Page 11: ...nstructions on page 29 on how to connect your camera to the computer Editing You will enjoy picture editing with MGI Photo Suite but you can also use your own picture publishing program that you are familiar with First take pictures in the highest quality setting Then you can make adjustments to the image on your computer like cropping adjusting the picture size or some really creative special eff...

Page 12: ...ded MGI Photosuite Software with camera driver Included Included Instruction Manual Included Included Quick Start Guide Included Included Camera Pouch Included Included Strap for camera and housing Included Included Care Kit cleaning cloth swabs desiccant Included Included Optional Accessories Compact Flash Memory Card 32MB or 128MB Water resistant sports case External Flash one or two with mounti...

Page 13: ...ows 98SE 2000 Me XP Macintosh version 8 5 or higher Available USB port At least 32MB RAM 80MB available hard disk space CD ROM drive Color monitor 800x600 24 bit or higher recommended Microsoft Internet Explorer 4 0 or higher PIONEERmanREV 11 19 01 6 00 PM Page 4 ...

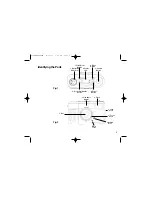
Page 14: ...cal 2 Flash 4 Focus Knob 2 Power Button 1 Shutter Button 3 Status LCD 4 Resolution Quality Button 5 Operating Mode Dial 6 Menu Button 7 Flash Mode Button LAND SEA Identifying the Parts Macro focus Standard focus 5 PIONEERmanREV 11 19 01 6 00 PM Page 5 ...

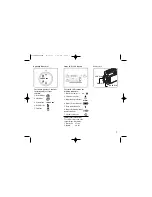
Page 15: ...Fig 3 Fig 4 8 LED 2 7 LED 1 2 Optical Viewfinder 3 Up Backward Self timer Button 4 Down Forward Button 5 OK Button 6 Monitor ON OFF Button 2 Tripod Socket 3 CF Cover 1 Battery Cover PIONEERmanREV 11 19 01 6 00 PM Page 6 ...

Page 16: ...ing indicators 1 Resolution Indicator 2 PC Mode Indicator 3 Image Quality Indicator 4 Battery Power Indicator 5 Flash Mode Indicator 6 Images Remaining Image Number Indicator 7 Self timer Indicator LCD Monitor not shown The LCD Monitor shows the current image information 1 Resolution 3 Time 2 Quality 4 Date USB Port DC IN Port Video Port Connectors LAND SEA LAND SEA 7 PIONEERmanREV 11 19 01 6 00 P...

Page 17: ...10 per day Store batteries in a plastic container in refrigerator or cool dry place Batteries may last about 2 hours with LCD on but actual time depends on how many pictures are taken if LCD is on or other factors Any of the following actions may cause the battery to split or leak resulting in fire or injury Do not attempt to charge alkaline batteries Do not carry or store a battery with objects s...

Page 18: ...o turn off the camera 2 Open the CF card slot cover and then insert a CF card as indicated by the arrow 3 Close the CF card slot cover The lower LED on back of camera will light up green indicating that the CF card is inserted correctly Inserting CF card with power on may permanently damage the memory card and result in lost images Insert CF card slowly and straight but not with force Setting the ...

Page 19: ...tor for usage 4 Press the Shutter button LED1 is blinking while capturing images Digital Zoom To record a zoom image perform the following 1 Set the camera to Record mode 2 Press the Monitor ON OFF button to turn on the LCD monitor 3 Press the OK button to activate 2X digital zoom function 4 Press the Shutter button Digital Zoom is only available at the high resolution of 1280x960 pixels Digital C...

Page 20: ...against your forehead while using the optical viewfinder to focus your shot Press and releasing Shutter Button Press the shutter button slowly and gently until you feel a click Keep your camera still while pressing the shutter button Continue holding camera steady until you hear the click sound of the camera taking a picture This can take up to 2 seconds depending on lighting conditions Practice n...

Page 21: ...of your camera 2 Connect the other end of the cable to the VIDEO IN port of your television 3 Turn on the camera and the TV Set the video output format before connecting to a TV See page 26 4 Set the camera to PLAY mode 5 Use the arrow buttons to forward backward through the recorded images To playback the image recorded in the CF card make sure the card is inserted To playback the images recorded...

Page 22: ...again to show thumbnail images 4 Use the arrow buttons to quickly locate the image you are searching and then press the OK or Display button to preview it at full screen How to examine image details Sometimes you may want the images to be enlarged on the LCD monitor to be carefully examined While in PLAY mode the OK button acts as a switch to cycle through 2X 4X and 1X magnification 1 Set the came...

Page 23: ...u press the arrow button the next picture will appear 5 Switch the operating mode dial to exit delete mode To delete the images recorded in the CF card make sure to insert the card before deletion To delete the images recorded in the camera internal memory remove the CF card The camera will not be able to read the internal data with an external memory card inserted You can browse through the recor...

Page 24: ...ty 640x480 pixels resolution with Super Fine Fine Normal quality To change the resolution quality setting perform the following 1 Power on the camera 2 Set the operating mode to RECORD 3 Press the Resolution Quality button Until you select the desired image resolution and quality setting The setting is conserved even if the camera power is off Always check focus setting before taking pictures to m...

Page 25: ... setting is conserved even if the camera power is off Resolution Quality Compression Number of Tips Ratio pictures with 8MB 1280x960 1280x960 1280x960 640x480 640x480 640x480 8 1 17 12 1 25 20 1 50 4 1 34 8 1 69 16 1 138 Ideal for printing larger pictures 8x10 recommended for most pictures Ideal for printing medium pictures 5x7 Ideal for printing small pictures 3x4 Ideal for emailing larger pictur...

Page 26: ...perform the following 1 Set the operating mode to RECORD 2 Press the Menu button The Record menu appears 3 Select the EV COMPENSATION item using the arrow button then press OK button 4 Select the desired exposure value using the arrow button then press OK button The effective range is from 1 8 to 1 8 in steps of 0 3 EV For more information on EV COMPENSATION see page 22 This setting is reset to 0 ...

Page 27: ... OK button For information on white balance see page 21 This setting is reset to AUTO when the camera power is off How to set the OSD On Screen Display language To set the OSD language perform the following 1 Set the operating mode dial to LAND SEA 2 The Setup menu appears 3 Select the LANGUAGE item Using the arrow button then press OK button 4 Select the desired language setting For information o...

Page 28: ... of the camera blinks at a rate relatively slow and then blinks rapidly for the last 3 seconds How to format the CF CompactFlash card This will delete all pictures stored on the flash card To format the CF card perform the following 1 Set the operating mode to LAND SEA The SET UP menu appears 2 Select the FORMAT MEDIA item using the arrow button then press OK button 3 Select YES default NO using t...

Page 29: ... change is made The setting is conserved even if the camera power is off QUICKVIEW If the LCD Monitor is on and QuickView mode is enabled a preview of the captured image is shown on the LCD Monitor as soon as the image is taken When the 3 seconds are over the LCD Monitor will return to viewfinder mode If the LCD Monitor is off but QuickView mode is enabled a preview of the captured image is tempor...

Page 30: ...er certain lighting conditions Select either one of the 5 Auto Sun Shade Fluorescent Tungsten manual white balance settings The auto white balance is recommended for most cases For certain critical circumstances if the result did not come out as expected you may manually change to another white balance type according to the ambient lighting condition Use the arrow buttons to move the cursor next t...

Page 31: ...mpensate value 1 8 1 8 Press the OK button again to make the change The cursor returns to the Record menu automatically when the change is made The setting is reset to AUTO when the camera power is off PLAY Mode In Play mode users can review the recorded images on the LCD Monitor or on a TV Set the operating mode to PLAY for image review PLAY MENU Press the Menu button in PLAY mode the Play menu a...

Page 32: ... cursor skips to data field Use the arrow buttons to toggle the YES or NO option Then press OK button to confirm DPOF Digital Print Order Format If you select the DPOF item all your image settings will be saved on the CF card Now a DPOF compatible printer will print images as specified in your setting after you insert the CF card into a printer DPOF User Interface You can use Shutter or Menu butto...

Page 33: ... 1 to 9 If you select PRINT SIZE use the arrow buttons to make change and then press OK to confirm and return to the DPOF submenu You can set the print size from PRINT STD 3X5 4X6 5X7 8x10 inch If you select PRINT INDEX use the arrow buttons to toggle ON or OFF and then press OK to confirm and return to the DPOF submenu You can select to print photo index or not If you select PRINT ENABLE use arro...

Page 34: ...lect the External Flash mode 1 Turn camera Power ON 2 Set the operating mode dial to LAND SEA The set up menu will appear 3 Use the arrow button to move cursor next to LAND SEA EXT FLASH 4 Press the OK button and the cursor will move to the data field at bottom of menu 5 Use the arrow button to select between LAND SEA or EXT FLASH mode and press OK button 6 Rotate operating mode dial to record to ...

Page 35: ... Traditional Chinese and Simplified Chinese Use the arrow buttons to move cursor next to language Press OK button and the cursor skips to the data field Use the arrow buttons to select the desired language setting default English Press the OK button again to make the change The cursor returns to the Setup menu automatically when the change is made SOUND This feature allows you to enable or disable...

Page 36: ...ides 2 different video output types for your selection NTSC and PAL Select the correct video type for your region e g NTSC TV or PAL TV The default setting is NTSC RESET TO DEFAULT Returns all the camera settings to the factory default settings Same as setting to LAND mode Use the arrow buttons to move cursor next to Reset to Default Press the OK button and cursor skips to the data field Use the a...

Page 37: ...e the arrow buttons to select the captured images you want to delete 4 Press the OK button to delete the displayed picture 5 Repeat the step 3 4 to continue the delete other images or switch the Operating Mode dial to exit Each image shown on LCD will also display file name and image number information at bottom of screen While in the delete mode you can browse the recorded images on the LCD Monit...

Page 38: ...The setup program starts Follow the on screen instructions to complete the software installation 3 Restart the computer recommended Windows 2000 ME and MAC version 8 5 or higher will automatically recognize camera so installing the driver is not necessary However installing driver will change name of mass storage device to Sealife camera Downloading Images to computer Follow the steps below to tra...

Page 39: ...use the program follow the steps below 1 Launch MGI PhotoSuite 2 Click the large Get button on the Welcome screen or the Get button on the Navigation bar 3 In the GET PHOTO menu click the computer button 4 Look in drive called removable disk All images are located in files under this drive Double click image to open and view 5 Now you are able to process your images with all the tools provided by ...

Page 40: ... and its intuitive interface will let even a novice get great results in minutes To use the program follow the steps below Step 1 Open Source Images in MGI PhotoVista MGI PhotoVista requires some overlap of source images to properly align them before a stitch For best results use a 20 to 50 overlap The number of photos you need to shoot to achieve this overlap depends on the lens type you re using...

Page 41: ...Panorama In Action Choose Show Viewer from the Panorama menu The Stitch Preview window changes to viewer mode Press and drag the pointer over the panorama vertically and horizontally Press SHIFT to zoom in or press CTRL to zoom out Close the viewer window when you re done to return to the preview stitch PIONEERmanREV 11 19 01 6 00 PM Page 32 ...

Page 42: ...ays the progress of the stitch Follow the procedure in Step 4 to view the panorama in action Step 6 Save a Panorama After Step5 you can save the panorama from the Stitched Result window as a BMP Flashpix FPX or JPEG file MGI PhotoVista also automatically creates an IVR file for you which you use to play the panorama 33 PIONEERmanREV 11 19 01 6 00 PM Page 33 ...

Page 43: ...AY modes While in RECORD mode press the Display button will toggle the LCD monitor On and Off In PLAY mode press the Display button to review the images in the following 3 modes 1 Single image display 2 Single image display with image information overlay 3 Multi image 3x3 thumbnail display Menu Button The Menu button is active in RECORD PLAY DELETE modes Press the Menu button to turn on the Record...

Page 44: ...Button Big red button The Shutter button is only active in RECORD and PLAY mode You may press the button in RECORD mode for image capturing processing and storing Before taking pictures please make sure that your camera has available free space for image storage and there is appropriate light for a successful image capturing In PLAY mode the shutter toggles between the DPOF printer setting Self Ti...

Page 45: ...heck the battery status by the battery power indicator on the LCD display Battery icon with 3 bars on The battery is fully charged Battery icon with 2 bars on The battery is partially charged should be recharged before diving Battery icon with 1 bar on Insert new or freshly recharged batteries Battery icon with no bars on The battery needs to be replaced there is no battery power remaining The cam...

Page 46: ...r SELF Timer Red On Self Timer IS ACTIVATED press shutter Yes Images Remaining Image Number Indicator The image number on the Status LCD may have different meanings in each mode RECORD Mode Shows the number of the minimum images that can be recorded in your camera with current settings LAND SEA Mode Shows the total amount of the recorded images in your camera PLAY DELETE Mode Shows the current ima...

Page 47: ... Status Number of Image Auto Red eye reduction Fill in Off 10 sec delay Auto Manual 0 3 EV step 1 8 1 8EV Auto Sun Shade Fluorescent Tungsten English Japanese German French Spanish Portuguese Traditional Chinese Simplified Chinese AC power port USB port Video Output NTSC or PAL 4X AA High Energy Alkaline Battery Ni MH Lithium AC DC Adapter CE FCC VCCI TSMI 105x66 5x48 mm about 190g without battery...

Page 48: ...inder Rubber grips yellow for high visibility slip proof adds shock resistance Optical glass lens port Stainless steel hardware corrosion proof Simple 2 button operation power and shutter delete button This housing is included with the Reefmaster Digital DC200 item SL121 SeaLife Reefmaster Digital Housing SL111 Depth rated and tested to 133ft 40M Rubber grips gray blue slip proof adds shock resist...

Page 49: ...g with fresh water after drying 4 Carefully close lid to seal housing Make sure O rings do not slip out of the groove when sealing Press lid firmly and tightly down into housing to ensure a waterproof seal 5 Never let any moisture or dirt get inside housing when opening Only open and load the housing in dry cool air such as inside an air conditioned room 6 For great underwater pictures you need Cl...

Page 50: ...n coated permanent Do not wipe off Teflon coating Only use cleaning brush to clean Replace Teflon O ring after every 50 dives We suggest you record camera usage and maintenance in your log book 41 PIONEERmanREV 11 19 01 6 00 PM Page 41 ...

Page 51: ... other objects become trapped under O ring If O ring must be removed use the other end of the cleaning brush to lift up O ring and remove Carefully inspect O ring for cuts and damage If this O ring is removed make sure it is carefully replaced Do not twist or stretch O ring Lid O ring must be pushed into it s groove Be careful not to pinch O ring when closing housing The underwater housing uses on...

Page 52: ...Opening tab 43 PIONEERmanREV 11 19 01 6 00 PM Page 43 ...

Page 53: ...44 PIONEERmanREV 11 19 01 6 00 PM Page 44 ...

Page 54: ...sing lid beyond its stop point or damage may occur to the hinge area 2 Carefully inspect O rings for damage and make sure O ring is firmly seated in its groove If O ring is damaged and requires replacement contact SeaLife Service Center For service details see page iii 3 Clean the housing glass lens port using clean dry cotton cloth It is recommended to apply anti fog solution to the inside surfac...

Page 55: ... button on the outside of the housing to take a test picture 3 The power or shutter button should have a smooth action and return to its original resting position after pressing It is normal to feel some resistance when pressing the power and shutter button 4 Press and hold power button to turn camera power off It is recommended to leave camera power off until you re ready to use camera to preserv...

Page 56: ...open the housing while on the dive boat make sure you and the housing are perfectly dry before opening the housing Do not allow the inside of the housing or the camera to get wet Cleaning housing after use 1 The sealed housing must be thoroughly cleaned with fresh water before opening Never let salt water dry on housing Salt crystals may damage the O rings lens and attract moisture 2 Never let wat...

Page 57: ...se your stretched out arm as a measuring tool to keep your minimum shooting distance of 2 feet 0 6 meters Remember that light does not travel very far underwater For best pictures use a 3X Macro Lens at distances from 12 to 36 inches 30 to 90 cm 3 Move calmly and control your buoyancy before taking a picture It is very hard to take good pictures when you are moving Look around for great picture op...

Page 58: ... set 10 to 13 25 to 33 cm Macro 16X lens filter SL959 set 7 to 10 18 to 25 cm 20 mm Wide angle lens SL970 1 30 cm to infinity Field of view about 50 larger The above distance only apply to digital camera SeaLife film cameras will have different shooting distances The 8X and 16X Macro lenses are sold in a set that also includes the extendable and collapsible distance measuring device Macro Wand Set...

Page 59: ...Step I and as introductory course at your dive store Step two Basic Underwater Photography skills You will learn to take great pictures with a basic underwater camera Learn about underwater varying light conditions how to use an external flash to wake up intense colors and the habi tats of our strange and colorful sea creatures Step Three Advanced Underwater Photography Skills Here we explore in d...

Page 60: ...ther non rechargeable battery in charger Never insert batteries into charger with polarity and reversed Remove charge from outlet after charging is complete Do not leave charger plugged into outlet when not in use To prevent fire and risk of electric shock do not remove the cover or back of charger Do not use charger if charger comes in contact with water even after it dries Do not charge battery ...

Page 61: ...r international outlets select appropriate plug adapter 3 The charging indicator light will turn orange while batteries are charging When charging is complete indicator light turns green 4 Once charging is complete remove charger from wall outlet and remove batteries from charger 5 Always use freshly charged batteries Batteries can discharge at room temperature up to 10 per day Store batteries in ...

Page 62: ...sed to water or moisture See specific warning on battery Lithium Lithium AA batteries are suitable for the SeaLife digital camera AA Lithium batteries typically will last the longest cost the most and are not rechargeable Standard and High Energy Alkaline Do not use alkaline batteries like Duracell Coppertop since they may only last about 10 minutes in the SeaLife Digital Camera If you cannot use ...

Page 63: ... 40 Minutes 4 Wait for 2 hours then repeat step 2 and step 3 5 Then repeat 3 Extreme conditions designed to test the power consumption in the most extreme operating conditions 1 Turn camera on Set to External FLASH mode Put in housing close housing 2 Take picture intervals as quickly as possible display always ON FLASH always fires Battery Life during Life during Type NORMAL dive use EXTREME usage...

Page 64: ...ow PC connection time Give at least 5 minutes for some PC s to establish connection Camera driver not installed Install camera driver CD page 29 No Video Connection Improper connection to TV Connect video cable to video IN jack of TV or VCR and change TV VCR to video in channel Poor Video connection Video cable not fully inserted into camera or TV Make sure video cable is completely inserted into ...

Page 65: ... Use only approved quality CF cards Reformat CF card will delete pictures Defective internal memory Reformat memory this will delete pictures in memory Using camera with low battery power Replace with freshly charged batteries Image number indicator does not count down This may occur depending on actual memory available N A Housing leaks water O ring not clean Perfectly clean main O rings Inspect ...

Page 66: ...Pioneer Research Manufacturers of SeaLife Cameras 97 Foster Road Moorestown NJ 08057 856 866 9191 www pioneer research com www sealife cameras com PIONEERmanREV 11 19 01 6 00 PM Page 57 ...

Reviews: