background image

35

XVI.  Parts and Service

SeaLife warrants the original purchaser of this product, for a
period of one (1) year from the date of purchase, that the product
is free from defects in workmanship and materials. For a detailed
warranty statement, please refer to the warranty information
included with the product.
In the event the original purchaser believes there is a defect in a
product, it is recommended that the purchaser first visit

www.sealife-cameras.com

for updates on troubleshooting and

technical tips and advice. The website also includes detailed
information on how to get repair service. 
If it is determined that the product requires servicing, a return
authorization number will be issued. Please contact your local
SeaLife dealer or the importer in the country where the product
was purchased for return information. 
Your local authorized SeaLife Dealer can also assist with product
servicing and ordering replacement parts. The SeaLife website
contains a list of authorized dealers and importers for your country.

Pioneer Research, 97 Foster Road, Moorestown, NJ 08057 USA

www.sealife-cameras.com

Summary of Contents for Sea Dragon flash

Page 1: ......

Page 2: ...d flash brightness 16 19 VIII External Flash adjustments 20 22 IX Maintaining a waterproof seal 23 X Care and maintenance 24 XI Replacing the O rings 25 XII Expanding your Flex Connect Lighting System 26 27 XIII Great pictures made easy 28 30 XIV Troubleshooting Guide 31 33 XV Specifications 34 XVI Parts and service 35 http www sealife cameras com service manuals html Español Deutsch Français Ital...

Page 3: ...lube Install new fully charged batteries and test fire flash If flash does not operate properly please contact your local SeaLife dealer or the SeaLife service center in your country Do not attempt to disassemble or access the electronic circuitry for any reason The internal electronics uses high voltage components that may result in severe electrical shock Do not expose flash to heat or direct su...

Page 4: ...u Got Spare O rings SL98303 O ring Lube SL9807 O ring remover SL9808 Sea Dragon Case Small SL941 or Large SL942 Universal Flash Link Cable Adapter SL992 Sea Dragon Flash with attached diffuser optical cable grip and tray ...

Page 5: ...iffuser removable 4 Release buttons 5 Flex Connect grip 6 Tray 7 Mounting screw 8 Rubber friction pad 9 Battery cap 10 Pressure safety valve 11 Power On Off dial 12 Test button Auto Learn button Flash ready light 13 Brightness adjustment dial Auto and Manual 14 Flex Connect swivel connector ...

Page 6: ...teries according to the polarity markings 3 Align cap notch with key and screw on waterproof battery cap Lightly hand tighten Do not overtighten using excessive force or tools Important Make sure o rings are perfectly clean undamaged and lightly lubed See page 23 for important information on maintaining a waterproof seal ...

Page 7: ...the mounting screw Do not over tighten Important Only attach the flash to cameras housings with minimum thread depth of 0 28 7 2 mm and using standard 1 4 20 tripod type thread Never force or over tighten the screw or you may damage the housing seal and threads ...

Page 8: ...rnal flash should come with the optical cable already attached to the flash head but it is good to know how the cable can be removed and re attached 1 Turn the cable locking screw counter clockwise by about 2 rotations to loosen the clamping effect of the lock Do not remove the locking screws 2 Insert the optical cable into the hole of the cable lock until the cable stops make sure cable is pushed...

Page 9: ...grooves so you can add another cable when using two flashes 2 Attach the Flash Link adapter around the lens and push down until it locks firmly into place There are two small locking mechanisms located on the outer edge of the adapter that should lock in to the camera housing Make sure the adapter is oriented so it is aligned with the recessed flash window 3 Once the cable and adapter is firmly at...

Page 10: ...dhesive backed hook and loop fastener Step 2 Remove adhesive backing strips and firmly attach above and below the flash window of the underwater housing Make sure housing surface is clean and dry Step 3 Unscrew cable adapter assembly and insert the larger half through the hole of the hook n loop fastener as shown Make sure the hook side of the fastener is facing towards the wide end of the adapter...

Page 11: ...ools Step 6 Attach fastener with cable to underwater housing so the cable is centered over the flash window Step 7 User scissor to cut away excess fastener material Important Leave enough fastener material so it completely covers the flash window or else the stray light escaping from the flash window may cause backscatter Connecting Flash Link optical cable to NON SeaLife cameras continued ...

Page 12: ...12 Secure the Flash Link optical cable to the Grip Fasten optical cable by pushing into groove along inside of grip ...

Page 13: ...mera battery ies are new or freshly charged before each dive 3 Set SeaLife digital cameras to External Flash mode 4 For Non SeaLife camera s do this a Set ISO to 100 or less if available but not Auto b Set White Balance to DAYLIGHT for better color c Set camera s flash to FORCE ON d Select the highest image resolution e Some cameras offer manual shutter and aperture controls which is recommended f...

Page 14: ...amera brands 1 Turn OFF flash power 2 Push and HOLD test button and power ON flash 3 The flash ready light will be blinking 4 With your camera connected to the optical cable and flash take a test picture Important Make sure your camera s flash is set to FORCE ON so it always fires 5 The flash ready light will stop blinking The flash is now synchronized to your camera ...

Page 15: ... on the back of the flash to Auto 2 Wait for the flash ready light to turn on A blinking flash ready light means the flash is recycling which takes a few seconds 3 Take a series of test picture while viewing the external flash from the side Don t look directly into the flash 4 The camera s flash and the external flash should be firing together 5 If the external flash is not firing at the same time...

Page 16: ...e best picture color and brightness Make sure you become familiar with these basic adjustments before you dive with your new external flash Overexposed picture Properly exposed picture Contrast and Colors are Good contrast with vibrant colors washed out You can adjust your camera setting and or external flash settings to achieve the best image exposure and color ...

Page 17: ...recommend starting with AUTO scene mode If your non SeaLife camera has an underwater scene mode don t use it These underwater modes are not intended for cameras using an external flash Read your camera s instruction manual to learn more about your camera s scene modes Experiment to find the best setting for you ISO setting The term ISO International Standards Organization relates to the ability or...

Page 18: ...or Ext Flash Auto mode and leave the EV Compensation at 0 Your SeaLife camera is pre programmed to automatically select the optimal EV value for underwater flash pictures For non SeaLife cameras start with an EV value setting of 2 and make adjustments as necessary to achieve the best results Avoid using EV values White Balance The camera s White balance setting will match your camera s image senso...

Page 19: ...will only fire if your camera s flash fires Manual exposure controls Some digital cameras include manual aperture and shutter speed controls which requires advanced knowledge of photography principles These controls are too advanced for this instruction manual For SeaLife cameras set the camera to Ext Flash mode or Ext Flash Auto mode The camera will automatically select the best aperture and shut...

Page 20: ...is over exposed white or washed out colors turn the power adjustment 1 or 2 steps clockwise to reduce the flash brightness and take another picture Do this until the image exposure is satisfactory If the test image is under exposed dark turn the power adjustment 1 or 2 steps counter clockwise to increase the flash brightness and take another picture Do this until the image exposure is satisfactory...

Page 21: ...the Auto setting consistently over or under exposes the picture it can be adjusted to increase or decrease average brightness If pictures are consistently over exposed white washed out turn power on set brightness dial to 1 dot between 2 and A and hold the TEST button down for 4 seconds The flash ready light will blink a few times indicating the the new Auto bright setting is saved in memory If pi...

Page 22: ... darker Remember that subjects appear closer underwater than they do on land so direct the flash a little over the intended target to compensate for this underwater effect About the Flash Diffuser The diffuser is used primarily for close up pictures to evenly illuminate the subject resulting in more vibrant colors Pull off the diffuser for shooting distances beyond 2ft 60cm ...

Page 23: ...o ring contact surfaces to remove any hair sand or debris 4 Carefully inspect the o ring for cuts tears or other damage Replace o rings if damaged 5 Lube O rings regularly Apply a small amount of silicone lube on your finger tip and wipe it around the O rings Wipe off excess lubricant The o ring surface should have shiny wet appearance Important Replace O rings every year if damaged or not Visit y...

Page 24: ...small holes located at the bottom of flex arm If using Flex Arms see page 26 for optional accessories 4 Dry off the flash with a towel Make sure you and the flash are dry before opening the waterproof battery cap 5 Remove battery before storing the flash 6 Allow flash to thoroughly dry before storage 7 Never use any detergents cleaners solvents or chemicals to clean the flash 8 Insert a fresh Mois...

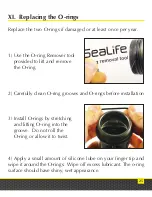
Page 25: ... O ring 2 Carefully clean O ring grooves and O rings before installation 3 Install O rings by stretching and lifting O ring into the groove Do not roll the O ring or allow it to twist 4 Apply a small amount of silicone lube on your finger tip and wipe it around the O rings Wipe off excess lubricant The o ring surface should have shiny wet appearance ...

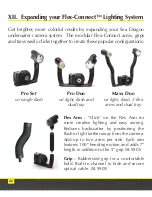
Page 26: ...n the Flex Arm for more creative lighting and easy aiming Reduces backscatter by positioning the flash or light farther away from the camera Add up to two arms per side Each arm features 100 bending motion and adds 7 length in addition to the 5 grip SL9901 Grip Rubberized grip for a comfortable hold Built in channel to hide and secure optical cable SL9905 Pro Set w single flash Pro Duo w light fla...

Page 27: ...fect fit for compact cameras Included with Sea Dragon 1200 Light or sold separately SL9902 Single Tray The standard single tray is ideal for medium size underwater cameras Included with Sea Dragon 2000 Light and Digital Flash or sold separately SL9903 Cold Shoe Mount a light or flash over the camera for the most compact lighting solution available Or use it to add a third light when using a dual t...

Page 28: ...cause low visibility and small spots to appear in your picture commonly referred to as backscatter Your external flash will help you reduce the backscatter effect because the flash only illuminates the outer rim of the floating debris As a general rule limit your shooting distance to 1 10 of the water visibility 2 Limit your shooting distance to 6 ft 1 8m Water is 800 times denser than air and qui...

Page 29: ...h controls There is no better way to learn than from your mistakes Become familiar with your camera controls so you can make quick adjustments depending on the conditions Take the time to practice and experiment with different settings Review your pictures and learn from your mistakes 5 Learn how to compose a good picture Once you have mastered how to control the brightness level exposure of your ...

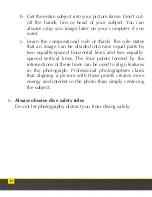
Page 30: ...ded into nine equal parts by two equally spaced horizontal lines and two equally spaced vertical lines The four points formed by the intersections of these lines can be used to align features in the photograph Professional photographers claim that aligning a picture with these points creates more energy and interest in the photo than simply centering the subject 6 Always observe dive safety rules ...

Page 31: ...ter in your country For a list of dealers please visit www sealife cameras com 2 External Flash fires when pushing TEST button but does not fire when triggered by camera a Make sure the power switch is set to ON position and the flash ready light stops blinking steady on b Take a test pictures and make sure your camera s inner flash fires c Check that your camera settings are correct Refer to page...

Page 32: ...s attached and secured b Check that your camera settings are correct Refer to page 9 12 for more information 4 The recycle time is very long a This is normally the result of low battery power The flash recycle time should not be more than 7 to 8 seconds when the flash is set to full power b Replace or recharge batteries if the recycle time is longer than 10 seconds c Remove diffuser for shooting d...

Page 33: ...ctivity of your subject c Check the brightness control setting Turn counter clockwise to increase flash brightness Turn clockwise to decrease flash brightness d The reflectivity of your subject will cause some areas to appear brighter than other areas For example dark coral needs more light than would white coral Adjust flash intensity accordingly 6 For updated trouble shooting information refer t...

Page 34: ...olor temperature 5700 degrees Kelvin Power source 4 AA batteries NiMH recommended Battery life 150 flashes Recycle time Instant recycle time when power setting is less than 1 2 power 5 seconds recycle time at full power fresh batteries Buoyancy Negative Housing material Fiber reinforced polycarbonate Hardware marine grade stainless steel Weight 18 ounces 509 grams Head w batteries Dimensions Head ...

Page 35: ...s com for updates on troubleshooting and technical tips and advice The website also includes detailed information on how to get repair service If it is determined that the product requires servicing a return authorization number will be issued Please contact your local SeaLife dealer or the importer in the country where the product was purchased for return information Your local authorized SeaLife...

Page 36: ......

Reviews: