background image

EN-24

Setting Image Resolution and Quality

As you get to know the digital camera, you can set the image resolution (number of 

vertical  and  horizontal  pixels)  and  image  quality  (compression  ratio)  based  on  the 

types of images you want to shoot. These settings affect the number of images that 

can be stored in memory, or on a memory card.

Higher resolution and higher quality images provide finer detail but cause the images 

file size to be larger.

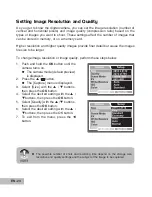
To change image resolution or image quality, perform these steps below:

1.   Push and hold the 

OK

 button until the 

camera turns on.

  The camera mode (default preview) 

is displayed.

2.   Press the 

 /   button.

  The [Capture] menu is displayed.

3.   Select  [Size]  with  the 

  / 

  buttons, 

then press the 

OK

 button.

4.   Select the desired setting with the 

 / 

 buttons, then press the 

OK

 button.

5.   Select [Quality] with the 

 / 

 buttons, 

then press the 

OK

 button.

6.   Select the desired setting with the 

 / 

 buttons, then press the OK button.

7.   To  exit  from  the  menu,  press  the 


button.

 

The  possible  number  of  shots  and  recording  time  depend  on  the  storage  size, 

resolution and quality settings and the subject of the image to be captured.

Summary of Contents for SL320

Page 1: ...oof Shockproof Digital Sports Camera ReefMaster Mini SL320 ECOshot SL321 English Instruction Manual Go to www sealife cameras com service manuals html for ENGLISH FRANCAIS DEUTSCH ITALIANO and ESPANOL versions ...

Page 2: ......

Page 3: ...nications However there is no guarantee that interference will not occur in a particular installation If this equipment does cause harmful interference to radio or television reception which can be determined by turning the equipment off and on the user is encouraged to try to correct the interference by one or more of the following measures Reorient or relocate the receiving antenna Increase the ...

Page 4: ...cessories to suit their market requirements customer demographics and geographical preferences Products very often vary between retailers especially with accessories such as memory cards cables carrying cases pouches and language support Occasionally a retailer will specify a unique product color appearance and internal memory capacity Contact your dealer for precise product definition and included...

Page 5: ... cause fire or electric shock Consult the store of purchase Do not disassemble change or repair the camera This might cause fire or electric shock For repair or internal inspection ask the store of purchase Do not place the camera on inclined or unstable surfaces This might cause the camera to fall or tilt over causing injury Keep the batteries out of the reach of children Swallowing batteries might...

Page 6: ...es consult a physician to receive treatment A camera is a precision instrument Avoid drops impact or excessive force when handling the camera This might cause damage to the camera Do not remove the battery immediately after long period of continuous use The battery becomes hot during use Touching a hot battery might cause burns Do not wrap the camera or place it in cloth or blankets This might cau...

Page 7: ...ive and they are not rechargeable High energy alkaline batteries Avoid using the battery in extremely cold environments as low temperatures can shorten the battery life and reduce camera performance The battery may feel warm after long period of continuous use of the camera or the flash This is normal and not a malfunction The camera may feel warm after long period of continuous use This is normal ...

Page 8: ...he camera Wipe off any water or dirt with a dry cloth as soon as possible after using the camera Avoid opening the battery SD card cover at the beach or by the sea Wait until the camera is completely dry before changing the batteries or the SD memory card Avoid changing the batteries or card where the camera is likely to get wet or dirty and make sure that your hands are dry If the camera is very ...

Page 9: ...Power On Off 19 Choosing the Screen Language 20 Setting the Date and Time 21 Formatting an SD Memory Card or Internal Memory 22 PHOTOGRAPHY MODE 23 Shooting Images The Basics 23 Setting Image Resolution and Quality 24 Using the Zoom Function 26 Setting Focus 27 Using the Flash 28 Using the Flash in External Flash Mode 29 Using the Self Timer 30 Adjusting the Exposure EV Compensation 31 Setting Whi...

Page 10: ... PICTURES 51 Maintaining a waterproof seal 52 How to Install and Remove O ring 55 How to Install Deflector 56 Using and cleaning camera underwater 58 Great Underwater Pictures Made Easy 59 TRANSFERRING FILES FROM YOUR DIGITAL CAMERA TO COMPUTER 61 Step 1 Connect the digital camera to your computer 62 Step 2 Download images or video clips 63 EDITING SOFTWARE INSTALLATION 64 Installing Photo Explorer...

Page 11: ...EN 9 MENU OPTIONS 68 Camera Menu 68 Video Menu 71 Playback Menu 72 Setup Menu 73 SPECIFICATIONS 75 TROUBLESHOOTING 76 ...

Page 12: ...zoom 1x 4x 16MB internal built in memory 14MB available for image storage Images can be captured without using a memory card Support for SD memory card for memory expansion up to 1 GB Recommend using only SanDisk Panasonic or Toshiba brand SD cards USB connection USB 2 0 compliant Still images video clips or voice recording files that you have recorded can be downloaded to your computer using the U...

Page 13: ...tteries 1 x Desiccant capsule User s Manual USB Cable Software CD ROM Deflector for optional flash accessory Spare Oring item SL32018 Common Optional Accessories SD memory card Rechargeable AA batteries SeaLife Mini Wide Angle lens item SL973 SeaLife Digital flash item SL960D Moisture Muncher desiccant capsules For a complete listing of all optional accessories please visit an authorized SeaLife deal...

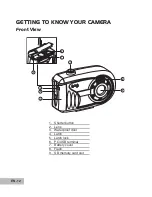
Page 14: ...EN 12 GETTING TO KNOW YOUR CAMERA Front View 1 2 8 4 5 9 6 3 7 1 Shutter button 2 Lens 3 Waterproof door 4 Latch 5 Latch lock 6 PC USB terminal 7 Battery cover 8 Flash 9 SD memory card slot ...

Page 15: ...imer button 2 Arrow button Up MENU button 3 OK button Power switch Digital zoom button 4 Playback button 5 Arrow button Right Flash button 6 Arrow button Down MODE button 7 Strap holder 8 Tripod socket 9 LCD monitor 10 Focus switch Macro mode Normal mode 11 Status LED ...

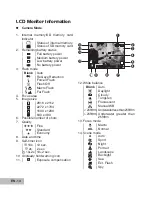
Page 16: ...us area 5 Image size 2816 x 2112 2272 x 1704 1600 x 1200 640 x 480 6 Possible number of shots 7 Quality Fine Standard Economy 8 Date and time 9 Self timer icon 10s 10 sec 2s 2 sec 10 2s 10 2 sec 10 Unsteady hold warning icon 11 Exposure compensation A 0 3 02 05 2006 08 03 12 White balance Blank Auto Daylight Cloudy Tungsten Fluorescent Manual WB 25ft 8m Underwater less than 25ft 8m 25ft 8m Underwa...

Page 17: ...tor if present 3 Battery power indicator 4 Playback information Video Playback 1 Playback mode 2 Video mode 3 Total of recorded time 4 SD memory card indicator if present 5 Battery power indicator 6 Playback indicator 7 Playback information 00 00 33 1 2 3 4 5 1 2 3 100 0001 Size EV 2006 02 10 2272 x 1704 0 3 10 26 0001 4 1 4 5 6 2 100 0002 Size EV 2006 02 10 320X240 0 3 09 34 0002 7 00 00 26 3 ...

Page 18: ...ientation as shown in the illustration 3 Close both the battery cover and waterproof door and lock the latch To remove the batteries turn the camera off before removing batteries and hold the camera with the waterproof door facing sideways then open the door Important Make sure that you and the camera are dry before opening the waterproof door Be careful not to drop the batteries when opening or c...

Page 19: ...e battery and battery SD card covers and lock the latch To remove the SD memory card make sure the camera is turned off Press lightly on the edge of the memory card and it will eject Important Use only SanDisk Panasonic or Toshiba brand SD memory cards up to 1GB in size Other brands and larger SD Memory cards may work fine but their compatibility and performance can not be guaranteed with the camer...

Page 20: ...e strap as shown in the illustration LED Indicators Color State During photography During connection to a PC Green Solid Ready for shot System ready Green Flashing Accessing files in progress Flash charging in progress Accessing files in progress ...

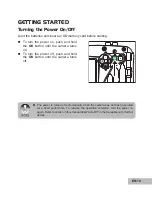
Page 21: ... button until the camera turns on To turn the power off push and hold the OK button until the camera turns off The power is turned off automatically when the camera has not been operated for a fixed period time To resume the operation condition turn the power on again Refer to section in this manual titled Auto Off in the Setup Menu for further details ...

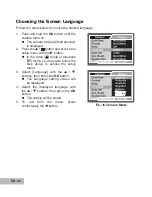
Page 22: ...d access the setup menu with the button In the video mode or playback mode you may also follow the step above to access the setup menu 3 Select Language with the buttons then press the OK button The Language setting screen will be displayed 4 Select the displayed language with the buttons then press the OK button The setting will be stored 5 To exit from the menu press continuously the button Ex I...

Page 23: ...u may also follow the step above to access the setup menu 3 Select Date Time with the buttons then press the OK button The Date Time setting screen will be displayed 4 Select the item s field with the buttons and adjust the value for the date and time with the buttons The date and time is set in the order year month day hour minute The time is displayed in 24 hour format 5 After confirming all setti...

Page 24: ...hen press the OK button 4 Select Execute with the buttons then press the OK button To cancel formatting select Cancel and press the OK button 5 To exit from the menu press continuously the button Ex In Camera Mode It is highly recommended to format the SD memory card when the card is first installed or when the card is used in another device or on a regular basis When you format an SD memory card b...

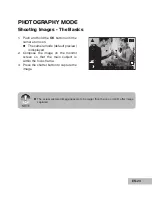
Page 25: ...ns on The camera mode default preview is displayed 2 Compose the image on the monitor screen so that the main subject is within the focus frame 3 Press the shutter button to capture the image A 0 3 02 05 2006 08 03 The actual captured image appears to be larger than the one on LCD after image captured ...

Page 26: ... resolution or image quality perform these steps below 1 Push and hold the OK button until the camera turns on The camera mode default preview is displayed 2 Press the button The Capture menu is displayed 3 Select Size with the buttons then press the OK button 4 Select the desired setting with the buttons then press the OK button 5 Select Quality with the buttons then press the OK button 6 Select ...

Page 27: ... 2272 x 1704 Fine 1 4 5 12 26 54 111 224 449 Standard 1 8 9 21 44 91 186 375 752 Economy 1 16 17 40 86 176 358 721 1447 1600 x 1200 Fine 1 4 9 21 46 94 191 385 774 Standard 1 8 15 36 76 158 320 645 1294 Economy 1 16 29 69 148 304 616 1241 2491 640 x 480 Fine 1 4 30 71 151 310 628 1265 2539 Standard 1 8 50 119 252 518 1051 2117 4248 Economy 1 16 96 229 485 998 2022 4073 8147 The above data shows th...

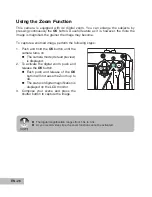
Page 28: ...steps 1 Push and hold the OK button until the camera turns on The camera mode default preview is displayed 2 To activate the digital zoom push and release the OK button Each push and release of the OK button will increase the Zoom up to 4X The status of digital magnification is displayed on the LCD monitor 3 Compose your scene and press the shutter button to capture the image The digital magnificati...

Page 29: ... mode 3 Compose your scene and press the shutter button The table below will help you choose the appropriate focus mode Focus mode Description Normal This mode is suitable for shooting distance of 3ft 1m to infinity Macro Select macro to capture close up images at shooting distance of 2ft 60cm to 3ft 1m Underwater focus range will vary because of the water s magnification effect Normal focus range i...

Page 30: ...ash mode Flash mode Description Auto The flash fires automatically according to the photographic conditions Red eye Reduction Use this mode to reduce the red eye phenomenon when you want to take natural looking photographs of people and animals in low light conditions When taking photographs the red eye phenomenon can be reduced by asking the subject person to look at the digital camera or get as cl...

Page 31: ... Ext Flash Scene mode In order to achieve proper image exposure it may be necessary to select from one of the following three flash modes Blank This is the default setting ideal for proper exposure from 1 yd 1m to 2 yd 2m Macro Flash This flash setting is ideal for shooting distances inside of 1 yd 1m Far Flash Select this flash mode for best exposure beyond 2 yds 2m shooting distance The above shoot...

Page 32: ... turns on The camera mode default preview is displayed 3 Toggle the button until your desired self timer mode appears on the LCD monitor OFF 10s 2s 10 2s No Indication 4 Compose your scene and press the shutter button The self timer function is activated The photography is then taken after the preset time To cancel the self timer at any time press the button to disrupt the sequence After one shot ...

Page 33: ...tremely large The EV compensation value can be set in the range from 2 0EV to 2 0EV 1 Push and hold the OK button until the camera turns on 2 Toggle the MODE button and switch to camera or mode 3 Press the button The Capture or Video Output menu is displayed 4 Select EV with the buttons then press the OK button 5 Use or button to set the range of EV compensation value from 2 0EV to 2 0EV then pres...

Page 34: ...e colors are off select the White Balance for the specific lighting type 1 Push and hold OK button until the camera turns on 2 Toggle the MODE button and switch to camera or video mode 3 Press the button The Capture or Video Output menu is displayed 4 Select White Balance with the buttons then press the OK button 5 Select the desired setting with the buttons then press the OK button 6 To exit from ...

Page 35: ...setting in SEA mode is 25ft 8m You will notice that the LCD display image has a red color tint on land This is normal and will not appear red while underwater In External flash mode the white balance is calibrated to the color temperature of the External Flash Optional Accessory You should not make any white balance adjustments when in Ext Flash mode ...

Page 36: ...sh the OK button 4 Select Manual WB with the buttons then push the OK button 5 Point the camera at a 8 5 x 11 A4 sheet of white paper or white slate Hold the paper or slate at arms length and push the OK button to Execute The Manual White Balance is now stored in the camera 6 To cancel the white balance setting repeat the above process and select Cancel in Step 5 Ex In Camera Mode It may be helpfu...

Page 37: ...saturation Backlight Select this mode when you want to capture images when the light comes from behind the object Sea Select this mode when you want to capture underwater photos when NOT using optional external flash accessory Ext Flash Select this mode when you want to capture underwater photos when using optional external flash accessory Spy For continuous pictures at set time intervals 1 Push and...

Page 38: ...ess the OK button d Select the desired time interval with the buttons and press the OK button e Press the button to exit from the menu 2 Aim the camera at the desired subject or scene It is preferred to use a compact tripod so the camera is steady and remains aimed at the subject 3 Press the shutter button The camera will countdown from 10 seconds and take the first picture 4 The LCD display will t...

Page 39: ...Use or button to select the desired images To view the previous image press the button To view the next image press the button 4 To exit from playback mode press the or MODE button 100 0001 Size EV 2006 02 10 2272 X1704 0 3 09 26 0001 The playback information displayed on the LCD monitor will disappear after seconds of time If there is no image stored in the internal memory or on the memory card N...

Page 40: ...on 2 Press the button The last recorded image appears on the LCD monitor To view the previous image press the button To view the next image press the button 3 Continuously push and release the OK button to zoom in on the picture The magnification factor is displayed on the LCD monitor 4 To view different portion of the images press the button to adjust the display area 0001 2 0X The magnification fa...

Page 41: ...eo clips the video mode icon will be displayed 4 Use the button to move the cursor to select the image to be displayed at regular size 5 Press the OK button to display the selected image on full screen 100 0003 1 2 3 4 5 6 7 8 9 If the first displayed file is a video clip use buttons to select an image file then press continuously the OK button to display the thumbnail In playback mode you may also d...

Page 42: ... OK button 4 Use to select the playback interval then press the OK button The slideshow starts 5 To stop the slide show during playback press the OK button You can adjust the slide show display interval within the range of 3 Sec 5 Sec 10 Sec The Auto Off function does not operate during slide show All still images in the folder are automatically played back Video clips are displayed the first frame...

Page 43: ...until the camera turns on 2 Press MODE and switch to mode 3 Press the shutter button to start recording 4 To stop recording press the shutter button again When recording a video clip the flash cannot be used You will need sufficient lighting for good quality video In low light conditions use a video light optional accessory to illuminate the subject ...

Page 44: ...ss the OK button again Push the MODE button while the video clip is paused to return to the beginning of the video clip 100 0002 Size EV 2006 02 10 320X240 0 3 10 34 0002 00 00 26 The playback information displayed on the LCD monitor will disappear after seconds of time The zoom function cannot be activated while playing the video clips back To playback the video clips on the computer we recommend...

Page 45: ...elect the image you want to erase with the buttons 3 Press the button The playback menu is displayed 4 Select Delete with the buttons then press the OK button The deletion menu is displayed 5 Select Single or All with the buttons then press the OK button Single Delete the displayed image or the last image All Delete all of the images on the SDmemory card except for the protected images Select Sele...

Page 46: ...layed 4 Select Select with the buttons then press the OK button The images are displayed in the thumbnail display 5 Select the image you want to delete with the buttons then press the OK button The image you ve just selected has been deleted As a shortcut you can delete any image while in Playback mode by pushing the shutter button This will display the Delete This Picture message ...

Page 47: ...to protect with the buttons 3 Press the button The playback menu is displayed 4 Select Protect with the buttons then press the OK button 5 Select Single or All with the buttons then press the OK button 6 Select Set with the buttons then press the OK button Press continuously the button to return to the playback mode The protect icon is displayed with the protected image When All has been selected ...

Page 48: ...ode The removal of image protection has been executed Protecting Selected Images 1 Select Protect with the buttons from the playback menu then press the OK button 2 Select Select with the buttons then press the OK button The images are displayed in the thumbnail display 3 Select the image you want to protect with the buttons then press the OK button 4 If you want to cancel the protection of select...

Page 49: ...t the image that you want to set DPOF with the buttons 3 Press the button The playback menu is displayed 4 Select DPOF with the buttons and press the OK button The DPOF setting screen is displayed 5 Select Single or All with the buttons and press the OK button Single Sets DPOF for each individual image All Sets DPOF for all images at once 6 Select Print Num with the buttons and press the OK button...

Page 50: ...on is finished press the button continuously to return to the playback mode The DPOF icon is displayed on each image that has DPOF settings 100 0001 1 The date that is printed on the photo is the date set on the camera To print the correct date on the photo set the date on the camera before you photograph the image Refer to section in this manual titled Setting the Date and Time for further details...

Page 51: ...splayed on the monitor 1 Select the item you want to configure with the buttons and press the OK button Images Select whether you want to print specific image or all images You may also select printing number for specific image Date Print According to the printer type select whether you want to print the image with date imprint or not Paper Size Select the desired paper size according to the printer ...

Page 52: ...ng the desired image and printing number press the OK button to confirm 4 Select Print with the buttons and press the OK button to start printing 5 The printing starts and the figure shown on the right hand side appears The Complete will be displayed temporarily reminding you that the printing procedure is finished If a print error is detected the Print Error will be displayed The image printing may ...

Page 53: ...n the O ring groove Carefully follow O ring removal and installation instructions contained in this manual Replace O ring every year to ensure proper seal Only use approved SeaLife O ring designed for the camera Soak and rinse camera in fresh water after each use Use clean soft cloth to dry housing Store camera only after careful cleaning and when totally dry 4 Carefully close waterproof door to s...

Page 54: ...ant Do NOT lubricate O ring Carefully inspect and clean O ring and O ring contact surfaces before each underwater use If O ring needs to be replaced contact your local SeaLife dealer or visit www sealife cameras com to located a dealer near you ...

Page 55: ...b finger along O ring and O ring contact surfaces to inspect for damage Replace O ring or have camera serviced if the O ring or O ring contact surfaces are damaged Do not use camera if O ring or O ring contact surfaces are damaged Replacement O rings are available at your local authorized SeaLife dealer Inspect and replace O ring if damaged A Cut B Tear C Dent 2 Carefully inspect and clean O ring a...

Page 56: ... dive equipment like dive mask because that water may contain detergents which are harmful to the camera b Push all the control buttons several times while camera is soaking to clean out any salt water sand or dirt that has accumulated during usage c Use clean soft cloth to dry camera You and the camera must be dry before opening waterproof door To protect your SeaLife camera from a build up of mo...

Page 57: ...O ring use an non sharp object like a credit card to lift up O ring at one of the corners To Install O ring carefully push O ring into groove making sure to align the shape of the o ring with the shape of the groove Be careful not to twist the O ring ...

Page 58: ...o the external flash light sensor which will then fire the external flash Insert deflector into External Flash base as shown Refer to instruction manual provided with optional external flash for detailed instructions and troubleshooting tips on using the optional external flash See your local SeaLife dealer or visit www sealife cameras com to locate dealer near you ...

Page 59: ...2 The optical cable is recommended to ensure that the external flash fires in all light conditions Insert optical cable through the holes as shown below With end of cable pointing at the camera s flash lightly tighten Allen screw with wrench provided until cable is secure Caution Do NOT over tighten screw ...

Page 60: ...you must open the camera while on the dive boat make sure you and the camera are perfectly dry before opening the waterproof door Do not allow the inside of the camera to get wet Cleaning camera after use 1 The sealed camera must be thoroughly cleaned with fresh water before opening Never let salt water dry on camera Salt crystals may damage the O ring lens and attract moisture 2 Never let water d...

Page 61: ...cm away from your subject 2 Stay within the ideal shooting distance of 2 to 6 feet The ideal shooting distance is between 2 to 6 feet 0 6 to 1 8 meters This distance will result in detailed colorful pictures Remember that light does not travel very far underwater so the closer you are to your subject the more colorful the pictures will be For best most colorful pictures we advise using the optiona...

Page 62: ...nd razor sharp details 7 Use the SeaLife Flash Accessories to enhance color and brightness Water filters out light and red yellow colors resulting in darker bluer images The only way to prevent this from occurring is by taking pictures at shallow depths within 10 15 depth on a sunny day or by using artificial light like the SeaLife External SL960 or Digital SL960D Flash The Flash easily mounts to th...

Page 63: ...em Requirements Windows Pentium lll 600 MHz or higher Windows 2000 ME XP or later 64MB RAM 128MB hard disk space CD ROM drive Available USB port System Requirements Macintosh PowerPC G3 G4 OS 9 0 or later 64MB RAM 128MB hard disk space CD ROM drive Available USB port ...

Page 64: ...desktop double click on My Computer 6 Look for a new Removable disk icon This Removable disk is actually the memory card in your camera Typically the camera will be assigned drive letter e or higher 7 Double click on the removable disk and locate the DCIM folder 8 Double click on the DCIM folder to open it to find more folders Your recorded images and video clips will be inside these folders Copy P...

Page 65: ...sired still images or video clips and then choose Copy from the Edit menu Open the destination location folder and choose Paste from the Edit menu You may also drag and drop image files from the digital camera to a desired location Macintosh Open the untitled disk icon and the destination location on your hard disk Drag and drop from the digital camera to the desired destination Memory card users m...

Page 66: ...l in one tool for owners of digital cameras WebCams DV camcorders scanners or anyone who strives to effectively organize a large collection of digital media 1 Insert the enclosed CD ROM into your CD ROM drive 2 When the welcome screen appears click INSTALL PHOTO EXPLORER 8 0 Follow the on screen instructions to complete the installation For more information about the operation of Photo Explorer ap...

Page 67: ...by adding creative design elements such as frames callouts and stamp objects Share results with family and friends via e mail and multiple print options 1 Insert the enclosed CD ROM into your CD ROM drive 2 When the welcome screen appears click INSTALL PHOTO EXPRESS 5 0 Follow the on screen instructions to complete the installation For information on how to use Photo Express to edit and retouch yo...

Page 68: ...work or Internet connection Video conferencing or video editing software is not included with the digital camera This mode is not supported for Mac Step 1 Install the PC camera driver The PC camera driver included in the CD ROM is exclusively for Windows The PC camera function is not supported for Mac platforms 1 Insert the enclosed CD ROM into your CD ROM drive 2 When the welcome screen appears c...

Page 69: ... port on your computer 3 Push and hold the OK button on the camera until the power turns on The USB screen appears on the LCD display 4 Use the to select PC Camera then press the OK button 5 Position the digital camera steadily on top of your computer monitor or use a tripod When using this digital camera as a PC camera it is necessary to install the battery into the digital camera ...

Page 70: ...on item with the buttons then press the OK button to enter its respective menu 4 Select the desired setting with the buttons then press the OK button 5 To exit from the menu press the button Size This sets the size of the image that will be captured 2816 x 2112 2272 x 1704 1600 x 1200 640 x 480 Quality This sets the quality compression rate at which the image is captured Fine Standard Economy Scen...

Page 71: ...ter color correction is most effective when there is sufficient ambient light It will become increasingly difficult to correct for colors below 50ft 16m depth Manual WB This manually sets the white balance and stores it Use of this is convenient when the white balance does not offer a good match Refer to section in this manual titled Setting Manual White Balance for further details Cancel Execute Do...

Page 72: ...Hard Normal Soft Preview This sets whether or not to display the captured image on the screen immediately after the image is captured On Off When Preview is set to On an instant delete screen will appear after each image is captured Select Execute and press the OK button to delete the image Select Cancel and press the OK button to save the image and return to the capture mode If no option is selec...

Page 73: ... option item with the buttons then press the OK button to enter its respective menu 5 Select the desired setting with the buttons then press the OK button 6 To exit from the menu press the button EV Refer to section in this manual titled EV in Camera Menu for further details White Balance Refer to section in this manual titled White Balance in Camera Menu for further details Audio This sets whethe...

Page 74: ...leting Images Video Clips for further details Copy to Card Allows you to copy your files from the digital camera s internal memory to a memory card Of course you can only do this if you have a memory card installed and some files in internal memory Cancel Execute Slide Show Refer to section in this manual titled Slideshow Display for further details DPOF Refer to section in this manual titled Settin...

Page 75: ...ns and press the OK button 5 To exit from the menu press continuously the button Date Time This sets the date and the time Refer to section in this manual titled Setting the Date and Time for further details Format Erases all images and reformats the SD card loaded in your camera Protected images are also erased SD card cannot be formatted if it is write protected Refer to section in this manual t...

Page 76: ... for a specific period of time the power to the camera is automatically turned off This feature is useful to reduce battery wear 3 Min 5 Min 10 Min Off Sys Reset This returns all basic settings to the camera default settings The time setting will not be reset Cancel Execute System Info This displays the current firmware version of the camera ...

Page 77: ...acro 45cm to 75cm 1 5ft to 2 5ft Normal 75cm to infinity 2 5ft to infinity LCD monitor 2 0 LTPS color LCD High resolution 75K pixels display Self timer 10 sec delay 2 sec delay 10 2 sec delay Exposure compensation 2 0EV 2 0EV in 0 3EV increments White balance Auto Daylight Cloudy Tungsten Fluorescent Manual WB 25ft 8m 25ft 8m ISO Auto 50 100 200 Interface USB connector Power 2 x AA Alkaline batterie...

Page 78: ...use The camera was left unattended and unused so the auto power off cuts it off Turn the power back on The batteries are exhausted Recharge or replace the batteries The power does not go off Camera malfunction Reload the batteries The batteries run out quickly It is being used in extreme low temperature Many shots are being captured in dark places inside requiring flash The batteries are not fully ...

Page 79: ...n all the way The memory card does not have any free space Load a new card or delete unwanted files End of memory card life Load a new memory card The flash is recharging Wait until the status LED off The memory card is unrecognized by the camera Format the memory card in this camera before its first use or when it was used other than this camera The auto power off function is activated Turn the powe...

Page 80: ...dark The image was captured in a dark place while set to flash off Set the flash to something other than flash off mode It is under exposed Set the exposure compensation to a larger value In Ext Flash mode set camera to far flash to make images brighter The image is too bright It is over exposed Set the exposure compensation to a smaller value In Ext Flash mode set camera to macro flash to make images ...

Page 81: ...d by this device Loaded a card that was formatted and stored on by this device Files cannot be deleted The file is protected Cancel protection You played back a memory card that was not formatted by this device Loaded a card that was formatted and stored on by this device Cannot format a memory card The memory card is write protected Remove the write protection End of memory card life Load a new me...

Page 82: ...SL32025 January 2007 9EQ39 4000 00 ...

Reviews: