background image

Attach Flash Link to Deflector


Remove deflector from flash base and insert cable to the top of

 the adapter.  Re-attach deflector to flash base after cable is
 inserted.

7

9

Summary of Contents for SL962

Page 1: ......

Page 2: ...Link will ensure the external flash fires regardless of the ambient light or position of the flash head resulting in brighter more colorful pictures Please follow these instructions for proper connection and care of your Flash Link optical cable system www sealife cameras com service manuals html Español Deutsch Français Italiano ...

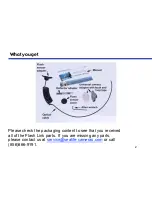
Page 3: ...What you get Please check the packaging content to see that you received all of the Flash Link parts If you are missing any parts please contact us at service sealife cameras com or call 856 866 9191 2 ...

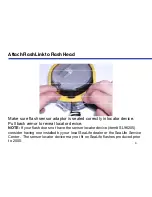
Page 4: ...3 Attach Flash Link to Flash Head Insert flash sensor adapter into the rubber hole of the flash head by stretching the armor around the sensor adapter ...

Page 5: ...ator device Pull back armor to reveal locator device NOTE If your flash does not have the sensor locator device item SL96205 consider having one installed by your local SeaLife dealer or the SeaLife Service Center The sensor locator device may not fit on SeaLife flashes produced prior to 2005 ...

Page 6: ...5 Attach Flash Link to Flash Head Insert flash sensor cover into rubber hole of flash head farthest away from camera Note SeaLife Flash may already have sensor cover inserted ...

Page 7: ...eaLife film camera and digital camera model DC100 DC200 DC250 DC300 or DC310 Skip this section if attaching Flash Link to another camera The correct SeaLife deflector is included with your SeaLife Camera The deflector adapter will attach to any of these deflectors as described in the instructions ...

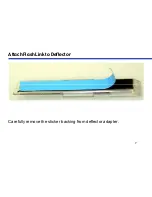
Page 8: ...Attach Flash Link to Deflector Carefully remove the sticker backing from deflector adapter 7 ...

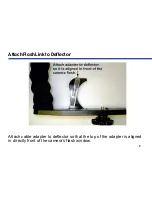
Page 9: ...8 Attach Flash Link to Deflector Attach cable adapter to deflector so that the top of the adapter is aligned in directly front of the camera s flash window ...

Page 10: ...Attach Flash Link to Deflector Remove deflector from flash base and insert cable to the top of the adapter Re attach deflector to flash base after cable is inserted 7 9 ...

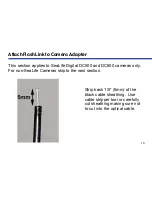
Page 11: ...pplies to SeaLife Digital DC500 and DC600 cameras only For non SeaLife Cameras skip to the next section Strip back 1 5 5mm of the black cable sheathing Use cable stripper tool or carefully cut sheathing making sure not to cut into the optical cable 10 ...

Page 12: ...t cable into one of the two holes in the camera adapter as shown Keep pushing cable up so it bends and points towards the camera s flash Use small Allen wrench provided to tighten screw DO NOT over tighten screw or this can damage the cable 11 ...

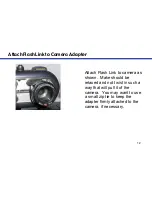
Page 13: ...Adapter Attach Flash Link to camera as shown Make should be relaxed and not twist in such a way that will pull it of the camera You may want to use a small zip tie to keep the adapter firmly attached to the camera if necessary 12 ...

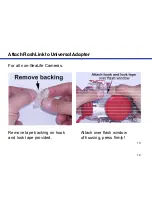
Page 14: ...Attach Flash Link to Universal Adapter For all non SeaLife Cameras Remove tape backing on hook Attach over flash window and look tape provided of housing press firmly 12 13 ...

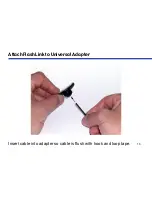
Page 15: ...Attach Flash Link to Universal Adapter Insert cable into adapter so cable is flush with hook and loop tape 14 ...

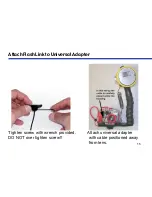
Page 16: ...Attach Flash Link to Universal Adapter Tighten screw with wrench provided Attach universal adapter DO NOT over tighten screw with cable positioned away from lens 15 ...

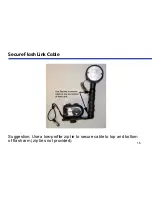
Page 17: ...16 Secure Flash Link Cable Suggestion Use a low profile zip tie to secure cable to top and bottom of flash arm zip ties not provided ...

Page 18: ...Works with Two Flashes Two Flash Links can be used for dual strobes 17 ...

Page 19: ... is positioned directly in front of the camera s flash Regularly check that cable end has a clean cut with nothing obstructing the optical core of the cable If not clean cut off end with a sharp razor Clean cable assembly with fresh water and dry after each use and allow drying time before storage Prevent the cable from being crushed during storage and transportation Don t bend or kink cable Inspe...

Page 20: ...problem is the Flash Link connection Inspect cable for any sharp bends or kinks which may indicate the optical core of the cable is broken Replace or cut off damaged cable Make sure the camera side of the cable is positioned directly in front of the camera s onboard flash Make sure the flash head side of the cable is directly aligned over the flash light sensor Newer SeaLife Flashes include a sens...

Page 21: ...ushed cut off the end of the cable as described above To re attach the cable slowly tighten the screw in 1 2 turn increments using the Allen wrench provided Pull on the cable after every 1 2 turn until it s secure Be very careful not to over tighten the screw or you will damage the cable Make sure flash sensor cover is in place on the sensor farthest from the camera See page 5 If you still experie...

Page 22: ...Once you have a return authorization ship the Flash Link freight prepaid to the authorized service center in your country or to the USA service facility at the address provided below Please include a letter describing the problem your return address No PO Box phone number and a copy of your original purchase receipt The USA Service Center is open M F 8 30 am to 5 00 pm EST You may contact the serv...

Page 23: ...Visit www sealife cameras com to view the entire line of SeaLife Cameras and Accessories ...

Reviews: