background image

Latest products and information available at www.sealite.com

2

SL-75 

3–5NM+ Solar Marine Lantern

SL-75

3-5NM+ Solar Marine Lantern

PCD

200

PCD

162

PCD

150

3 x 7

4 x 4

16 X 15 Slots

6 Places

314

158

114.55

114.55

190.7

4 x 4.00 THRU

PCD

150.00

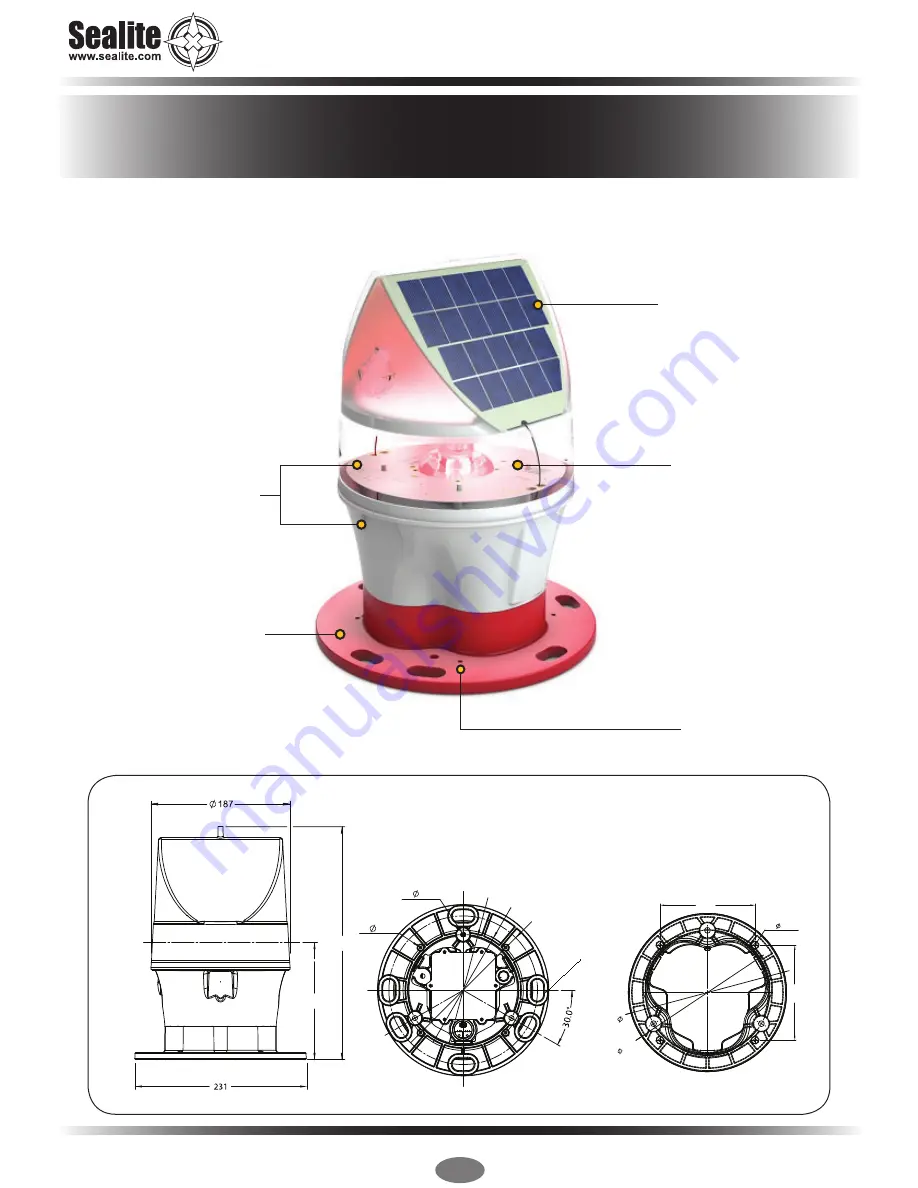
Lens and base 

moulded from 

UV-stabilised 

LEXAN® 

polycarbonate

Large industry 

standard 200mm bolt  

pattern for ease 

of installation. Optional 

bases available

Dual internal 

high-performance solar 

modules

Internal 

user-replaceable 

battery in sealed 

compartment

Single LED Optic

Summary of Contents for SL-75

Page 1: ...Version 1 4 SL 75 3 5NM Solar Marine Lantern Installation Service Manual ...

Page 2: ...D 1 5 0 3x 7 4x 4 16X15Slots 6Places 314 158 114 55 114 55 190 7 4x 4 00THRU PCD 150 00 Lens and base moulded from UV stabilised LEXAN polycarbonate Large industry standard 200mm bolt pattern for ease of installation Optional bases available Dual internal high performance solar modules Internal user replaceable battery in sealed compartment Single LED Optic ...

Page 3: ...e 16 Lux Page 16 Error Acknowledge Indication Page 18 Configuration Settings Page 18 Hibernation Mode Advanced Users Page 19 Storage Mode Advanced Users Page 20 Operational Mode Page 21 Optional GPS Synchronisation Page 22 Optional AvMesh Monitoring Control System Page 23 Optional GSM Monitoring Control System Page 23 Fixed Structure Orientation Page 23 Maintenance and Servicing Page 24 Trouble Sh...

Page 4: ...minute begin flashing to the set code Technology Sealite is the world s fastest growing manufacturer of marine aids to navigation We employ leading mechanical optical hardware software engineers to create innovative products to service the needs of our customers worldwide and offer the widest range of solar powered LED lanterns in the marketplace Electronics Sealite employs leading in house electr...

Page 5: ...al Voltage VDC 3 6 Autonomy days 30 14 hour darkness 12 5 duty cycle Temperature Range 40 to 80 C Solar Characteristics Solar Module Type Multicrystalline Power Supply Battery Type High grade NiMH Battery Capacity Ah Standard 17 2 Battery Capacity Ah Large 21 5 Nominal Voltage V 3 6 Physical Characteristics Body Material LEXAN Polycarbonate UV stabilized Lens Material LEXAN Polycarbonate UV stabil...

Page 6: ...A B C D E F 0 1 2 3 A B ON OFF Rotary Switch A Rotary Switch B Intensity Setting ON OFF Switch User Replaceable Battery Lantern Base Installation Manual Setting Lantern is activated by ON OFF Switch Intensity and flash settings need to be set prior to activation 1 Remove the marked flash adjustment bung from the base of the lantern and set internal toggle switch to ON 2 The power and range setting...

Page 7: ...tensity Power or reducing the Duty Cycle All lanterns have 2 rotary switches marked A and B on the flasher unit Turning the small arrows to the appropriate number or letter will set the code see Flash Codes section of this manual The unit may take up to one minute to activate a new flash code A comprehensive list of available flash codes is listed on pages in the Flash Codes section of this manual...

Page 8: ...e duty cycle i e the amount of time on as a proportion to the timing cycle For example 0 5 seconds on and 4 5 seconds off equals a 10 duty cycle It is best to operate at the lowest duty cycle appropriate to the actual needs of the application Recommended Rhythm for Flashing Light IALA Regions A and B MARK DESCRIPTION RHYTHM Port Hand Starboard Marks Any other than Composite Group Flashing 2 1 Pref...

Page 9: ...FL 5 S 0 3 4 7 279 FL 5 S 0 4 4 6 5 1 81 FL 5 S 0 5 4 5 9 5 149 FL 5 S 0 9 4 1 6 1 97 FL 5 S 1 0 4 0 7 1 113 FL 5 S 1 5 3 5 SWITCH IR Controller FLASH CODE ON OFF A B 4 2 66 ISO 5 S 2 5 2 5 8 2 130 LFL 5 S 2 0 3 0 0 3 3 OC 5 S 3 0 2 0 1 3 19 OC 5 S 4 0 1 0 2 3 35 OC 5 S 4 5 0 5 C 6 198 FL 6 S 0 2 5 8 B 5 181 FL 6 S 0 3 5 7 C 5 197 FL 6 S 0 4 5 6 8 1 129 FL 6 S 0 5 5 5 9 1 145 FL 6 S 0 6 5 4 A 1 16...

Page 10: ...6 S 1 0 1 0 1 0 3 0 3 9 57 Q 2 6 S 0 3 0 7 0 3 4 7 295 LFL FL 6 S 3 0 1 0 1 0 1 0 273 FL 2 6 5 S 0 5 1 0 0 5 4 5 283 FL 2 7 S 0 4 1 2 0 4 5 0 311 FL 2 7 S 0 5 1 5 0 5 4 5 A 9 169 FL 2 7 S 1 0 1 0 1 0 4 0 7 B 123 FL 2 8 S 0 4 0 6 2 0 5 0 8 A 138 FL 2 8 S 0 4 1 0 0 4 6 2 285 FL 2 8 S 0 4 1 7 0 4 5 5 4 7 71 FL 2 8 S 0 5 1 0 0 5 6 0 297 FL 2 8 S 0 5 0 5 1 5 5 5 8 8 136 FL 2 8 S 0 8 1 2 2 4 3 6 5 7 87 ...

Page 11: ...8 9 137 OC 3 10 S 5 0 1 0 1 0 1 0 1 0 1 0 B B 187 Q 3 10 S 0 3 0 7 0 3 0 7 0 3 7 7 D 8 216 FL 2 1 10 S 0 5 0 5 0 5 0 5 1 5 6 5 288 FL 3 12 S 0 4 2 1 0 4 2 1 0 4 6 6 1 B 27 FL 3 12 S 0 5 1 5 0 5 1 5 0 5 7 5 E A 234 FL 3 12 S 0 5 2 0 0 5 2 0 0 5 6 5 E 7 231 FL 3 12 S 0 8 1 2 0 8 1 2 0 8 7 2 B 6 182 FL 3 12 S 1 0 1 0 1 0 3 0 1 0 5 0 4 8 72 FL 2 1 12 S 0 8 1 2 0 8 2 4 0 8 6 0 5 8 88 FL 2 1 12 S 1 0 1 ...

Page 12: ...D 141 Q 4 6 S 0 4 0 6 0 4 0 6 0 4 0 6 0 4 2 6 299 FL 1 3 8 S 1 5 0 5 0 5 0 5 0 5 0 5 0 5 3 5 309 FL 4 7 S 0 3 0 7 0 3 0 7 0 3 0 7 0 3 3 7 1 D 29 FL 4 10 S 0 5 1 0 0 5 1 0 0 5 1 0 0 5 5 0 2 D 45 FL 4 10 S 0 8 1 2 0 8 1 2 0 8 1 2 0 8 3 2 F E 254 Q 4 10 S 0 3 0 7 0 3 0 7 0 3 0 7 0 3 6 7 300 FL 4 10 S 1 5 0 5 0 5 0 5 0 5 0 5 0 5 4 5 312 FL 4 11 S 0 5 1 5 0 5 1 5 0 5 1 5 0 5 4 5 B E 190 FL 4 12 S 0 3 1...

Page 13: ... 6 2 0 5 0 8 8 136 MO A 8 S 0 8 1 2 2 4 3 6 B 8 184 MO U 10 S 0 3 0 7 0 3 0 7 0 9 7 1 C 8 200 MO U 10 S 0 4 0 6 0 4 0 6 1 2 6 8 D 8 216 MO U 10 S 0 5 0 5 0 5 0 5 1 5 6 5 9 8 152 MO A 10 S 0 5 0 5 1 5 7 5 8 9 137 MO D 10 S 5 0 1 0 1 0 1 0 1 0 1 0 A 8 168 MO A 15 S 0 5 1 5 2 0 11 0 F 8 248 MO U 15 S 0 6 0 3 0 6 0 3 1 4 11 8 0 9 9 MO U 15 S 0 7 0 5 0 7 0 5 1 9 10 7 1 9 25 MO U 15 S 0 7 0 7 0 7 0 7 2 ...

Page 14: ...r should wait until the light responds to each keypress before pressing another key If there is no response to the keypress after 3 seconds it has not been detected by the light and the key can be pressed again If an invalid key is detected the light will flash quickly 5 times In this case the command will have to be restarted T C T C Read Lux Flash Code Intensity Battery Status Test Configure R L...

Page 15: ...mal operation Read Pressing the Read followed by one of the configuration keys shall cause the light to flash the configured value Example Key Sequences The light flashes the IR Remote number belonging to the currently set Flash Code Refer to the Flash Code tables to match the IR Remote flash number to the Flash Code The light flashes the current intensity setting 1 flash for 25 2 for 50 3 for 75 ...

Page 16: ...lashes followed by a delay 5 flashes The flash for number 0 is one long flash For example if the current Flash Code is set to 51 via the AB switches the lamp will flash number 081 For a flash code set to 01 the lamp will flash 001 FC 3 1 2 FC T C T C Intensity This function sets the light intensity Valid intensity values are 1 for 25 2 for 50 3 for 75 and 4 for 100 Example Key sequence This sets t...

Page 17: ... are set together for the sunset and sunrise transitions Example key sequence Assume the current Lux settings are at the factory preset values of 2 This sets the ambient light level to be lower than the default 100 lux The light will turn on when its surroundings are darker The light responds by acknowledgement with a long flash Level Sunset Dusk Sunrise Dawn 1 64 100 2 100 150 3 150 240 4 240 370...

Page 18: ...1 If the intensity is set at 100 with the intensity switches and is then set to 50 using the IR Remote Control the intensity setting will change to 50 If the intensity is then set to 75 using the switches the new intensity value will be 75 In order to change intensity settings using the IR Remoter Control the lamp must be powered The lamp can detect a change in switch settings if they are changed ...

Page 19: ...of 15 seconds When the lantern exits from Test Mode it will either enter Dusk to Dawn mode Hibernation mode or Storage Mode if enabled L I Store Hibernation Mode Date Range The following details the key press sequence that defines the start and end dates of Hibernation Mode where ddmm is the numerical representation of the month 01 January 08 August of the start date and DDMM is the numerical repr...

Page 20: ...e lantern will return to Hibernation mode Read Stored Hibernation Dates By pressing the following key sequence the lantern will respond with the stored start and end dates for Hibernation Read Hibernation Mode Status By pressing the following key sequence the lantern will respond with status of Hibernation mode Where A single long flash hibernation mode is Enabled Two quick flashes hibernation mod...

Page 21: ...torage Mode By pressing the following key sequence the lantern will enter Storage Mode The lantern will leave storage mode when exposed to daylight or if the power switch is turned OFF and ON again B I R T C T C I 1 B T C T C I 2 B T C T C I 3 B T C T C Operational Mode Sets the Lanterns Operation mode Dusk to Dawn Always On Standby Dusk to Dawn Mode at Dusk the light sensors will turn on the ligh...

Page 22: ...ided from a number of earth stations using atomic clocks as the time base Continuous self checking ensures that the light will continue to run in synchronisation Light Activation At power up the microprocessor checks that the internal GPS module is programmed correctly and is able to provide valid time base and time data Once outside with a clear view of the sky valid data should become available ...

Page 23: ...me diagnostics data and change lantern settings via cell phone The system can also be configured to send out alarm SMS text messages to designated cellular telephone numbers Users can also have alarms and reports sent to designated email addresses Installing the Sim Card 1 Unscrew the Bung on the side of the light to gain access to the GSM compartment When fixing the lantern on a fixed structure p...

Page 24: ... switch lantern ON via internal switch Close the bung 7 To test place dark cover towel or jacket on top of lantern to activate sensor lantern will come on Care must be taken to observe the polarity of the battery before the leads are re connected and ensure the replacement battery is correctly fitted Always discard old batteries in a safe manner Long Term Storage Instructions If the SL 75 is to be...

Page 25: ...witches several times to ensure contacts are clear Lantern will not operate for the entire night Expose lantern to direct sunlight and monitor operation for several days Sealite products typically require 1 5 hours of direct sunlight per day to retain full autonomy From a discharged state the lantern may require several days of operational conditions to cycle up to full autonomy Reducing the light...

Page 26: ...erials and workmanship under normal and intended use subject to the conditions hereinafter set forth for a period of twelve 12 months from the date of purchase by the original purchaser 5 Sealite Pty Ltd warrants that any LED sign lighting products Sign Lighting Products will be free from defective materials and workmanship under normal and intended use subject to the conditions hereinafter set fo...

Page 27: ...age caused by the incorrect replacement of battery in solar lantern models 11 This warranty does not cover any damage or defect caused to any product as a result of water flooding or any other acts of nature 12 There are no representations or warranties of any kind by Sealite or any other person who is an agent employee or other representative or affiliate of Sealite express or implied with respec...

Page 28: ...l Systems Marine Buoys up to 3mt in diameter Mooring Systems Accessories Monitorin Control Sy Sealite United Kingdom Ltd UK t 44 0 1502 588026 Sealite Asia Pte Ltd Singapore Sealite USA LLC USA t 65 6829 2243 t 1 603 737 1311 Sealite Pty Ltd Australia t 61 0 3 5977 6128 We believe technology improves navigation info sealite com sealite com ...

Reviews: