background image

14

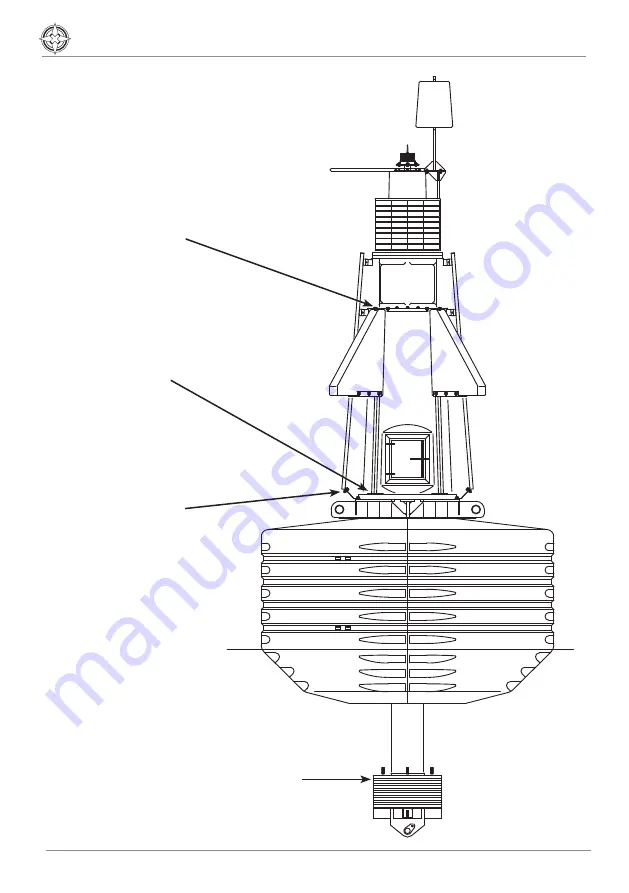
Diagram 2.

5.1 mtr TRIDENT-2600

Ballast Plates

Day Marks fit over locating 

posts here

Secure to base of  

Tower Assembly

Ladder Mounting Plate

Summary of Contents for TRIDENT-2600Q

Page 1: ...TRIDENT 2600Q 2600mm dia Ocean Buoy V1 3 INSTALLATION SERVICE MANUAL ...

Page 2: ...ion Date Author Approved 1 0 Manual Launch July 2014 S Turner 1 1 Assembly update May 2015 N Brothers 1 2 Warranty Footer Feb 2017 S Amirthalingam M Nicholson 1 3 Technical specifications update Oct 2020 M Dutka M Nicholson ...

Page 3: ... Buoy Division Page 4 Why Choose Polyethylene Buoys Page 4 Mooring Requirements Regulations Page 4 TRIDENT 2600Q Ocean Buoy Page 5 Assembly Ballast Section Page 7 Assembly TRIDENT 2600Q Page 8 Mooring Diagram Page 15 Standard Wiring Diagram Page 16 GSM Wiring Diagram Page 17 Marine Buoy Maintenance Page 18 Sealite Buoy Warranty Page 19 ...

Page 4: ...Sealite buoy division provides turn key production of navigation buoys From tooling development raw materials selection and production to final testing and inspection Sealite guarantees superior quality and fast turn around times Sealite s buoy products are available in a wide range of configurations and sizes and can be economically shipped worldwide Why Choose Polyethylene Buoys No painting Inhi...

Page 5: ...rom four 4 roto moulded quadrants which fasten together to form an incredibly robust 2 6 meter wide float section standing 1 5m tall Each quadrant is moulded from UV stabilised virgin polyethylene and has an 16mm wall thickness Number of Lifting Points 4 SWL for 2 or more lifting points 11 000kg mooring point Visual area 6 0m2 with daymark SWL for 1 point lifting 5500kg deck and primary structure ...

Page 6: ... fixtures Rotationally moulded UV stabilised virgin polyethylene float section tower assembly top marks and panelling 316 grade stainless steel fixtures Wall Thickness mm inches 16 5 8 16 5 8 Ballast kg lbs 672 1482 external steel 672 1482 external steel Height mm inches 6240 2455 8 6240 2455 8 Width mm inches 2600 1023 8 2600 1023 8 Mass kg lbs 2340 5159 depending on payload 2340 5159 depending o...

Page 7: ...ny component is missing or damaged Assembly Step 1 Lay centre core down supported so end section is clear of the plates to be installed Step 2 Duck Plate take one ring and tack weld in six places allowing access to the four bolt holes on the underside Slide the balance of the metal ballast rings over the core leaving the duck plate ring as the last one Slide duck plate over core ensuring the 4 x b...

Page 8: ...DayMark Wings Bottom M10X50SS M10 x 50mm Sets 8 M10FLATWASHERSSS M10 Flat Washers 16 M10NUTSSS M10 Nuts 8 M10 Spacers M10 Spacers x 15mm 19mm 8 DayMark Wings Middle M8X50SS M8 x 50 Sets 32 M8FLAT WASHERS M8 Flat Washers 32 M8 SPRINGWASHERS M8 Spring Washers 32 M8 NUTS M8 Nuts 32 Top Plate 3000 to SLB1750 M10FLATWASHERSSS M10 Flat washers 14 M10SPRINGWASHERSSS M10 Spring washers 14 M10NUTSSS M10 Nu...

Page 9: ...SHER M6 Spring washers 8 M6NUTS M6 Nuts 8 Base Core M20X40 GALV SETS M20 x 40 Galv Sets 4 M20GALVSPRINGWASHERS M20 Spring Washers 4 M16X110 SS SETS M16 x 110 Bolts 2 M16FLATWASHERS M16 Flat Washers 2 M16FLATWASHERS M16 Penny washers 2 M16SPRINGWASHERS M16 Spring washers 2 M16NYLOCK M16 Nuts 2 M10X35SS M10 x 35mm Sets 4 M10FLATWASHERSSS M10 Flat Washers 8 M10SPRINGWASHERSSS M10 Spring washers 4 M10...

Page 10: ...Bolts nuts and washers Please coat each bolt in Anti Seize or Grease before fitting Nuts Step 3 Place a flat washer on the bolt before sliding it through the hole in the Float Section then fit a second flat washer and a Spring washer on to the bolt before securing with a nut Hand tighten 2 4 bolts per side until all four Float sections are secured around the mooring post Secure 8 x bolts down each...

Page 11: ...ring it with a dark cloth or jacket and wait 1 minute for activation Please refer to the SL125 Manual for more information on setting flash codes intensity and troubleshooting Step 8 Position and secure the top mark to the Tower Assembly using 4 x M8 Socket Head Cap Screws Flat and Spring Washers and Nuts Step 9 Lift and secure the Tower Assembly onto the Mooring Post The Tower Assembly MUST be po...

Page 12: ... Posts are secured afterward Step 11 Fit the ladder to the Tower Assembly Secure the Ladder Mounting Plate to the base of the ladder using two M10 x 25mm Long Bolts Nuts Flat and Spring Washers Secure the Ladder Mounting Plate to the Mooring Post using 2 x M10 x 45mm Bolts Nuts Flat and Spring Washers Step 12 Finish securing the Tower Assembly to the Mooring Post Check that all M10 x 90mm Long Bol...

Page 13: ...Marine Buoys Latest products and information available at www sealite com 13 Day Marks fit over locating posts here Secure to base of Tower Assembly Ladder Mounting Plate Ballast Plates Diagram 1 4 5 mtr TRIDENT 2600 ...

Page 14: ...14 Diagram 2 5 1 mtr TRIDENT 2600 Ballast Plates Day Marks fit over locating posts here Secure to base of Tower Assembly Ladder Mounting Plate ...

Page 15: ...TRIDENT 2600Q Marine Buoys Latest products and information available at www sealite com 15 TRIDENT 2600Q Mooring Diagram ...

Page 16: ...16 Standard Wiring Diagram ...

Page 17: ...TRIDENT 2600Q Marine Buoys Latest products and information available at www sealite com 17 GSM Wiring Diagram ...

Page 18: ... Check the free movement of each swivel around its head If any swivel head sticks it must be replaced Check every link of the thrash length of the chain Check the diameter of the nips and sides and also inspect the welds on every link If depth allows a worn riding chain may be reversed Change a chain when any link shows excessive wear Chain must be replaced if any link wears to less than 3 5 of th...

Reviews: