background image

IMPORTANT :  This  instruction  manual  includes  essential  information  on  the  safety  measures  to  be 

implemented for installation and start-up. It is important to read these instructions before beginning 
installation and start-up. Keep this manual for future reference.  

Failure  to  comply  with  the  instructions  given  by  the  manufacturer  in  this  manual  regarding 
installation, operational start up and maintenance of the product exonerates the manufacturer or the 

distributor  from  any  liability  for  damages  affecting  persons,  the   concerned  product  or  the  other 
installations, and shall void the guarantee . 


ENGLISH 


1. VERIFY THE CONTENT OF THE PACKING                                                                           


PAR56 LED lamp ~12V 


    Cable gasket  7, 9 and 13 mm 


Screws 


O’ring 


Radio remote controller 4 buttons with battery 

    4 Wedging  blocks 


Manual of installation and maintenance 


2. GENERAL CHARACTERISTICS 

This lamp has been designed to be used immerged in fresh water. It is a Class III electric  apparatus 
with  very  low  safety  voltage  ~12V.  The  light  source  of  this  lamp  is  not  replaceable;  when  the  light 
source reaches its end of life, the whole lamp shall be replaced. This lamp complies with IP68 degree 
of protection and must be installed in a PAR56 niche at a maximal immersion depth of 1 meter. 
This  lamp  complies  with  international  standards  for  lights,  especially  the  EN  60598-2-18  standards, 
lights  for  swimming  pools  and  similar  applications.  This  lamp  must  be  connected  to  a  power  supply 
cable with a minimum section of 2x1mm². 
 

3. INSTALLATION 

For  a  correct  installation,  the  power  socket  which  feeds  the  installation  lamp  will  have  to  possess  a 
device of protection by residual current with a maximal intensity of 30mA.  
This projector will be only connected to a ~12V security transformer with double winding. Another type 
of transformer is prohibited. 
The power of this transformer will be always higher than the power of all projectors connected. 
The manufacturer is not responsible in any circumstances for assembly, installation or start-up of any 
electric components which have been inserted or handled at locations other than its own premises. 

 
4. ASSEMBLY and REPLACEMENT 

Before any operation, turn OFF the power supply to lamp 

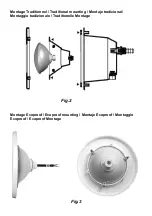
4.1 Traditional mounting  


Remove existing bulb from housing to dry place and unscrew its back support   


Unscrew the gland to make the cable free  


Unscrew the 2 connectors  from the back of the lamp 


Change  the O-ring of the projector  


Connect the new LED lamp with no use of the back cap and nut, lube the lamp cup, 
screw on the back support, the gland and replace the projector in its niche. 


Control the sealing of the support and turn ON the power supply


4.2   Ecoproof mounting 


Remove the cap and nut at the back part of the lamp 


Select the gasket corresponding  to the section of the cable gain and screw the cable 
with the connectors placed into the lamp cup 


First screw the cap and then, the nut with adapted tools 


Place the lamp in the projector crown  


Use 3 wedging blocks and screw them with the crown by using the projector screws 


Control the sealing of the assembly and turn ON the power supply


>

 Proceed to the remote controller pairing 


Summary of Contents for LEDINPOOL 502679

Page 1: ...UBACUATICA DE LED PAR56 502679 IT LAMPADA SUBACQUEA A LED PAR56 502679 DE LED UNTERWASSERLAMPE PAR56 502679 MANUEL D INSTALLATION D ENTRETIEN INSTALLATION MAINTENANCE MANUAL MANUAL DE INSTALACION Y MANTENIMIENTO MANUALE DI INSTALAZIONE E MANUTENZIONE MONTAGE WARTUNGSHANDBUCH RoHS REACH ...

Page 2: ......

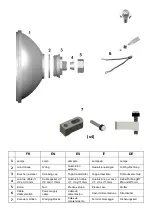
Page 3: ... Schraubverschluβ 4 Joint de câble 7 9 et 13mm Cable gasket 7 9 and 13mm Guarnición cable 7 9 y 13mm Guarnizione per cavo 7 9 e 13mm Kabel DichtungØ7 Ø9 und Ø13mm 5 Ecrou Nut Prensa estopa Pressa cavo Mutter 6 Câble d alimentation Power supply cable Cable de alimentación Cavo d alimentazione Stromkabel 7 Cale de maintien Wedging blocks Calas de mantenimiento Fermi di bloccaggio Sicherungskeil 6 7 ...

Page 4: ...ntage Traditionnel Traditional mounting Montaje tradicional Montaggio tradizionale Traditionelle Montage Fig 2 Montage Ecoproof Ecoproof mounting Montaje Ecoproof Montaggio Ecoproof Ecoproof Montage Fig 3 ...

Page 5: ...mbién instalarse de manera tradicional utilizando todas las piezas de origen del proyector En caso de no utilización de estas piezas es aconsejado conservarlas para la remonta de una lámpara PAR56 clásica IT Il lampada Ecoproof si può installare anche in modo tradizionale utilizzando tutti i pezzi d origine del proiettore In caso di non utilizzazione di questi pezzi è consigliato di conservarli pe...

Page 6: ...1mm 3 INSTALLATION Pour une installation correcte la prise de courant du projecteur devra posséder un dispositif de protection par courant résiduel avec une intensité maximale de 30mA Ce projecteur sera raccordé uniquement à un transformateur isolant de sécurité à bobinage double et d une tension de sortie maximale de 12V Un autre type de transformateur est interdit La puissance de ce transformate...

Page 7: ...de Installez la pile fournie dans son compartiment et allumez la lampe Pressez simultanément les boutons O et S de la télécommande pendant 5 secondes La lampe clignote plusieurs fois et valide le paramétrage Pressez plusieurs fois le bouton C ou P jusqu à obtenir la couleur ou le programme désiré 7 AVERTISSEMENTS DE SECURITE 8 GARANTIE La lampe PAR56 à LED est garantie contre tout défaut de matièr...

Page 8: ...n of 2x1mm 3 INSTALLATION For a correct installation the power socket which feeds the installation lamp will have to possess a device of protection by residual current with a maximal intensity of 30mA This projector will be only connected to a 12V security transformer with double winding Another type of transformer is prohibited The power of this transformer will be always higher than the power of...

Page 9: ...emote controller and switch on the projector Press the buttons O S together during 5 seconds Each lamp connected flash several times to valid the pairing and keep a static colour Press several times the button C or P until obtaining the colour or the desired program 7 SAFETY WARNINGS 8 GUARANTEE This PAR56 LED lamp is guaranteed 24 months against any material and or manufacture defect electronic c...

Page 10: ...2x1mm 3 INSTALACION Para una instalación correcta el enchufe del proyector deberá poseer un dispositivo de protección por corriente residual con una intensidad máxima de 30mA Este proyector únicamente será conectado con un transformador aislado de seguridad a enrollamiento doble y de una tensión de salida máxima de 12V Otro tipo de transformador es prohibido La potencia de este transformador siemp...

Page 11: ...tancia Instale la pila abastecida en su compartimiento y encender el proyector Apriete simultáneamente los botones O y S del telemando durante 5 segundos La lámpara parpadea varias veces y valida la configuración Basta luego con apretar el botón C o P hasta obtener el color o el programa deseado 7 ADVERTENCIAS DE SEGURIDAD 8 GARANTIA Esta lámpara PAR56 de LED esta garantizada contra todo defecto d...

Page 12: ...e di 2x1mm 3 INSTALLAZIONE Per un installazione corretta la presa di corrente del proiettore dovrà possedere un dispositivo di protezione per corrente residua con un intensità massimale di 30mA Questo proiettore sarà raccordato unicamente ad un trasformatore isolante di sicurezza con bobinaggio doppio e di una tensione di uscita massimale di 12V Un altro tipo di trasformatore è vietato Ia potenza ...

Page 13: ...allate la pila fornita nel suo scompartimento e accendere il proiettore Premete simultaneamente i bottoni O e S del telecomando durante 5 secondi La lampada lampeggia parecchie volte configurazione effettuata Basta poi premere parecchie volte sui bottoni C o P del telecomando per ottenere il colore o il programma desiderato 7 AVVERTENZE DI SICUREZZA 8 GARANZIA La lampade led PAR56 é garantita cont...

Page 14: ...ung mit einer maximalen Stromstärke von 30mA verfügen Dieser Scheinwerfer darf nur an einem isolierenden Sicherheitstransformator mit Doppelwicklung und maximaler Ausgangsspannung von 12V angeschlossen werden Ein anderer Transformatortyp ist untersagt Die Leistung dieses Transformators muss stets höher sein als die Gesamtleistung der angeschlossenen Scheinwerfer Der Hersteller ist in keiner Weise ...

Page 15: ...rte Batterie in ihr Fach legen und die Lampe einschalten Gleichzeitig 5 Sekunde auf die Knöpfe O und S der Fernbedienung drücken Die Lampe blinkt mehrmals und validiert die Synchronisierung Dann mehrmals auf die Knöpfe C oder P drücken bis man die gewünschte Farbe oder das gewünschte Programm erhält 7 SICHERHEITSWARNUNGEN 8 GARANTIE Auf die fehlerlose Beschaffenheit des Materials und oder Fabrikat...

Page 16: ... cova de poder do projetor terá que possuir um dispositivo de proteção através de corrente residual com uma intensidade máxima de 30MEU Este projector só será unido com um transformador que isola de segurança com sinuoso dobro e de uma tensão de saída máxima de 12V Outro tipo de transformador é proibido O poder deste transformador sempre será superior ao poder total dos projectores conectados O fa...

Page 17: ...igue o projetor Aperte simultaneamente o botão O e S do controle remoto durante 5 segunda A lâmpada brilha várias vezes e confirma a colocação de parámetro É então necessário apertar várias vezes o botão C ou P até que obtenha a côr ou o programa desejado 7 ADVERTÊNCIAS DE SEGURANÇA 8 GARANTIA A lâmpada PAR56 para LED está garantida contra qualquer defeito de and or material que fabrica componente...

Page 18: ......

Page 19: ...NOTES ...

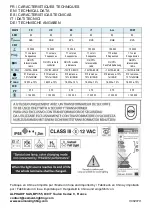
Page 20: ...f Funkfernbedienung On Off telecomando rádio 12V 50 60HZ 12V 50 60HZ 12V 50 60HZ 12V 50 60HZ 12V 50 60HZ 12V 50 60HZ 180 510 lumens 10 full RGB 510 lumens 10 full RGB 510 lumens 10 full RGB 510 lumens 10 full RGB 510 lumens 10 full RGB 510 lumens 10 full RGB P max 16 0W 10 16 0W 10 16 0W 10 16 0W 10 16 0W 10 16 0W 10 IEE PF 0 75 0 75 0 75 0 75 0 75 0 75 100 000 100 000 100 000 100 000 100 000 100 ...

Reviews: