background image

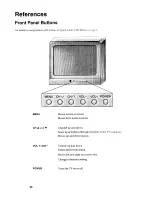
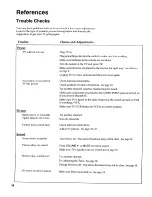
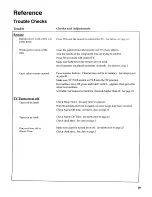
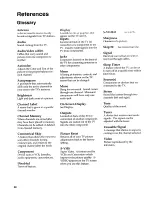
Summary of Contents for 274.43918390 SERIES

Page 1: ...and the Serial No of your television in the space provided Model No Serial No Keep this information for future use _o ooo SEARS 31 TABLETOP COLOR TELEVISION WITH REMOTE CONTROL Safety Information Use Warranty and Service Sears Roebuck and Co Hoffman Estates IL 60179 U S A ...

Page 2: ... the safety feature of the plug The wide blade fits into the wall socket only one way If you need an extension cord make sure it matches the plug of the TV Operate TV only on 120 volts 60 Hz AC power normal house power For safety reasons make sure any equipment or accessories connected to this product bears the UL listing mark or if purchased and used in Canada the CSA certification mark If in dou...

Page 3: ...th Remote Buttons With VCRs With a Cable Box With a Laserdisc With Audio Equipment 6 7 8 11 12 13 14 15 Adjusting Your TV Overall Picture 16 Picture Settings 17 Color Tint Brightness Sharpness Autocolor Picture Reset Sound Settings 18 19 Stereo Tone Speakers Using Advanced Features Place Channels in Memory Autoprogram Naming Channels Setting the Sleep Timer Setting the Alarm Clock Watching Closed ...

Page 4: ...NS GUIDE Hook up ally antennas cables or other equipment to your TV before you follow the steps below 2 Plug in the TV Plug the cord into the outlet matching the wide and the small end of the plug with the outlet 3 Put Batteries in the Remote A Pull off the cover of the battery compartment B Place the four AAA batteries as shown matching the and end of each battery in the compartment C Replace the...

Page 5: ...s Alarm Ad A Press MENU until the Setup menu is selected This menu is white B Press to start placing channels in the TV s memory 6 Set the Time 2 21 AM 13 A B Press MENU until the Alarm menu is selected This menu is green The Clock is automatically highlighted the first time you set it If it is not press CHANNEL down to highlight it C Press to set the hour D Press to set the minutes E Press DONE t...

Page 6: ... Controls Details are on page 6 Turns the TV on Sets the remote to control the TV Operates TV when remote is set to control the TV Operates the TV and advanced features Component Buttons Details are on pages 8 15 Menu Buttons See next page for details Controls components such as a VCR laserdisc audio equipment and a cable box Changes the menus and features on the screen Used to watch two pictures ...

Page 7: ... Press MENU repeatedly to see each of the four menu colors Each menu has a different color background as shown at the left Menu Buttons These buttons are used with the TV s menus to adjust the features You can use the menu buttons on the remote or the front of the TV Moving through the Menus Controls Alarm Ad 1 Press MENU to move from menu to menu 2 Press CHANNEL up and down to move up and down th...

Page 8: ... Volume Raises and lowers sound Moves left and right on a menu line See Quick Guide to the Menus on page 5 Changes a feature setting MUTE Turns off the TV sound CHAN Channel Scans up and down through channels in the TV s memory Moves up and down menus See Quick Guide to the Menus on page 5 Moves through channels in VCR s memory PREV CHAN Previous Channel Changes back and forth between two channels...

Page 9: ...ewind Rewinds a tape or laserdisc Searches backward while tape or laserdisc is playing FF Fast Forward Fast forwards a tape or laserdisc Searches forward while tape or laserdisc is playing REC Record Starts recording onto tape CLEAR Clears items from timer programs and VCR s clock PROG Program Sets clock and programs timer on VCR STOP Stops tape or laserdisc PAUSE Pauses tape or laserdisc PLAY Pla...

Page 10: ...dbx 14 16 Dimensia 00 Dynatech 15 Emerson 09 10 13 15 20 23 24 34 41 Fisher 02 12 18 19 43 Funai 15 GE 00 07 08 32 37 Goldstar 09 14 Harman Kardon 14 Hitachi 05 15 35 36 Instant Replay 08 JCL 08 JCPenney 02 05 07 08 14 16 30 35 JVC 02 14 16 30 Kenwood 02 14 16 30 Lloyd 15 Magnavox 08 29 Marantz 02 08 14 16 29 30 Marta 09 MEI 08 Memorex 08 09 12 15 MGA 04 27 Minolta 05 35 Mitsubishi 04 05 27 35 40 ...

Page 11: ... to the chart below for your setting 1 Select the Setup Menu Controls Alarm Ad 13 A Press TV to set the remote to control the TV B Press MENU to select the Setup menu This menu is white 2 Highlight VCR1 Channel Controls Alarm Adjust 3 3 A Press CHANNEL down to highlight the VCR 1 Channel B Press 4 to highlight the channel 3 Enter channel number 4 Press DONE to save the setting 13 Controls Alarm Ad...

Page 12: ...ge 7for more details on buttons used with your VCR Turn on the VCR Turn off the VCR A Press channel 00 on the I V to see what the VCR is doing B Press VCR1 or VCR2 to set the remote to control the VCR C Press ON OFF to turn on the VCR if it did not turn on when you pressed VCR1 or VCR2 A Press VCR1 or VCR2 to set the remote to control the VCR B Press ON OFF 10 ...

Page 13: ...o set the remote to control the VCR Tune the VCR to the channel you want to record using CHANNEL up and down or pressing two number buttons Press RECORD to start recording Press TV VCR on the VCR Press TV to set the remote to control the TV Press CHANNEL up or down to change channels on the TV To see the channel you are recording tune the TV back to channel 00 A Turn on VCR B Insert a tape in the ...

Page 14: ...he first one does not work A Tune TV to channel 02 03 04 05 or 06 B Point remote at the cable box and press GABLE C Press ON OFF to turn it on D Press CHANNEL up or down to change channels on the cable box A Press CABLE B Press ON OFF to turn it off 12 Cable Box Codes ABC 22 46 Anvision 07 08 Cablestar 07 08 Eagle 08 Eastern International 02 General Instrument 04 05 15 23 24 25 30 36 46 Hamlin 12 ...

Page 15: ...4 05 or 06 Consult your cable company for more information 1 Select the Setup menu Controls Alarm 13 A Press TV to set the remote to control the TV B Press MENU to select the Setup menu This menu is white 2 Highlight Cable Channel 3ontrols Alarm Ad 13 A Press CHANNEL down to move down the menut until Cable Channel is highlighted B Press to underline the channel 3 Enter channel number 4 Press DONE ...

Page 16: ...tion Laserdisc Codes I Pion or Proscan 33 RCA 33 _ A Point the remote at the audio equipment and hold LDISC B Enter the code for your brand from the code list below C Release LDISO D Press ON OFF If nothing happens try pressing LDISC and then ON OFF A Tune TV to channel 00 03 or 04 B Point the remote at the Laserdisc and press LDISG C Press ON OFF to turn it on D Use the buttons on the remote that...

Page 17: ... equipment Basic Operation Audio Codes RCA Dimensia AM FM 03 CD 07 Tape 06 Phono 05 Aux 04 A Point the remote at the audio equipment and hold AUDIO B Enter the code from the code list C Release AUDIO D Press ON OFF to turn it on If nothing happens try pressing AUDIO and then ON OFF E Repeat A D with another code if the first one does not work a B C D Point the remote at the audio equipment and pre...

Page 18: ...t the Controls Menu Alarm Ad Press MENU to select the Controls menu This menu is yellow 2 Highlight Picture Alarm Ad Press CHANNEL down to highlight Picture 3 Use VOLUME and to adjust the Picture 4 Press DONE to save the setting A Press 4 to lighten the picture OR Press to darken the picture B Press DONE to save the setting F_II_IIIK_ 16 ...

Page 19: ...ls Alarm Press or to adjust each item Press DONE to save the setting Press VOLUME to _ Press VOLUME to Color Increase color richness Lower color to black and white i Tint Give red tint to skin color Give green tint to skin color Bright Brightness Add more light to dark parts of Add more dark to light parts of the picture the picture Sharp Sharpness I Show cleaner clearer images Make picture more s...

Page 20: ...em to change Alarm Ad Tone High Press CHANNEL down to highlight the sound item you want to adjust 3 Use VOLUME or to adjust each item 4 Press DONE to save the setting Alarm Ad Tone High Press or to adjust each item Press DONE to save the setting Stereo On Sound is automatically reproduced in stereo or mono whichever the TV station is broadcasting Tone High High pitched sounds are louder Sound is r...

Page 21: ...Select the Setup Menu ontrofs Alarm Ad Press MENU repeatedly to select the Setup menu This menu is white 2 Highlight speakers Controls Alarm Ad Press CHANNEL down until Speakers is highlighted 3 Turn Speakers on or off 4 Press DONE to save the setting ontrols Alarm Adjust _et_g Press 4 or to turn the speakers on or off Press DONE to save the setting e 11 fL Speakers On The sound comes from the lV ...

Page 22: ...ore you begin these steps or you will not be able to add channels into memory B Press MENU repeatedly to select the Setup Menu and highlight Autoprogram This menu is white C Press to start the TV adding all the channels into memory D Wait until the TV has cycled through all the channels and returns to the original channel 2 Add or delete channels 3 Press DONE to save the setting Controls Alarm Ad ...

Page 23: ... C Press to underline the channel number D Select the channel number with the number buttons E Press 4 to underline the first character of the name F Choose the character using CHANNEL up or down G Repeat E F to complete the name H Press to move backward if you want to change an item I Press DONE to save the setting 3 Erase a name 4 Press DONE to clear the name 12 ontro sA arm Channel Memory 13 St...

Page 24: ...ight Sleep Timer This menu is yellow B Press 4 enter the amount of time you want to watch TV before it shuts off Each press equals 15 minutes C Press to subtract time from the sleep timer D Press DONE to save the setting 3 Add more time Alarm Ad A When 0 01 appears on the screen the TV will shut off in one minute Press 4 to add more time 4 Cancel the Timer Alarm Ad A Press MENU to select the Contr...

Page 25: ...m Channel 3 Press Done to save the setting 12 34 AM 13 Alarm Off Time Disabled AM A B C Press CHANNEL down to highlight the Alarm Channel Press I to highlight the channel number Enter the channel that you want the TV to turn on to with the number buttons D Press DONE to save the setting 4 Set On and Off Times 5 Press Done to save the setting 12 34 AM 13 Alarm Controls Adjust Setup 12 34 AM 13 Alar...

Page 26: ...ral information usually shown in a box on the screen with information that is not related to closed captioning 1 Select the Controls Menu Alarm Ad Press MENU to _elect the Controls menu This menu is yellow 2 Highlight Closed Captioning Alarm Ad Press CHANNEL down to highlight Closed Captioning 3 belect _setting 4 Press DONE to save the setting _ontrols Alarm Ad A Press or to select Off CI or C2 Se...

Page 27: ... menu Controls Alarm 13 Press MENU repeatedly to select the Setup menu This menu is white 2 Highlight Cable Air Controls Alarm 13 Press CHANNEL down to highlight Cable Air 3 Select Cable or Air 4 Press DONE to save the setting 13 Controls Alarm Adjust VCR 1 Channel 00 A Press or to select Cable or Air Select Cable if you have cable Select Air if you have a home antenna connected to your TV B Press...

Page 28: ...ge 5 MENU Shows menus on screen Moves from menu to menu CH and Channel up and down Scans up and down through channels in the TV s memory Moves up and down menus VOL and Volume up and down Raises and lowers sound Moves left and right on a menu line Changes a features setting POWER Turns the TV on or off 26 ...

Page 29: ...Details are on page 21 Channel number you are watching Indicates that a component is connected to the S VIDEO jack on the back of the TV it is turned on and channel 00 is selected Indicates that a component is connected to the VIDEO jack on the back of the TV it is turned on and channel 00 is selected Alarm clock is set to turn on or off Details are on page 23 Sleep Timer is set to turn off the TV...

Page 30: ... position of Cable Air feature See page 25 Try another channel Inactive channel may be tuned Make sure component connected to the VIDEO INPUT jacks is turned on if you choose channel 00 Make sure TV is tuned to the same channel as the switch on back of VCR if watching a VCR Make sure TV VCR button on VCR is in correct position Try another channel Scan the channels Picture poor sound okay Sound Noi...

Page 31: ... buttons Channel may not be in memory See autoprogram on page 20 Make sure TV VCR switch on VCR is in the TV position For numbers over 100 press and hold I until 1 appears then press the other two numbers Set Cable Air feature to Cable for channels higher than 69 See page 25 TV Turns on or off Turns off by itself Turns on by itself Does not turn off at Alarm Time Check Sleep Timer See sleep timer ...

Page 32: ...tors located on the back of the TV for connecting antennas or other components Menu A listing of features controls and adjustments shown on the TV screen that can be changed Mono Slang for monaural Sound comes through one channel Monaural components will have only one audio jack On Screen Display See Display Outputs Located on back of the TV for connection of another component Signals are routed o...

Page 33: ...d Adjustments 28 29 CLEAR Button 6 7 Clock 3 23 Closed Captioning 26 Codes Audio 15 Cable Box 12 Laserdisc Player 14 VCR 8 Color 17 Colors Menus 5 Commerical Skip 6 Button 6 Display 29 Component Buttons 13 AUDIO CABLE LDISC VCR1 VCR2 Components Audio Equipment 15 Cable Box 12 13 Laserdisc Player 14 VCR 8 9 10 11 Contents 1 Controls TV Front Panel 26 Remote 6 7 Controls Menu Closed Captioning 24 Pi...

Page 34: ... 27 Service back cover Set Clock 3 Set Time 3 Setting Cable Air 25 Setting the Cable Channel 12 Setting the Sleep Timer 22 Setup Menu Autoprogram 3 20 30 Cable Air 25 Channel Label 21 Channel Memory 3 20 VCR 1 Channel 8 Sharpness 17 Signal 7 30 SKIP 30 6 30 Sleep Display 22 26 Sleep Timer 22 Sharpness 17 Sound 18 19 Speakers 19 Stereo 18 30 Stereo Display 27 STOP Button 7 8 11 15 T Table of Conten...

Page 35: ...33 ...

Page 36: ...1 800 366 7278 WARRANTY FULL 90 DAYWARRANTYON COLOR TELEVISION Forthe first 90daysfromthe date of purchase Searswill repairthistelevision free of charge if defectivein materialorworkmanship LIMITEDWARRANTYON ALLPARTSEXCEPT PICTURE TUBE After90 daysfromthe date of purchase and upto oneyear Searswill furnish free of charge a replacement for anydefectivepart inthis television Youpayfor labor LIMITEDW...

Reviews: