background image

8

30" GAS SLIDE-IN RANGE INSTALLATION INSTRUCTIONS

(Models with Sealed Top Burners)

Once regulator is in place, open the shutoff valve in the 

gas supply line. Wait a few minutes for gas to move 

through the gas line.

Check for leaks.

 After connecting the range to the gas 

supply, check the system for leaks with a manometer. 

If a manometer is not available, turn on the gas supply 

and use a liquid leak detector (or soap and water) at all 

joints and connections to check for leaks.

 Do not use a flame to check for leaks 

from gas connections. Checking for leaks with a flame 

may result in a fire or explosion.

Tighten all connections

 as necessary to prevent gas 

leakage in the range or supply line.

Disconnect this range and its individual manual 

shutoff valve

 from the gas supply piping system 

during any pressure testing of that system at test 

pressures greater than 1/2 psig (3,5 kPa or 14" water 

column).

Isolate the range from the gas supply piping 

system

 by closing its individual manual shutoff valve 

during any pressure testing of the gas supply piping 

system at test pressures equal to or less than 1/2 psig 

(3,5 kPa or 14" water column).

5.

 LP/Propane Gas Conversion

This appliance can be used with Natural gas or LP/

Propane gas. It is shipped from the factory for use with 

natural gas.
If you wish to convert your range for use with LP/

Propane gas, use the supplied fixed orifices located 

in a bag containing the literature marked "FOR 

LP/PROPANE GAS CONVERSION". Follow the 

instructions packaged with the orifices for surface, 

oven and broil burners conversion.
The conversion must be performed by a qualified 

service technician in accordance with the 

manufacturer's instructions and all local codes and 

requirements. Failure to follow these instructions 

could result in serious injury or property damage. 

The qualified agency performing this work assumes 

responsibility for the conversion.

 Failure to make the appropriate 

conversion can result in serious personal injury and 

property damage.

6.

 Electrical Requirements

120 volt, 60 Hertz, properly grounded dedicated circuit 

protected by a 15 amp circuit breaker or time delay 

fuse.

Note: 

Not recommended to be installed with a Ground 

Fault Interrupt (GFI).

Do not use an extension cord with this range.

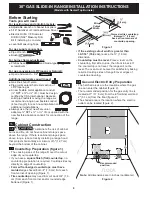
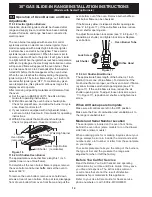
Preferred Method

Grounding type 

wall receptacle

Do not, under any 

circumstances, 

cut, remove, 

or bypass the 

grounding prong.

Power supply cord with 

3-prong grounding plug.

Figure 5

Grounding Instructions

IMPORTANT

 Please read carefully.

For personal safety, this appliance must be 

properly grounded.

The power cord of this appliance is equipped with a 

3-prong (grounding) plug which mates with a standard 

3-prong grounding wall receptacle (see Figure 5) to 

minimize the possibility of electric shock hazard from 

the appliance.
The wall receptacle and circuit should be checked by 

a qualified electrician to make sure the receptacle is 

properly grounded.
Where a standard 2-prong wall receptacle is installed, 

it is the personal responsibility and obligation of the 

consumer to have it replaced by a properly grounded 

3-prong wall receptacle.

Do not, under any circumstances, cut or remove 

the third (ground) prong from the power cord.


Disconnect electrical supply cord from 

wall receptacle before servicing the appliance.

7.

 Moving the Appliance for

Servicing and Cleaning

Turn off the range line fuse or circuit breakers at 

the main power source, and turn off the manual gas 

shut-off valve. Make sure the range is cold. Remove 

the service drawer (warmer drawer on some models) 

and open the oven door. Lift the range at the front 

and slide it out of the cut-out opening without creating 

undue strain on the flexible gas conduit. Make sure 

not to pinch the flexible gas conduit at the back of the 

range when replacing the unit into the cut-out opening. 

Replace the drawer, close the door and switch on the 

electrical power and gas to the range.

Summary of Contents for 30" GAS SLIDE-IN RANGE

Page 1: ...tion 12 Before You Call for Service 12 Anti Tip Brackets Installation 13 14 Notes 44 If the information in this manual is not followed exactly a fire or explosion may result causing property damage pe...

Page 2: ...binets above the range Children could be seriously burned climbing on the range to reach items To eliminate the need to reach over the surface burners cabinet storage space above the burners should be...

Page 3: ...when the cabinet is unprotected 4 For cutouts below 22 7 8 58 1 cm appliance will slightly show out of the cabinet 5 Kenmore Models Allow at least 19 48 9 cm clearance for door depth when it is open...

Page 4: ...ese surfaces should be flat leveled hatched area IMPORTANT Cabinet and countertop width should match the cutout width Do not install the unit in the cabinet before reading next 2 pages A HEIGHT Under...

Page 5: ...side of cooktop frame should be at least 1 16 0 16 cm taller than cabinet sides as measured in step 2 8 After the installation MAKE SURE that the unit is supported by the leveling legs NOT by the cook...

Page 6: ...d fire do not have cabinet storage space above the range If there is cabinet storage space above range reduce risk by installing a range hood that projects horizontally a minimum of 5 12 7 cm beyond t...

Page 7: ...nal pipe threads Your regulator is in location as shown in figure 3 Do not allow regulator to rotate on pipe when tightening fittings Connection to Pressure Regulator The regulator is already installe...

Page 8: ...his work assumes responsibility for the conversion Failure to make the appropriate conversion can result in serious personal injury and property damage 6 Electrical Requirements 120 volt 60 Hertz prop...

Page 9: ...Range Models Equipped with Leveling Device 8 13 Adjust leveling legs so that the underside of the cooktop is sitting on the countertop Carefully screw in refer to Leveling the range Models equipped w...

Page 10: ...Figure 8 Take 2 readings with the level placed diagonally in one direction and then the other Level the range if necessary by adjusting the 4 leg levelers with a wrench see Figure 23 3 Taking care to...

Page 11: ...t position without extinguishing the flame Flame should be as small as possible without extinguishing NOTE On dual burners the inner flame cannot be adjusted Adjustments are made to the outer flame on...

Page 12: ...blue flame To determine if the oven burner flame is proper remove the oven bottom and burner baffle and set the oven to bake at 300 F To remove the oven bottom remove oven hold down screws at rear of...

Page 13: ...cture of the range is trapped by the anti tip bracket Figure 19 Lower the range by adjusting the 4 leveling legs until the underside of the cooktop is sitting level on the countertop Refer to Leveling...

Page 14: ...el the range if necessary by adjusting the leveling legs Leg Leveler Raise Lower Range side FASTEN BRACKET WALL OR FLOOR MOUNTING Leveling leg Wall mount Floor Mount Anti Tip Bracket Rear of Range Wal...

Page 15: ...e para el consumidor Mantenga estas instrucciones con el manual del usuario para futuras referencias Tabla de materias Importantes instrucciones de seguridad 16 Dimensiones de la unidad de la gabinete...

Page 16: ...n artefacto est siendo usado A medida que los ni os crecen ens eles el uso apropiado y de seguridad para todos los artefactos Nunca deje la puerta del horno abierta cuando la estufa est desatendida No...

Page 17: ...o el conducto flexible de gas entre la estufa y la pared Puerta abierta vea la nota 5 Panel lateral A ALTURA Bajo Cubierta B ANCHO C ANCHO DE LA PLANCHA DE COCINAR D PROFUNDIDAD A LA FRENTE DE LA EST...

Page 18: ...si no ha lado esta 2 p gina A ALTURA Bajo Cubierta B ANCHO C ANCHO DE LA PLANCHA DE COCINAR D PROFUNDIDAD A LA FRENTE DE LA ESTUFA E ANCHO DE RECORTADO cubierta y armario F PROFUNDIDAD DE RECORTADO G...

Page 19: ...nsporte 5 Deslice la unidad hacia el gabinete Aseg rese que la unidad este centrada con el centro de la abertura del gabinete 6 Remueva la parte en pl stico extruido en cada lado de la cubierta de vid...

Page 20: ...dades cuadradas planas no se necesita ninguna preparaci n del mostrador El reborde de frente de mostradores moldeados deben tener bordes moldeados a 3 4 1 9 cm a partir de cada extremidad de la apertu...

Page 21: ...tire las 3 tornillos Figura 3 Si esta usando una salida de piso de gas remover la protecci n de la l nea de la parte de abajo de la unidad para permitir el acceso para la tuber a de gas Fig 3 Recomend...

Page 22: ...rica Una vez que regulador est en su lugar abra la v lvula en la l nea del suministro de gas Espere algunos minutos para que el gas pueda moverse a trav s de la l nea de gas Compruebe para saber si ha...

Page 23: ...ce la unidad hacia el gabinete y central antes de nivelarla 8 12 Nivele la cocina vea Nivelaci n de la estufa El piso donde se instala la cocina debe estar nivelado Siga las instrucciones nivelaci n d...

Page 24: ...a aseg rese que el piso este nivelado o contactar a un carpintero para nivelar 9 2 Para los modelos equipado con las patas niveladoras Nivele la estufa y ajuste la altura de la estufa antes de instala...

Page 25: ...emitiendo chispas b El quemador superior se encender cuando el gas llegue al quemador Cebe el sistema de las tuber as de suministro dejando la perilla en la posici n LITE encendido hasta que el quema...

Page 26: ...terior del fondo del horno Jale hacia arriba desenganche el frente del fondo del marco anterior del horno y jale la base hacia a fuera de ste Retire el deflector del quemador de manera que la llama de...

Page 27: ...parte posterior de la cocina 2 Desplegar el molde de papel y colocarlo alisado sobre el piso con el v rtice posterior derecho posicionado exactamente en la intersecci n de las l neas central y posteri...

Page 28: ...er trasladadas y instaladas con la cocina Las instrucciones provistas sirven para instalaci n en suelo de madera o concreto Al fijar los tornillos al suelo asegurase que no atraviesen la instalaci n e...

Page 29: ...ubliez pas de laisser ces instructions au consommateur 5 Note Pour utilisation de l appareil 2000 pieds au dessus du niveau de la mer la puissance des br leurs doit tre r duite de 4 pour chaque 1000 p...

Page 30: ...ximit de l appareil peut r sister la chaleur g n r e par celui ci Ne bloquez pas la circulation d air l orifice de ventilation du four ni autour de la base ou sous le panneau inf rieur avant de la cui...

Page 31: ...ntation ou le conduit de gaz entre le mur et l appareil 2 Ne scellez pas l appareil aux armoires lat rales Porte ouverte Voir la note 5 Panneau lat ral A HAUTEUR Sous la table de cuisson B LARGEUR C L...

Page 32: ...Ces surfaces doivent tre planes et niveau r gion hachur e IMPORTANT La largeur de l armoire et celle du comptoir doivent correspondre la largeur de d coupage E E E Dimensions de l armoire 1 1 8 2 86 c...

Page 33: ...t le dispositif de nivellement si pr sent pour que la hauteur entre le plancher et le renfort de m tal en dessous de la table de cuisson soit plus grande par 1 16 0 16 cm que la plus grande mesure H1...

Page 34: ...le de cuisson de la cuisini re s ajustent au dessus du rebord du d coupage du dessus de comptoir Si vous avez un dessus de comptoir au fini carr plat il n est pas n cessaire de pr parer le dessus du c...

Page 35: ...air pour la combustion et le conduit de ventilation de l appareil Pour un utilisation ad quat la pression int rieure maximale au r gulateur ne doit pas tre sup rieure 14 35 56 cm 3 5 kpa de pression d...

Page 36: ...tation en gaz la cuisini re Une fois le r gulateur en place ouvrez le robinet de la ligne d alimentation en gaz Attendez quelques minutes pour permettre au gaz circuler travers la canalisation pour le...

Page 37: ...de l utiliser la glisser hors de son g te tout en vitant de soumettre le conduit gaz flexible des contraintes excessives Lorsque la cuisini re est replac e dans son g te veillez ne pas coincer le cond...

Page 38: ...Le plancher qui supporte la cuisini re doit tre de niveau 8 12 Finalement glissez l appareil dans l ouverture du comptoir 9 Mise niveau de la cuisini re 9 1 Mod les poss dant un dispositif de nivellem...

Page 39: ...ils sont en fonction NE laissez pas les renversements la nourriture les agents de nettoyage ou tout autre mat riau obstruer l orifice du br leur V rifiez et assurez vous que la dimension des couvercl...

Page 40: ...de gaz aient t v rifi es minutieusement pour d tecter les fuites et que la cuisini re ait t branch e au r seau lectrique Le br leur du four est muni d un allumeur lectrique ainsi qued unsyst medecomma...

Page 41: ...pproximative de la flamme du br leur du fourneau est de 1 25 mm centre de flamme bleu distinct Pourd terminersilaflammedubr leurdufourestad quate enlevez le fond du four et l enceinte du br leur et r...

Page 42: ...et les extr mit s des c t s exactement sur la ligne pr alablement trac e utilisez le diagramme ci dessous pour localiser le support anti bascule si le gabarit de papier n est pas disponible Figure 18...

Page 43: ...rquez au sol la position des vis du support tel que montr sur ce gabarit le support peut tre install droite ou gauche Figure 20 B Percez des avant trous et fixez le support Rep rez le centre des trous...

Page 44: ...44 NOTES NOTAS...

Reviews: