background image


3


SAFETY PRECAUTION 

THIS UNIT IS INTENDED FOR HOUSEHOLD USE ONLY 

IMPORTANT 

SAFETY PRECAUTIONS 

Thank you for purchasing our product.  Even though we go to great efforts to ensure the quality of each 
product, occasional errors and/or omissions do occur.  In any event should you find this product to be defective 
or missing a part please contact our Customer Service Department.  Your Free Spirit treadmill was designed 
and built for optimum safety.  However, certain precautions apply whenever you use your treadmill.  
Be sure to read the entire manual before assembly and operation.  Also, please note the following safety 
precautions: 

DANGER: 

To reduce the risk of electric shock, always unplug the treadmill from the electrical outlet 

immediately after using and before cleaning. 

  1. Read OWNER OPERATING MANUAL and all accompanying literature and follow it carefully before 

using your treadmill. 

2. If dizziness, nausea, chest pains, or any other abnormal symptoms are experienced while using this 
equipment, STOP the workout at once.  CONSULT A PHYSICIAN IMMEDIATELY. 
3. Never leave the treadmill unattended when plugged in.  Unplug from the outlet when not in use and before 
removing or replacing parts. 
4. Never operate the treadmill if it has a damaged cord or plug, if it is not working properly, if it has been 
dropped, damaged, or exposed to water. 
5. Do not pull the treadmill by the power supply cord or use cord as a handle.  Keep cord away from heated 
surfaces and open flames. 
6. Fitness equipment must always be installed and used on a flat surface.  Do not use outdoors or near water. 
7. Do not insert any objects into any openings. 
8. Keep children and pets away from this equipment at all times while exercising. 
9. Handicapped individuals should have medical approval and close supervision when using this treadmill. 
10. Do not place hands or feet under the treadmill.  Always keep hands and legs off of the treadmill when 
others are using it. 
11. Never turn on treadmill while standing on treadbelt.  Always return the treadmill to slow speed to provide 
for safe dismount and low speed restart. 
12. To disconnect, turn all controls to the off position, then remove plug from outlet.  
13. Use the treadmill only for it’s intended use as described in this manual. 
14. Warm up 5 to 10 minutes before each workout and cool down 5 to 10 minutes afterward.  This allows your 
heart rate to gradually increase and decrease and will help prevent straining muscles. 
15. Never hold your breath while exercising.  Breathing should remain at a normal rate in conjunction with the 
level of exercise being performed. 
16. Start your program slowly and very gradually increase your speed and distance.  
17. Always wear suitable clothing and footwear while exercising.  Do not wear loose fitting clothing that could 
become entangled with the moving parts of your treadmill. 
18. Do not walk or jog barefoot, in stocking feet or loose fitting shoes or slippers. 
19. Care must be taken when lifting or moving the equipment, so as not to injure your back.  Always use 
proper lifting techniques. 
 

WARNING:

 Before beginning any exercise program consult your physician.  This is especially important for 

individuals over the age of 35 or persons with pre-existing health problems.  Read all instructions before using 
any fitness equipment.  We assume no responsibility form personal injury or property damage sustained by or 
through the use of this product. 


Summary of Contents for free spirit C 249 30427 1

Page 1: ...ment should not be undertaken without first consulting a physician No specific health claims are made or implied as they relate to the equipment IMPORTANT Read all instructions carefully before using this product Retain this owner s manual for future reference SEARS CANADA INC TORONTO ONTARIO M5B 2B8 OWNER S MANUAL C 249 30427 1 ...

Page 2: ...sembly Check List 4 Assembly 5 Treadmill Monitor Operation 6 12 Folding 13 Parts List 14 16 Overview Drawing 17 18 Trouble Shooting 19 Adjustment 20 22 Maintenance 23 Training Guidelines 24 26 Stretching 27 28 Ordering Replacement parts 29 Service and Parts 30 ...

Page 3: ...r nearest Sears Canada Inc service center SEARS THREE YEAR MOTOR WARRANTY WHAT DOES THIS WARRANTY COVER This warranty covers your treadmill motor against defects in material and workmanship when used for the purpose intended under normal conditions and provided it receives proper care HOW LONG DOES THE COVERAGE LAST This warranty lasts for three years from date of purchase This warranty is not tra...

Page 4: ...bjects into any openings 8 Keep children and pets away from this equipment at all times while exercising 9 Handicapped individuals should have medical approval and close supervision when using this treadmill 10 Do not place hands or feet under the treadmill Always keep hands and legs off of the treadmill when others are using it 11 Never turn on treadmill while standing on treadbelt Always return ...

Page 5: ...ASSEMBLY CHECK LIST 73 5 16 x 1 2 Round Bolt x14 105 5 16 x18x1 5T Flat Washer x6 106 5 16 x23x1 5T Curve Washer x2 111 Lubricant x1 40 Safety Key x1 110 M6 Allen Wrench x1 109 M5 Allen Wrench x1 4 ...

Page 6: ...ts 73 using the allen wrench 109 Connect the incline adjustment switch cable 59L from the left upright 4L to the extension incline cable 61 Slide the left handgrip tube 5 into the left upright 4L Secure using two round head bolts 73 using the allen wrench 109 See figure 4 and 5 STEP 5 Connect the extension speed cable 63 to the speed cable 62 from the console assembly Connect the extension compute...

Page 7: ...et installed by a qualified electrician The use of an extension cord with this product is not recommended If an extension cord is needed use a short less than 10 feet heavy gauge 14 gauge or better extension cord with a three prong grounded plug and receptacle To Operate treadmill Note Before operating your treadmill become familiar with all operating parts and controls their location and function...

Page 8: ...rt your treadmill St reset Press the st reset button to stop your treadmill Press the st reset button for 2 seconds to reset all data Up Press the up button to raise the incline position The maximum incline position is 10 Down Press the down button to lower the incline position The minimum incline position is 0 Speed rapid Key 5 preset speed buttons 2mph 4mph 6mph 8mph 10mph Incline rapid key 5 pr...

Page 9: ...dmill 3 Monitor will show press user weight and you can enter your weight by pressing the slow fast button or up down button 4 Press the start for manual mode P1 or press program button to select the pre set programs or user mode 5 a Manual P1 Before beginning your exercise program you can preset your time Press the enter key to select the time function press the fast or slow keys to set your time...

Page 10: ...0 87 5 87 5 87 5 75 75 75 62 5 62 5 62 5 P5 INCLINE L1 L2 L3 L4 L5 L7 L8 L7 L6 L5 L4 L4 L5 L6 L7 L7 L6 L4 L2 L1 P6 SPEED 50 62 5 62 5 75 87 5 62 5 62 5 87 5 62 5 75 100 62 5 75 100 62 5 75 87 5 62 5 62 5 50 P6 INCLINE L1 L2 L3 L4 L5 L3 L4 L6 L3 L4 L7 L3 L4 L8 L3 L4 L6 L4 L2 L1 For example Setting 12MPH is P2 high speed the speed will calculate through above formula and show in program drawing S1 S...

Page 11: ...ED MAX 25 USER SPEED MAX 12 5 USER SPEED MAX P4 SPEED Interval Speed 100 USER SPEED MAX 87 5 USER SPEED MAX 75 USER SPEED MAX 62 5 USER SPEED MAX 50 USER SPEED MAX 37 5 USER SPEED MAX 25 USER SPEED MAX 12 5 USER SPEED MAX P5 SPEED Hill Intervals 100 USER SPEED MAX 87 5 USER SPEED MAX 75 USER SPEED MAX 62 5 USER SPEED MAX 50 USER SPEED MAX 37 5 USER SPEED MAX 12 5 USER SPEED MAX P6 SPEED Hill Repea...

Page 12: ...al signals However plain water can also be used to pre wet the electrodes 2 black square areas on the reverse side of the belt and either side of transmitter It is recommended that you wear the transmitter strap a few minutes before your work out Some users because of body chemistry have a more difficult time in achieving a strong steady signal Your workout must be within range distance between tr...

Page 13: ...12 FIGURE 4 Monitor Safety Key Handpulse Speed Adjustment Switch Incline Adjustment Switch Handgrip Tube Handrail Walking belt Frame Wheel ...

Page 14: ...completely in the fold down position Note The treadmill will not operate if the treadmill is not completely in the fold down position Note Should you release the auto fold switch you simply holding the auto fold switch and pressing the up or down button to resume the feature The treadmill will sound warning beeps if the treadmill folding degree is less than 60 Moving Before moving the treadmill fo...

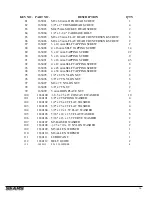
Page 15: ...018 ψ30 x 60 SQUARE END CAP 2 19 163019 ψ40 x 80 CURVE END CAP 2 20 163020 ψ38 CURVE END CAP 2 21 163021 ψ50 x13 x 1 3T SPACER A 6 22 163022 ψ50 x18 5 x 1 3T SPACER B 2 23 163023 ψ50 xψ18 xψ13 x 7T RAISED SPACER 2 24 163024 TOP MOTOR COVER 1 25 163025 MOTOR COVER ANCHOR 7 26 163026 70 x35L WHEEL 4 27 163027 30 x35H CUSHION 6 28 163028 FOOT PAD 2 29 163029 TOP FRAME COVER 1 30 163030 BOTTOM FRAME C...

Page 16: ... 61 163061 3 Pin 300mm EXTENSON INCLINE CABLE 1 62 163062 3 Pin 550mm UPPER SPEED CABLE 1 63 163063 3 Pin 300mm EXTENSION SPEED CABLE 1 64 163064 2 Pin 600mm AUTO FOLDING CABLE 1 65 163065 2Pin 300mm AUTO FOLDING CABLE 1 66 163066 4Pin 500mm HANDPULSE WIRE 1 67 163067 CONTROLLER 1 68 163068 18cm x 764 x 764 CONNECTING CABLE 2 69 163069 10cm x 764 x 764 CONNECTING CABLE 1 70 163070 12 Pin 800mm COM...

Page 17: ...63093 4 x 25 m m SELF TAPPING SCREW 2 94 139094 4 x 38 m m SELF TAPPING SCREW 2 95 163095 1 2 x 8T NYLON NUT 8 96 163096 3 8 x 7T NYLON NUT 6 97 163097 M8 x 7T NYLON NUT 1 98 163098 3 8 x 7T NUT 2 99 163099 5 m m IRON PLATE NUT 2 16 100 1630100 ψ6 5 x 25 x 1T CONCAVE WASHER 10 101 1630101 3 8 x 2T SPRING WASHER 4 102 1630102 1 2 x 26 x 2T FLAT WASHER 6 103 1630103 3 8 x 25 x 2T FLAT WASHER 4 104 1...

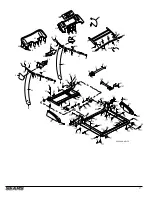
Page 18: ...7 52 21 21 66 11 50 50 35 59R 5 63 71 36 4R 4L 47 20 20 47 5 59L 33 34 65 61 37 23 8 8 23 108 43 64 74 93 93 74 81 97 89 89 89 89 89 89 89 89 89 89 73 92 92 94 73 73 73 94 84 80 84 96 37 104 90 90 102 95 102 75 75 102 95 95 102 107 99 99 56 91 91 17 ...

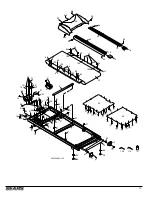
Page 19: ...25 18 18 38 39 68 53 55 54 27 27 42 41 27 30 29 88 88 88 88 90 90 90 90 90 88 88 88 88 100 100 88 85 85 85 100 88 100 100 85 85 85 86 86 100 100 83 83 98 109 110 111 98 75 77 77 107 103 101 103 101 79 25 87 75 102 95 102 21 21 21 21 91 91 91 91 91 57 69 91 91 930624AM1130 ...

Page 20: ...adjustment on page 20 Treadbelt slips Treadbelt tension too loose See treadbelt adjustment on page 20 Treadbelt hesitates while being stepped on Insufficient lubricant on treadbelt See treadbelt lubrication page 22 Black particles collecting under treadmill Drive belt is breaking in Vacuum under treadmill periodically No display on monitor On off switch not on Push on off button to on Monitor does...

Page 21: ...nd c until belt is centered Treadbelt shifts too far to the left a Set the treadmill speed to 3 5 M P H b Tighten the left adjusting bolt 91 a 1 4 turn clockwise using allen wrench c Wait 15 seconds if no change turn the right adjusting bolt 91 a 1 4 turn counter clockwise using allen wrench e Repeat steps b and c until belt is centered IMPORTANT DO NOT OVERTIGHTEN TREADBELT If treadbelt is over t...

Page 22: ...ation of car wax Do not use aerosol sprays or pump bottles as they may deposit wax upon the walking or computer surface 2 Under no circumstances are you to use ammonia oils silicones or any other compounds on the rubberized walking surface The use of such materials may cause serious injury to the body and or deteriorate the performance of the walking surface Only clean the rubberized walking surfa...

Page 23: ...f the bottle of lubricant HOW TO APPLY LUBRICANT 1 Lift one side of treadbelt 2 Pour one half of the lubricant bottle under the center of the treadbelt on the top surface of the treadboard 3 Walk on the treadmill at a slow speed for 3 to 5 minutes to evenly distribute lubricant NOTE DO NOT over lubricate treadboard Any excess lubricant that comes out should be wiped off IMPORTANT ONLY USE HALF THE...

Page 24: ...T If your treadmill looses power or will not start check the fuse located on the motor controller or the incline controller DANGER Turn the power switch off and unplug the treadmill to reduce the risk of an electric shock Remove the motor cover Remove and replace the fuse on the motor controller Replace the motor cover SPEED SENSOR ADJUSTMENT If the monitor does not display speed or distance the s...

Page 25: ...f the heart and lungs Aerobic Fitness The largest amount of oxygen that you can use per minute during exercise is called your maximum oxygen uptake MVo2 This is often referred to as your aerobic capacity The effort that you can exert over a prolonged period of time is limited by your ability to deliver oxygen to the working muscles Regular vigorous exercise produces a training effect that can incr...

Page 26: ...ct with a heart rate of 110 120 beats per minute BPM If you are fitter you will need a higher threshold of stimulation To begin with you should exercise at a level that elevates your heart rate to about 65 to 70 of your maximum If you find this is too easy you may want to increase it but it is better to lean on the conservative side As a rule of thumb the maximum heart rate is 220 minus your age A...

Page 27: ...ence PAIN during or after exercise your body is telling your something Stop exercising and consult your doctor What to Wear Wear clothing that will not restrict your movement in any way while exercising Clothes should be light enough to allow the body to cool Excessive clothing that causes you to perspire more than you normally would while exercising gives you no advantage The extra weight you los...

Page 28: ... intensity aerobic activity or callisthenic type exercise Movements should be performed slowly and smoothly with no bouncing or jerking Move into the stretch until slight tension not pain is felt in the muscle and hold for 20 30 seconds Breathing should be slow rhythmical and under control making sure never to hold your breath ...

Page 29: ...28 ...

Page 30: ...ADA INC RETAIL OR CATALOG STORES AND SERVICE CENTERS If the parts you need are not stocked locally your order will be electronically transmitted to a SEARS Parts Distribution Center for expedited handling When ordering parts by mail selling prices will be furnished on request or parts will be shipped at prevailing prices and you will be billed accordingly WHEN ORDERING REPLACEMENT PARTS ALWAYS GIV...

Page 31: ...that you need to do it yourself www sears ca _______________________________________________________________________________________________ To purchase or inquire about a Sears Maintenance Agreement call 1 800 361 6665 9 a m 11 p m Mon Fri EST 9 a m 4 p m Sat _______________________________________________________________________________________________ Pour service en francais 1 800 LE FOYERMC 1...

Reviews: