
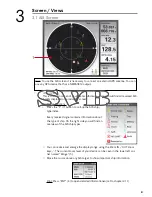
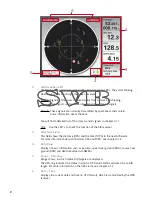


Press the “menu” (1) button to enter the AIS menu. You can now edit the following settings:
•
CPA Limit
Here you can adjust the radius of the CPA ring.
CPA (Closest Point of Approach) describes the distance between your
current position and the AIS target before it becomes a threat to you.
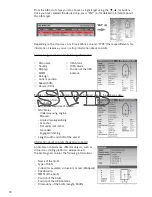
3.1.2 AIS Menu
•
CPA Limit ON/OFF
Turns the CPA alarm on or off.
•
TCPA Limit
Here you can setup the time for the TCPA Alarm.
TCPA (Time to closest point of approach) describes the time until the next
CPA becomes active.
•
TCPA Limit ON/OFF
Turns the CPA alarm on or off.
•
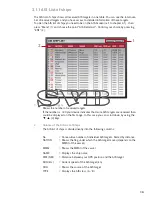
AIS Detail List
Here you can open the AIS list of ships (ref. to chapter 3.1.1.)
12
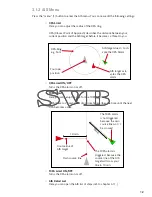
Own course line
Course line of
AIS target
10 min.
10 min.
The TCPA alarm is
triggered, because the
course line of the AIS
target will cross your
line in 10 min.
The TCPA alarm
is not triggered
because the own
course line won´t
be crossed
Your own
position
AIS target acti-
vates the CPA
alarm
AIS target doesn´t acti-
vate the CPA Alarm.
CPA-Ring
e.g. 5nm
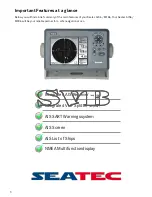
Summary of Contents for AIS6
Page 1: ...User Manual AIS6 MFR6...


