background image

11

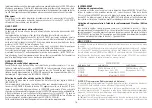
OPERATION USING DIFFERENT MODELS OF REMOTE CONTROL

Different models of remote control may be programmed. By storing a code (1 button) 

a cyclic step by step operation (Up-Stop-Down) may be achieved, and by storing two 

different codes (2 buttons) different commands are produced, one for Up and one for 

Down. Storing three different codes (3 “BeFree” series buttons) produces three different 

commands: the first for Up, the second for Stop and the third for Down.

Operation using a 1-button radio control :  

The following type of operation is obtained using a radio-control with a single button: The 

first press controls the upward movement until the motor stops (the motor has a running 

time of around 2 minutes). The second press controls the downward movement of the 

shutter. If the button is pressed before the motor stops running, the control unit will stop 

the shutter moving and the button will need to be pressed again to reactivate the motor 

in the opposite direction.

Operation using a 2-button radio control:

By using a radio control with 2 buttons, the following processes may be carried out: the 

first button, “Up”, controls the upward movement for about 2 minutes, until the motor 

has stopped running and the second button (“Down”) controls the downward movement 

of the shutter. If the upward movement is interrupted with another “Up” command, the 

motor will continue to run in the upward movement direction. If, however, the movement 

is interrupted with a “Down” command, the control unit will stop the motor.

The procedure is the same for the down movement phase.

Operation using a 3-button radio control (BeFree x1):

The following type of operation is obtained using the 

BeFree x1

, radio control: the (Up) 

key controls the upward movement until the end of the motor time (2 minutes), the (Stop) 

key makes the shutter stop and the (Down) key controls the downward movement. If 

a stop command is sent during the upward or downward movement, the control unit 

causes the shutter to stop. If a command that is in the opposite direction to the current 

movement is sent during the upward or downward movement, the control unit causes the 

shutter to change direction.

Operation using a 3-button radio control (BeFree x3):

When using the 

BeFree x3

, radio control, you will obtain the same operation as previ-

ously described for the BeFree x1 version; in addition, by using the keys (-) and (+) at the 

sides of the radio control it is possible to enable and disable the sun sensor (the selection 

is confirmed by a quick Up / Down movement of the motor).

Operation using a 3-button radio control (BeFree x6):

When using the 

BeFree x6

 radio control, you will obtain the same operation as previ-

ously described for the BeFree x1 version; in addition, by using the keys (-) and (+) at the 

sides of the radio control it is possible to select the UP – STOP – DOWN controls for 6 

different types of use.

INVERSION OF THE ROTATION MOTOR

If you notice that when pressing the UP key on the radio-control the control unit causes 

the shutter to move upwards instead of downwards, all you have to do is simply repeat 

the programming procedure pressing the DOWN key instead of the UP key, or invert the 

motor’s Upward movement wire with the Downward movement wire.

GROUP OR GENERAL CENTRALISATION

It is also possible to insert two identical codes (buttons) from one radio control to all the 

control units or a group of them that are situated at a maximum distance of 20 metres 

from the point of command, in order to obtain general or partial motion of more than 

one automation.

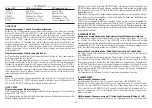
ANEMOMETER OPERATION

The electronic control unit will control the upward movement of the sun shade every time 

the wind exceeds the selected threshold.

SUN SENSOR OPERATION

The electronic control unit controls the downward movement of the sun shade after 5 

minutes during which the brightness is greater than the threshold selected using the VR1 

trimmer and displayed when the SUN LED lights up; it also controls the upward movement 

of the shade after 5 minutes during which the brightness is below the selected threshold.

Sun sensitivity adjustment 

 (5 ÷ 40 Klux)

The control unit allows you to adjust the sensitivity of the Sun Sensor using the VR1 

trimmer. When the SUN LED lights up on the control unit, this indicates that the intensity 

of the sun exceeds the selected threshold; this enables you to use the current light condi-

tions as a reference when setting the desired value.

OPERATION PRINCIPLES

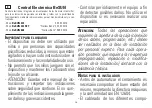
Centrale Elettronica BeSUN

Centrale  elettronica  integrata  nel  contenitore  dei  Sensori
Vento/Sole, per l'automazione di tapparelle e tende, con possi-
bilità di funzionamento con i radiocomandi, per il comando indi-
viduale e/o centralizzato.

- Mod.  

BeSUN 433 

:

 433,92 MHz

- Mod.  

BeSUN 433 SET

:

“Narrow Band” 433,92 MHz

- Mod.  

BeSUN 868 

:

“Narrow Band” 868,3 MHz

C

ARATTERISTICHE

 T

ECNICHE

- Alimentazione:

230V~  50/60Hz  2,5 W

- Uscita motore:

230V~  500W Max.

- Temperatura d'esercizio:

-10

60°C

- Ricevitore radio:

vedi modello

- Radiocomandi compatibili:

12-18 Bit - Rolling Code

- Sensibilità Anemometro :                                  5 

¸

 40 Km/h

- Sensibilità Sensore Sole:                                    5 

¸

 40 Klux

- Quantità Radiocomandi memorizzabili:                       4 Max.   
- Dimensioni imballo:                                  240x185x110 mm.
- Contenitore:                                         PC  UL94V-0  ( IP54 )

C

OLLEGAMENTI


DELLA

 M

ORSETTIERA

 CN1

1: Terra.
2: Ingresso linea 230V~ ( Fase ).
3: Ingresso linea 230V~ ( Neutro ).
4: Uscita motore Salita.
5: Uscita motore Comune.
6: Uscita motore Discesa.

C

ONDIZIONE

 I

NIZIALE


DI

 F

UNZIONAMENTO

L'apparecchiatura  può  funzionare  solamente  in  abbinamento
con uno o più radiocomandi. Nella configurazione di fabbrica la
centrale  non  contiene  nessun  codice  di  radiocomando  in  me-
moria.

F

UNZIONAMENTO


CON


DIFFERENTI


MODELLI


DI

  R

ADIOCOMANDI

È possibile  la programmazione di  differenti modelli  di radioco-
mandi, memorizzando un codice ( 1 tasto ) si ottiene un funzio-
namento ciclico Passo - Passo (Salita - Stop -Discesa), memo-
rizzando due codici ( 2 tasti ) differenti si ottengono dei coman-
di  distinti,  il  primo  per  la  Salita  ed  il  secondo  per  la  Discesa,
memorizzando  tre  codici  (  3  tasti  “serie  BeFree”  )  differenti  si
ottengono dei comandi distinti, il primo per la Salita, il secondo
per lo Stop ed il terzo per la Discesa.

Funzionamento con radiocomando 1 Tasto :

Utilizzando il  radiocomando con un  solo tasto,  si ottiene il se-
guente funzionamento: il primo impulso comanda la Salita fino
allo scadere del tempo motore pari a 2 minuti. Il secondo impul-
so comanda la Discesa del serramento; se un impulso perviene
prima dello scadere del tempo motore, la centrale effettua l'ar-
resto del serramento, un ulteriore impulso effettua la ripresa del
moto nel senso opposto di marcia.

Funzionamento con radiocomando 2 Tasti :

Utilizzando  il  radiocomando  con  2  tasti,  si  ottiene  il  seguente
funzionamento,  il  primo  tasto  (  “Up”  associato  al  senso  di
salita  )  comanda  la  Salita  fino  allo  scadere  del  tempo  motore
pari a 2 minuti ed il secondo tasto( “Down” associato al senso
Discesa ) comanda la Discesa del serramento. Nel caso in cui
durante la Salita viene inviato nuovamente un comando Up, la
centrale continua il moto di Salita, mentre se inviato un coman-
do Down, la centrale effettua l'arresto del moto.
La stessa procedura è valida nella fase di Discesa.

Funzionamento con radiocomando 3 tasti (BeFree x1):

Utilizzando  il  radiocomando

BeFree  x1

,  si  ottiene  il  seguente

funzionamento: il tasto ( Up ) comanda la salita fino allo scade-
re del tempo motore pari a 2 minuti, il tasto ( Stop ) comanda
l’arresto ed il tasto ( Down ) comanda la discesa del serramen-

to. Nel caso in cui durante la salita o la discesa sia inviato un
comando  di  (  Stop  )  la  centrale  comanda  l’arresto  del  serra-
mento. Nel caso in cui durante la salita o la discesa sia inviato
un  comando  opposto  al  moto  corrente,  la  centrale  comanda
l’inversione del senso di marcia.

Funzionamento con radiocomando 3 tasti (BeFree x3):

Utilizzando  il  radiocomando

BeFree  x3

,  si  ottiene  il  funziona-

mento come in precedenza descritto per la versione BeFree x1,
inoltre con  i due  tasti laterali ( – ) e ( +  ) del  radiocomando è
possibile  abilitare  e  disabilitare  il  funzionamento  del  sensore
sole  (  la  selezione  viene  confermata  da  un  breve  movimento
UP / Down del motore ).

Funzionamento con radiocomando 3 tasti (BeFree x6):

Utilizzando  il  radiocomando

BeFree  x6

,  si  ottiene  il  funziona-

mento come in precedenza descritto per la versione BeFree x1,
inoltre con  i due  tasti laterali ( – ) e ( +  ) del  radiocomando è
possibile selezionare dei comandi ( UP - STOP - DOWN ) per 6
differenti utilizzazioni.

I

NVERSIONE


DEL


MOTO


DI


ROTAZIONE

Nel caso in cui si riscontri che al comando ( UP ) del radioco-
mando,  la  centrale  anziché  associare  la  salita  del  serramento
associa la discesa, sarà solamente necessario ripetere la pro-
cedura  di  programmazione  premendo  il  tasto  (  DOWN  )  anzi-
ché quello ( UP ) oppure invertire il filo di Salita con il filo di Di-
scesa del motore.

C

ENTRALIZZAZIONE


DI

 G

RUPPO


O

 G

ENERALE

È possibile inoltre, inserire codici ( tasti ) uguali di un radioco-
mando a tutte le centrali o ad un gruppo, che si trovino ad una
distanza  non  superiore  a    20  metri  dal  punto  di  comando,  in
modo da ottenere il moto generale o parziale di più automazio-
ni.

F

UNZIONAMENTO


DELL

’ A

NEMOMETRO

La  centrale  elettronica  comanderà  la  salita  della  tenda  ogni
qual volta che il vento supera la soglia d'intervento selezionata.

F

UNZIONAMENTO


DEL

 S

ENSORE

 S

OLE

La centrale elettronica comanderà la discesa della tenda dopo 
5 minuti di luminosità superiore alla soglia selezionata tramite il 
trimmer VR1 e visualizzata tramite l’accensione del LED SUN, 
comanderà la salita della tenda dopo 5 minuti di luminosità infe-
riore alla soglia selezionata. 

Regolazione della sensibilità al Sole ( 5 

¸

 40 Klux )

La centrale permette la regolazione della sensibilità del Senso-
re Sole tramite il trimmer VR1. L’accensione del LED SUN sulla
centrale indica che l’intensità del Sole supera la soglia d’inter-
vento selezionata, in questo modo avremo un riferimento alle 
attuali condizioni di luce per stabilire quella desiderata.

L

OGICHE


DI

 F

UNZIONAMENTO

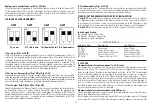
       SW1               SW1                SW1               SW1

Passo Passo   P/P + Discesa  Test Sensore Sole Test Anemometro

1) Passo - Passo (Dip 1 e 2 OFF)

Utilizzando  il  radiocomando  BeFree  xx,  si  ottiene  il  seguente
funzionamento: il tasto ( Up ) comanda la salita fino allo scade-
re del tempo motore pari a 2 minuti, il tasto Stop comanda l’ar-
resto ed il tasto ( Down ) comanda la discesa del serramento.
Nel  caso  in  cui  durante  la  salita  o  la  discesa  è  inviato  un  co-
mando di ( Stop ) la centrale comanda l’arresto del serramento.
Nel  caso  in  cui  durante  la  salita  o  la  discesa  è  inviato  un  co-

1

Rev. 3.0       09-09-2016

I


Step-by-step 

P/P + Down mov. 

Sun Sensor Test  Anemometer Test

Summary of Contents for 96010000

Page 1: ...BeSUN Electronic Control Unit ...

Page 2: ...Product installation ...

Page 3: ...rezza in esso contenute Il non rispetto delle prescrizioni potrebbe provocare danni e gravi incidenti Esaminare frequentemente l impianto per rilevare eventuali segni di danneggia mento Non utilizzare il dispositivo se è necessario un intervento di riparazione attenzione Tutte le operazioni che richie dono l apertura dell involucro collega mento cavi programmazione ecc devono essere eseguite in fa...

Page 4: ...o le richiusure accidentali secondo quanto previsto al punto 5 2 9 della EN 12453 Il motoriduttore usato per muovere il serramento deve essere conforme a quanto prescritto al punto 5 2 7 della EN 12453 Per un corretto funzionamento della parte radio ricevente in caso di utilizzo di due o più centrali si consi gli all in stallazione ad una distanza di almeno 3 metri l una dall altra CARATTERISTICHE...

Page 5: ... caso in cui durante la salita o la discesa sia inviato un comando di Stop la centrale comanda l arresto del serramento Nel caso in cui durante la salita o la discesa sia inviato un comando opposto al moto corrente la centrale comanda l inversione del senso di marcia Funzionamento con radiocomando 3 tasti BeFree x3 Utilizzando il radiocomando BeFree x3 si ottiene il funzionamento come in precedenz...

Page 6: ...e il funzionamento dell Anemometro ed il corretto senso di rotazione al momento dell installazione nel seguente modo far ruotare manualmente le palette dell a nemometro nello stesso istante la centrale comanderà la salita per un tempo pari a 5 sec TASTI DI PROGRAMMAZIONE E LED DI SEGNALAZIONE Tasto SEL seleziona il tipo di funzione da memorizzare la scelta è indicata dal lampeggio del Led Premendo...

Page 7: ...el Sensore Sole La centrale è fornita con il Sensore Sole disabilitato LED MAN AUT OFF L abilitazione del Sensore Sole può essere eseguita nel seguente modo posizionarsi con il tasto SEL sul lampeggio del LED MAN AUT poi premere per un istante il tasto SET nello stesso tempo il LED MAN AUT rimarrà acceso e l abilitazione del Sensore Sole sarà completata È possibile ripetere l operazione per disabi...

Page 8: ...uttore con il Blocco dei movimenti Automatici disabilitato se si desidera abilitare la funzione procedere nel seguente modo assicurarsi di aver abilitato il menù esteso evidenziato dal lampeggio alternato dei Led WIND e Led MAN AUT posizionarsi con il tasto SEL sul lampeggio del LED T MOT poi premere il tasto SET nello stesso istante il LED T MOT si accenderà permanentemente e la programma zione s...

Page 9: ...fe place and adhere to the impor tant safety instructions contained within it Non adherence to these instructions may lead to property damage and seri ous accidents Examine the system frequently to check for any signs of damage Do not use the device if it needs to be repaired Warning All operations which require the casing to be opened such as wire connection programming etc must be carried out du...

Page 10: ...e control units are used we recommend that you install the devices at least 3 metres away from each other TECHNICAL DATA Power supply 230V 50 60Hz 2 5 W Motor output 230V 500W Max Working temperature 10 60 C Radio receiver see model Compatible radio controls 12 18 Bit or Rolling Code Anemometer sensitivity 5 40 Km h Sun sensor sensitivity 5 40 Klux Number of codes that may be stored 4 Max Packagin...

Page 11: ...the selected threshold SUN SENSOR OPERATION The electronic control unit controls the downward movement of the sun shade after 5 minutes during which the brightness is greater than the threshold selected using the VR1 trimmer and displayed when the SUN LED lights up it also controls the upward movement of the shade after 5 minutes during which the brightness is below the selected threshold Sun sens...

Page 12: ...option stored Led off option not stored Flashing LED option selected MAIN MENU Reference Led LED Off LED On 1 CODE No code TX Pgm code 2 T MOT Motor time 2 minutes Pgm motor time 3 WIND Wind safety 25 km h Pgm Wind safety 4 MAN AUT Sun sensor OFF Sun sensor ON 5 SUN Sun shining OFF Sun shining ON 1 CODE LED Programming using a 1 or 2 button radio control To programme the transmission codes in the ...

Page 13: ...bility of selecting only the functions listed in the main menu To enable the functions of the extended menu proceed as follows press the SET key and hold for 5 seconds the WIND and MAN AUT LEDs will flash alternately and the user has 30 seconds within which to select the functions of the extended menu using the SEL and SET keys After another 30 seconds the control unit returns to the main menu EXT...

Page 14: ...laisser les radiocommandes à leur portée ATTENTION conserver cette notice d ins tructions et respecter les consignes de sécurité importantes qu elle contient Le non respect de ces consignes peut causer des dommages et des accidents graves Examiner fréquemment l installation pour détecter tout signe de dommage Ne pas utiliser ce dispositif s il néces site une réparation Attention Toutes les opérati...

Page 15: ...oir un dispositif de sectionnement sur l installation Il faut que ce dernier soit positionné de façon à être protégé contre les fermetures accidentelles conformément au point 5 2 9 de la norme EN 12453 Le motoréducteur utilisé pour actionner le volet doit être conforme aux pres criptions du point 5 2 7 de la norme EN 12453 Pour un bon fonctionnement de la par tie récepteur radio en cas d utilisati...

Page 16: ...ande BeFree x1 on obtient le fonctionnement suivant la touche Up commande la montée jusqu à la fin du temps moteur soit 2 minutes la touche Stop commande l arrêt et la touche Down commande la descente Si une commande de Stop est envoyée pendant la montée ou la descente la centrale commande l arrêt du mouve ment Si une commande opposée au mouvement courant est envoyée pendant la montée ou la descen...

Page 17: ...ation comme suit tournez à fond le trimmer VR1 dans le sens des aiguilles d une montre dans la position la centrale va alors commander l allumage de la LED SUN et la descentependantuneduréede5sec TournezletrimmerVR1danslesenscontraireauxaiguilles d une montre dans la position la centrale va alors commander l extinction de la LED SUN ainsi que la montée pendant une durée de 5 sec 4 Test Anémomètre ...

Page 18: ...ement de la LED WIND équivaut à une augmentation 5 Km h et dès que le seuil souhaité est atteint appuyer sur la touche SET il y aura en même temps mémorisation de la valeur sélectionnée et la LED WIND restera allumée au fixe par exemple 5 doubles clignotements de LED WIND 25 Km h Cette opération peut être répétée également en cas d erreur de programmation 4 LED MAN AUT Activation du capteur solair...

Page 19: ...omentanément les mouvements automatiques jusqu à la commande suivante de montée ou de descente Le fabricant fournit la centrale avec le Blocage des mouvements automatique désactivé pour activer la fonction procéder comme suit s assurer d avoir bien activé le menu étendu signalé par le clignotement alterné des Led WIND et Led MAN AUT se posi tionner à l aide de la touche SEL sur la LED T MOT appuye...

Page 20: ...t dieser Vorrichtung zu spielen und halten Sie die Funksteuerungen außerhalb der Reich weite von Kindern ZUR BEACHTUNG Bewahren Sie diese Bedienungsanleitung bitte sorgfältig auf und halten Sie sich strengstens an die darin enthaltenen Sicherheitshinweise Die Nichteinhaltung dieser Vorgaben kön nen Schäden und schwerwiegende Unfäl le verursachen Kontrollieren Sie die Anlage regelmäßig und in kurze...

Page 21: ...chenden an der Steuerzentrale befindlichen Klemme mit dem Erdleiter der Elektroanlage siehe Schaltschema zu verbinden Die Steuerzentrale verfügt über keine Art von Trennvorrichtung der 230 Vac Elektroleitung Es ist daher Aufgabe des Installateurs eine Trennvorrichtung vor zusehen Diese ist so anzubringen dass sie gemäß 5 2 9 der Norm EN 12453 gegen selbsttätiges Wiederschließen geschützt ist Der z...

Page 22: ...P Aufwärtslauf steuert den Aufwärtslauf bis zum Ablauf der Motorzeit von 2 Minuten und die zweite Taste Down Abwärtslauf steuert den Abwärtslauf der Rolllade bzw der Markise Wird während des Aufwärtslaufs erneut ein Up Befehl erteilt steuert die Zentrale den Aufwärtslauf weiter wird dagegen ein Down Befehl erteilt stoppt die Steuerzentrale den Lauf Das gleiche gilt für die Abwärtslauf Phase Betrie...

Page 23: ...o P P Discesa Test Sensore Sole Test Anemometro 1 Passo Passo Dip 1 e 2 OFF Utilizzando il radiocomando BeFree xx si ottiene il seguente Schrittweise Schritt Senken Test Sonnensensor Test Windmesser 1 Schrittweise Steuerung Dip 1 und 2 OFF Bei Verwendung der Funksteuerung BeFree xx erfolgt der Betrieb folgendermaßen Die Taste Up gibt den Befehl zum Aufwärtslauf bis zum Ablauf der Motorzeit von 2 M...

Page 24: ... Rollladen bzw die Markise wird nun heraufgezogen Bei Erreichen des gewünschten Punktes geben Sie die Taste SET frei Die Motorzeit ist jetzt gespeichert und die LED T MOT bleibt eingeschaltet Wird eine Automatisierung mit Endanschlag verwendet empfiehlt es sich eine Zeit einzuspei chern die um einige Sekunden größer ist als die Zeit die der Rollladen bzw die Markise zum Erreichen des Endanschlags ...

Page 25: ...rieben Werkseitig wird die Steuerzentrale mit deaktivierter Funktion Programmierung des Transmittercodes per Fernsteuerung geliefert Soll diese aktiviert werden ist wie folgt vorzugehen Vergewissern Sie sich in erster Linie das erweiterte Menü aktiviert zu haben angezeigt durch abwechselndes Blinken der LED WIND und der LED MAN AUT wählen Sie nun über die Taste SEL die auf Blinklicht geschaltete L...

Page 26: ...e su alcance ATENCIÓN Guardar este manual de ins trucciones y respetar las indicaciones sobre seguridad que contiene El no cum plimiento de las indicaciones podría gene rar daños y graves accidentes Controlar periódicamente el equipo a fin de detectar posibles daños No utilizar el dispositivo si es necesario realizar una reparación Atención Todas las operaciones que requieren la apertura de la caj...

Page 27: ...mismo se debe instalar de modo tal que quede protegido contra cierres accidentales según lo previsto en el punto 5 2 9 de la EN 12453 El motorreductor utilizado para mover el cerramiento debe estar en conformidad con el punto 5 2 7 de la EN 12453 Cuando se utilizan dos o más centrales para un correcto funcionamiento de la parte radiorreceptora se aconseja ins talarlas a una distancia de 3 metros c...

Page 28: ... comanda el descenso del cerramiento Si durante el ascenso o el descenso se envía un mando de Stop la central acciona la parada del cerramiento Si durante el ascenso o el descenso se envía un mando opuesto al movi miento corriente la central acciona la inversión del sentido de marcha Funcionamiento con radiocomando 3 teclas BeFree x3 Utilizando el radiocomando BeFree x3 se consigue el funcionamien...

Page 29: ...amiento del Anemómetro y del correcto sentido de rota ción en el momento de la instalación de la siguiente manera haga girar manualmente las paletas del anemómetro en ese instante la central accionará el ascenso durante un tiempo de 5 seg BOTONES DE PROGRAMACIÓN Y LED DE SEÑALIZACIÓN Tecla SEL selecciona el tipo de función que se va a memorizar la selección está indi cada por el centelleo del Led ...

Page 30: ...al mismo tiempo se deter minará la memorización del valor seleccionado y el LED WIND permanecerá encendido ejemplo 5 centelleos dobles del LED WIND 25 Km h Si la programación realizada es incorrecta es posible repetir la operación 4 LED MAN AUT Habilitación del Sensor de Sol La central se suministra con el Sensor Sol deshabilitado LED MAN AUT OFF La habilitación del Sensor Sol se puede realizar de...

Page 31: ...ión de Bajada Automática de este modo si durante la fase de movimiento se emplea el mando Stop con el radiocomando la central bloquea momentáneamente los movimientos automáticos hasta el próximo mando de Subida o Bajada El fabricante entrega la central con el Bloqueo de los movimientos automáticos inha bilitado si se desea habilitar la función proceder como sigue Asegurarse que se ha habilitado el...

Page 32: ...TENÇÃO conserve este manual de ins truções e respeite as importantes prescri ções de segurança contidas no mesmo O desrespeito das prescrições poderia cau sar danos graves e incidentes Examine frequentemente a instalação para detectar eventuais sinais de danos Não utilize o dispositivo se o mesmo esti ver necessitando de conserto Atenção Todas as operações que requi sitam a abertura do invólucro l...

Page 33: ...nado de maneira a ser pro tegido contra fechamentos acidentais segundo o estabelecido no ponto 5 2 9 da EN 12453 O motorredutor empregado para mover a esquadria deve ser em conformidade ao estabelecidopeloponto5 2 7daEN12453 Para um funcionamento correcto da parte rádio receptor se forem utilizadas duas ou mais centrais aconselha se a instalação a uma distância de pelo menos 3 metros uma da outra ...

Page 34: ...ida da esquadria Se durante uma subida ou uma descida for enviado um comando de Stop a central comandará para parar a esquadria Se durante uma subida ou uma descida for envia do um comando oposto ao movimento corrente a central comandará uma inversão da direcção do movimento Funcionamento com comando rádio 3 teclas BeFree x3 Utilizando o comando rádio BeFree x3 obtém se o funcionamento da maneira ...

Page 35: ... 5 seg 4 Ensaios do Anemómetro Dip 1 e 2 ON é possível verificar o funcionamento do anemómetro e a direcção certa de rotação no momento da instalação da seguinte maneira rode as pás do anemómetro manualmente no mesmo momento a central comandará uma subida por um prazo durando 5 seg TECLAS DE PROGRAMAÇÃO E LEDS DE SINALIZAÇÃO Tecla SEL selecciona o tipo de função a ser guardado na memória a selecçã...

Page 36: ...egar ao limite que desejar no mesmo momento será guardado na memória o valor seleccionado e o LED WIND permanecerá aceso por exemplo 5 piscadas duplas de LED WIND 25 km p h É possível repetir esta operação se a programação estiver errada 4 LED MAN AUT Activação do Sensor do Sol Esta central é fornecida com o Sensor do Sol desactivado LED MAN AUT OFF A activação do sensor do sol pode ser realizada ...

Page 37: ... durante a fase de movimento é dado um comando de Stop mediante comando rádio a central bloqueia momentaneamente os movimentos automáticos até um sucessivo comando de Subida ou Descida A central é fornecida pelo fabricante com o Bloqueio dos movimentos automáticos desac tivado se desejar habilitar esta função realize as seguintes operações assegure se que activou o menu extenso evidenciado pelo pi...

Page 38: ...trollerna så att de är oåtkomliga för barn OBSERVERA Sparadennabruksanvisning och respektera säkerhetsföreskrifterna som anges i bruksanvisningen Skador och allvarliga olyckor kan förorsakas om inte säkerhetsföreskrifterna respekteras Undersök regelbundet utrustningen för att upptäcka eventuella tecken på skador Använd inte utrustningen om det är nöd vändigt att göra en reparation Observera Alla m...

Page 39: ...kyddad mot ofrivilliga stängningar enligt vad som föreskrives i punkt 5 2 9 i standard EN 12453 Reducerväxeln som används för att flyt ta låsanordningen ska överensstämma med vad som beskrivs i punkt 5 2 7 i standard EN 12453 För att radiomottagaren ska fungera korrekt vid användning av två eller fler styrenheter rekommenderas att instal lera dem på minst 3 meters avstånd från varandra TEKNISKA EG...

Page 40: ...inställt gränsvärde SOLSENSORNS FUNKTION Styrenheten sänker markisen 5 minuter efter att gränsvärdet för ljus har överstigits Gränsvärdet ställs in med justeranordningen VR1 och visas genom att lysdioden SUN tänds Styrenheten höjer markisen 5 minuter efter att det inställda gränsvärdet för ljus har understigits Inställning av solkänslighet 5 40 Klux Styrenhetens solsensor kan ställas in med juster...

Page 41: ...E Programmering av fjärrkontroll med 1 eller 2 knappar Programmeringen av sändningskoderna för fjärrkontrollen görs på följande sätt Genom att trycka på knappen SEL börjar lysdioden CODE att blinka Skicka samtidigt den första koden som ska sparas med önskad fjärrkontroll Lysdioden CODE börjar att blinka snabbt Skicka den andra koden som ska sparas Lysdioden CODE tänds och programmeringen är klar O...

Page 42: ... att välja funktionerna från den utökade menyn med hjälp av SEL och SET knapparna Efter ytterli gare 30 sekunder återgår styrenheten till huvudmenyn UTÖKAD MENY Riferimento Led Led spento Led Acceso A CODE Fjärr PGM OFF Fjärr PGM ON B T MOT Aut rörelseblockering OFF Aut rörelseblockering ON C WIND Blinkljus ON OFF D MAN AUT Blinkljus ON OFF A CODE Programmering av fjärrstyrning Det går att program...

Page 43: ...ze ver van de afstandsbedieningen vandaan BELANGRIJK bewaar dit instructie boekje en respecteer de belangrij ke veiligheidsaanwijzingen die erin beschreven staan Het niet respecteren van deze aanwijzingen kan schade en serieuze ongelukken veroorzaken Controleer de installatie regelmatig om eventuele schade waar te kunnen nemen Gebruik het apparaat niet als er een reparatie plaats moet vinden Belan...

Page 44: ...e installatie zoals aangegeven in het verbindingsschema De centrale bezit geen enkel soort verdeelsysteem van de elektrische lijn 230 Vac De installateur moet dus zelf zorgen dat er een verdeelsysteem wordt geplaatst in de installatie Dit moet zodanig worden geplaatst dat het beveiligd is tegen onverwachte afslui tingen zoals voorzien in punt 5 2 9 van de richtlijn EN 12453 Debewegingsreductiediew...

Page 45: ...nctie Omlaag van het scherm In het geval er tijdens het stijgen opnieuw een opdracht Up wordt gegeven zal de centrale de stijging laten voortgaan Als daarentegen de opdracht Down wordt gegeven zal de centrale de bewe ging onderbreken Dezelfde procedure geldt tijdens het dalen Werking met afstandsbediening 3 toetsen BeFree x1 Bij gebruik van de afstandsbediening BeFree x1 bereikt u de volgende werk...

Page 46: ...ruik van de afstandsbediening BeFree xx bereikt u de volgende werking de toets Up bedient de stijging totdat de motortijd van 2 minuten is verstreken de Stop toets bedient het stilstaan en de toets Down bedient het neerlaten van het scherm Als gedu rende het omhoog of omlaag gaan een Stop opdracht is gegeven beveelt de centrale de stilstand van het scherm In het geval gedurende het stijgen of dale...

Page 47: ...paalde tijd is compleet U kunt deze handeling herhalen in het geval van een verkeerde programmering 3 LED WIND SPEED Het vertonen van de geprogrammeerde Winddrempel Het vertonen van de keuze drempel Windveiligheid wordt als volgt uitgevoerd ga met de toets SEL naar de LED WIND de LED begint net zo vaak dubbel te knipperen als de drempel Windveiligheid die zich in het geheugen bevindt iedere dubbel...

Page 48: ...t de LED CODE op met knipperen en het programmeren is beëindigd Herhaal de handeling als u de vorige configuratie wilt herstellen B T MOT Automatische Bewegingsblokkering De centrale staat een blokkering van de automatische bewegingen toe Stijgen Dalen van het scherm in opdracht van de Zonnesensor of van de functie Automatische daling Op deze manier blokkeert de centrale indien tijdens de beweging...

Page 49: ...ρείτε αυτό το εγχει ρίδιο οδηγιών και να εφαρμόζετε τις σημαντικές υποδείξεις ασφαλείας που περιέχονται σε αυτό Η μη τήρηση των υποδείξεωνμπορείναπροκαλέσειζημιές καισοβαράατυχήματα Να εξετάζετε συχνά την εγκατάσταση για τη διαπίστωση ενδείξεων βλαβών Μηχρησιμοποιείτετηδιάταξηαναπαι τείται επέμβαση επισκευής Προσοχή Όλες οι εργασίες που απαι τούν το άνοιγμα του καλύμματος σύνδεση καλωδίων προγραμμ...

Page 50: ...νδεσης Tο κέντρο δεν παρουσιάζει κανε νός τύπου διάταξη κατανομής της ηλεκτρικής γραμμής 230 Vac συνε πώς αποτελεί φροντίδα του τεχνι κού εγκατάστασης να προνοήσει για διάταξη κατανομής Αυτή πρέπει να εγκατασταθεί με τρόπο που να είναι προστατευμένη από τυχαία κλεισίμα τα σύμφωνα με ότι προβλέπεται στο σημείο 5 2 9 της EN 12453 Ο μηχανομειωτήρας που χρησιμοποι είται για την κίνηση του κουφώματος π...

Page 51: ...τοιχεί στη φορά Καθόδου διευθύνει την Κάθοδο του κουφώματος Στην περίπτωση που κατά την Άνοδο σταλεί εκ νέου μια εντολή Up το κέντρο συνεχίζει την κίνηση Ανόδου ενώ αν σταλεί μια εντολή Down το κέντρο διενεργεί το σταμάτημα της κίνησης Η ίδια διαδικασία ισχύει στη φάση Καθόδου Λειτουργία με ραδιοχειριστήριο με 3 Κουμπιά BeFree x1 Χρησιμοποιώντας το ραδιοχειριστήριο BeFree x1 επιτυγχάνεται η ακόλου...

Page 52: ...υθύνει την άνοδο μέχρι τη λήξη του χρόνου κινη τήρα ίσου με 2 λεπτά το κουμπί Stop διευθύνει το σταμάτημα και το κουμπί Down διευθύνει την κάθοδο του κουφώματος Στην περίπτωση που κατά την άνοδο ή την κάθοδο σταλεί μια εντολή Stop το κέντρο εντολοδοτεί το στα μάτημα του κουφώματος Στην περίπτωση που κατά την άνοδο ή την κάθοδο σταλεί μια εντολή αντίθετη προς την τρέχουσα κίνηση το κέντρο εντολοδοτ...

Page 53: ...υ χρόνου κινητήρα και το LED T MOT θα παραμείνει αναμμένο Στην περίπτωση που χρησιμοποιείτε αυτοματισμό με τέλος διαδρομής συνι στάται η αποθήκευση χρόνου μεγαλύτερου κατά μερικά δευτερόλεπτα αφού το κούφωμα φτάσει στο τέλος διαδρομής Στην περίπτωση που επιθυμείτε άπειρο χρόνο κινητήρα εκτελέστε την ίδια διαδικασία προγραμματισμού κρατώντας πατημένο το κουμπί SET συνεχώς για χρόνο μικρότερο των δύ...

Page 54: ...άφεται παραπάνω για το LED CODE στο κύριο μενού Το κέντρο παρέχεται από τον κατασκευαστή με τον προγραμματισμό του κωδι κού μετάδοσης εξ αποστάσεως ανενεργό αν επιθυμείτε να ενεργοποιήσετε τη λειτουργία προχωρήστε με τον ακόλουθο τρόπο βεβαιωθείτε ότι έχετε ενερ γοποιήσει το διευρυμένο μενού επισημαίνεται από το εναλλασσόμενο αναβο σβήσιμο των Led WIND και Led ΧΕΙΡ ΑΥΤ τοποθετηθείτε με το κουμπί S...

Page 55: ......

Page 56: ......

Reviews: