background image

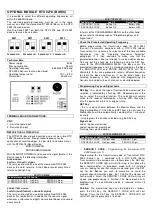
OPTIONAL MODULE  RTX 2278 ( BASIC) 


It  is  possible  to  select  four  different  operating  frequencies,  all 

within the 868 MHz band. 

The  selected  operating  frequency  must  be  set  in  the  same 
manner  on  either  the  memorised  RTX2278  (Base) or  the RTX 

2252 (Sensor) devices. 

Use  Dip  Switch  SW1  on  both  the  RTX  2278  and  RTX  2252 

devices to make the selection.  
 

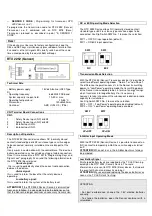
       SW1                 SW1                  SW1                 SW1 


F

REQUENCY 

A


F

REQUENCY 

B


F

REQUENCY 

C


F

REQUENCY 

D


Technical Data 

- Power supply: 

5Vdc 

- Max. consumption: 

25 mA 

- Operating frequency: 

868 MHz FSK band 

- RTX 2252 Sensors that can be stored: 

- Operating temperature: 

-10°C ÷ 55°C 

- Dimensions: 

59x39 mm. 


TERMINAL BOARD CONNECTIONS: 


CN1 : 

1 : Aerial hot pole input. 
2 : Aerial earth input. 


D

ESCRIPTION OF 

O

PERATION


The RTX 2278 (Base) device controls one, or at most, two RTX 

2252 (Sensor) devices, through radio-frequency, for the 
connection of sensitive edges. It is possible to view two menus 

with the RTX 2278 (Base) Device: 


MONITOR MENU 


PROGRAMMING MENU 

With the MONITOR MENU and an acoustic signal (Buzzer), the 
Device reports the following information: 

A

LARM SIGNAL

:


Led on + Acoustic signal.  

This lets you know which one of the memorised RTX 2252 

devices the alarm refers to. A short Beep sounds every time a 
reference Led lights up. 


---------------------- MONITOR MENU ----------------- 

Led Reference Led Off Led On 

1) SENSOR 1 CODE     No Alarm              SENSOR 1 Alarm 
2) SENSOR 2 CODE     No Alarm              SENSOR 2 Alarm 


L

OW BATTERY SIGNAL

:


Led On (brief flashes) + Acoustic signal.  

This lets you know which one of the memorised RTX 2252 
devices has low batteries. In addition to the acoustic signal 

whenever a reference Led lights up, two brief Beeps also sound 

every minute. 


---------------------- MONITOR MENU ----------------- 

Led Reference                       Led Off                   Flashing Led 

1) SENSOR 1 CODE           Battery OK                      Battery LOW 
2) SENSOR 2 CODE           Battery OK                      Battery LOW 


In terms of the PROGRAMMING MENU, on the other hand, 

please refer to the paragraph on "Programming Keys and 

Signal Leds". 

Check the Preselected Operating Frequency 

Before  programming  the  transmission  code  for  RTX  2252 
(Sensor)  Transceivers  combined  with  a  RTX  2278  (Base) 

Transceiver,  it  is  necessary  to  select  one  of  the  four  available 

frequencies  (see  the  "Operating  Frequency  Selection" 

paragraph).  It  is  then  advisable  to  make  sure  that  the 
preselected band is free (not already in use by another device). 

To  carry  out  this  check,  do  the  following:  using  the  SET  key, 

move  to  the  PROGRAMMING  MENU;  the  Base  scans  the 

preselected frequency and if it is already occupied by the Base 
the  MONITOR  LED  and  PROGR.  MENU  LEDs  will  flash 

alternately. In this case proceed to select a different frequency 

(on  both  the  Base  and  Sensor).  If,  on  the  other  hand,  the 

selected  frequency  is  free,  proceed  with  programming  the 
Sensors associated with each channel, as described below. 


Programming Keys and Signal Leds 

SEL key

: this selects the type of function to be memorised, the 

selection is indicated by a flashing LED. Repeatedly press the 

key  to  select  the  desired  function.  The  selection  will  remain 

active for 15 seconds indicated by a flashing LED, after which 
time the device will return to its original state. 

SET Key

:  

-  this  is  used  to  choose  between  the  Monitor  Menu  and  the 

Programming Menu: if the SEL and SET keys are not used, the 
Monitor  Menu  will  be  automatically  selected  after  1  minute  of 

inactivity. 
- this programs the function selected using the SEL key. 

Signal Led 

Led on: option memorised. 

Led off: option not memorised. 
Flashing led: selected option. 


---------------------- PROGRAMMING MENU ----------------- 

Led Reference Led Off Led On 

1) SENSOR 1 CODE    No Pgm. code           SENSOR 1 Pgm. 
2) SENSOR 2 CODE    No Pgm. code             SENSOR 2 Pgm . 


SENSOR  1  CODE


(  Programming  for  transceiver  RTX 

2252 Sensor no. 1) 

Programming  for  the  transmission  code  of  Transceiver  RTX 

2252  (Sensor)  no.  1  combined  with  a  RTX  2278  (Base) 
Transceiver must be carried out as follows: press the SEL key, 

the SENSOR 1 CODE LED will start flashing; in this phase the 

Base  communicates  in  broadcast  mode  with  all  installed 

sensors, looking for one that can be memorised: press the SET 
key  for  the  Sensor  you  wish  to  memorise  to  send  the 

memorisation confirmation code ( the TX LED of the Sensor will 

flash quickly 5 times); the SENSOR 1 CODE LED will stay on 

steady  and  programming  is  finished.  The  Base  device  exits 
programming  if  no  confirmation  code  is  received  within  15 

seconds.  

Deletion

:  The  memorised  code  can  be  deleted  as  follows: 

press  the  SEL  key,  the  SENSOR  1  CODE  LED  will  start 
flashing.  Press  the  SET  key,  the  SENSOR  1  CODE  LED  will 

switch off, and the procedure is finished. 


Summary of Contents for LG 2212 New

Page 1: ...rio installare un interruttore omnipolare con categoria III di sovratensione Esso deve essere posizionato in modo da essere protetto contro le richiusure accidentali secondo quanto previsto al punto 5 2 9 della EN 12453 Per i cavi di alimentazione si raccomanda di utilizzare cavi flessibili sotto guaina isolante in policloroprene di tipo armonizzato H05RN F con sezione minima dei conduttori pari a...

Page 2: ...impulso comanda la chiusura del serramento se si invia un impulso prima dello scadere del tempo motore la centrale effettua l arresto del moto sia nella fase di apertura sia in quella di chiusura Un ulteriore comando determina la ripresa del moto in senso opposto Chiusura automatica La centrale permette di richiudere il serramento in modo automatico senza l invio di comandi supplementari La scelta...

Page 3: ...iante lenta moto in apertura lampeggiante veloce moto in chiusura Funzionamento del Lampeggiatore La centrale è dotata di un uscita per la gestione di un lampeggiatore 230 Vac Il suo funzionamento è condizionato dal movimento del motore e dalla chiusura automatica che se attivata abilita il lampeggiatore anche durante il tempo di pausa Funzionamento con TIMER La centrale permette di collegare al p...

Page 4: ...mpo di lavoro del Motore 1 Pedonale predefinito pari a 10 secondi e senza rallentamento Se occorre modificare il tempo di lavoro pedonale la programmazione deve essere effettuata a serramento chiuso nel seguente modo posizionarsi con il tasto SEL sul lampeggio del LED T MOT PED poi premere per un istante il tasto SET il Motore 1 inizierà ciclo di apertura in corrispondenza del punto iniziale desid...

Page 5: ...nte il LED INB CMD AP si accenderà permanentemente e la programmazione sarà conclusa Se si desidera abilitare la funzione di Colpo d Ariete alla potenza impostata tramite il Trimmer FORZA ripetere l operazione sopra descritta premendo il tasto SEL due volte ottenendo il lampeggio veloce del LED INB CMD AP anziché una volta Ripetere l operazione se si desidera ripristinare la configurazione inizial...

Page 6: ...tesso istante il LED INB CMD AP si accenderà permanentemente e la programmazione sarà conclusa In questo modo la centrale ad ogni inizio di moto controllerà la partenza del motore portando la forza in modo graduale dal minimo al massimo nei primi 2 secondi di funzionamento Ripetere l operazione se si desidera ripristinare la configurazione precedente E T MOT Attivazione Elettroserratura CMD PED La...

Page 7: ... evidenzia visivamente il fallimento del test effettuando il lampeggio contemporaneo di tutti i Led di segnalazione Una volta ripristinato il corretto funzionamento delle fotocellule la centrale è pronta per il normale utilizzo Ciò garantisce un monitoraggio contro i guasti conforme alla Categoria 2 della EN 954 1 Test input comandi In corrispondenza ad ogni ingresso di comando in bassa tensione l...

Page 8: ...Rev 3 3 del 15 12 2020 ...

Page 9: ...or abbinati ad un Rice Trasmettitore RTX 2278 Base è necessario selezionare una frequenza tra le quattro disponibili vedi paragrafo Selezione della Frequenza di Funzionamento ed è poi raccomandabile verificare che tale banda prescelta sia libera non sia già utilizzata da qualche altro dispositivo per eseguire questa verifica procedere come segue mediante il tasto SET posizionarsi sul MENU PROGRAMM...

Page 10: ...he serve a informare la base che il dispositivo di sicurezza si è attivato Segnale di batteria scarica che serve ad informare la base dello stato della batteria ATTENZIONE Se il Dispositivo RTX 2252 Sensor viene rimosso da una installazione si consiglia di togliere le batterie per evitare che il Sensore continui inutilmente a trasmettere Selezione Modalità di Funzionamento NC o 8K2 Dispositivo RTX...

Page 11: ...nit does not have any type of isolating device for the 230 Vac line It is therefore the responsibility of the installer to set up an isolating device inside the system It is necessary to install an omnipolar switch surge category III It must be positioned to provide protection from accidental closing pursuant to point 5 2 9 of EN 12453 For the power supply cables use flexible cables in an insulati...

Page 12: ...me expires The second impulse commands gate closing If an impulse is sent before the motor time has expired the control unit will stop the motion during opening and closing phase An additional control re starts motion in the opposite direction Automatic closing The control unit closes the gate automatically without sending additional commands Selecting this operating mode is described under the in...

Page 13: ...closing which if activated enables the flashing beacon even during pause time Operation with TIMER The control unit can have a timer set up instead of an open close PUL control button Example at 08 00 the timer closes the contact and the control unit opens the gate At 18 00 the timer opens the contact and the control unit closes the gate During the interval between 08 00 and 18 00 at the end of th...

Page 14: ... closing phase is finished press the SET key twice during programming instead of just once During programming the radio control key of the control unit can be used instead of the SET key if stored previously 7 T PAUSA Automatic closing time programming max 4 minutes The control unit is supplied by the manufacturer without automatic closing If you wish to enable automatic closing proceed as follows...

Page 15: ...LED flash rapidly Repeat the operation to restore the initial configuration Accordingly the control unit if functioning with Deceleration during closing will reach after having completed the deceleration closing phase a time of 1 second with power relative to the choice selected in order to overcome the gate installed F T MOT PED LED 4x Limit switch 4x Safety device The control unit is supplied by...

Page 16: ...previous configuration F T MOT PED LED PUL and PED command functions The control unit is factory supplied with PUL control input operation for the connection of a cyclical primary control button NA and a PED input for the connection of a cyclical Pedestrian command button NA If you wish to select another mode of function of the PUL and PED inputs proceed as follows make sure that you have enabled ...

Page 17: ... procedure the control unit will automatically switch off the programming LEDs to save energy The LEDs will light up depending on the previously set programs only when the SEL or SET keys are pressed or when a motion command has been received OPTIONAL MODULES The control unit can be fitted with Optional Modules to enable additional functions Several functions will be available based on the type of...

Page 18: ...Rev 3 3 dated 15 12 2020 ...

Page 19: ...n paragraph It is then advisable to make sure that the preselected band is free not already in use by another device To carry out this check do the following using the SET key move to the PROGRAMMING MENU the Base scans the preselected frequency and if it is already occupied by the Base the MONITOR LED and PROGR MENU LEDs will flash alternately In this case proceed to select a different frequency ...

Page 20: ... RTX 2252 Device Sensor is dismantled from an installation it is advisable to take the batteries out so that the Sensor no longer continues unnecessary transmission NC or 8K2 Operating Mode Selection The RTX 2252 Device allows NC normally closed contact standard type or 8K2 resistance type sensitive edges to be connected Use Dip Switch SW2 No 1 to make the selection DIP 1 OFF NC input operation de...

Page 21: ...llateur sera donc chargé de prévoir un dispositif de sectionnement dans l installation Il est indispensable d installer un interrupteur omnipolaire de 3e catégorie de surtension Il doit être positionné de façon à être protégé contre les fermetures accidentelles conformément aux indications mentionnées au point 5 2 9 de la norme EN 12453 Pour les câbles d alimentation il est recommandé d utiliser d...

Page 22: ... suivant la première impulsion commande l ouverture jusqu à ce que le temps moteur soit écoulé La seconde impulsion commande la fermeture du portail si vous envoyez une impulsion avant l expiration du temps moteur la centrale effectue l arrêt du mouvement aussi bien pendant la phase d ouverture que de fermeture Une commande supplémentaire détermine la reprise du mouvement dans le sens inverse Ferm...

Page 23: ...met d effectuer le raccordement d une lampe témoin 24Vdc pour la visualisation de l état de l automatisation Lampe témoin éteinte l automatisation est fermée Lampe témoin allumée l automatisation est ouverte Lampe témoin qui clignote lentement mouvement en cours d ouverture Lampe témoin qui clignote rapidement mouvement en cours de fermeture Fonctionnement du clignotant la centrale est dotée d une...

Page 24: ...mps de travail du moteur 1 piéton prédéfini de 10 secondes sans ralentissement Pour modifier le temps de travail du moteur piéton effectuer la programmation de la façon suivante lorsque le portail est fermé avec la touche SEL se placer sur le voyant de la LED T MOT ensuite appuyer un instant sur la touche SET le moteur 1 commence le cycle d ouverture au niveau du point initial de ralentissement so...

Page 25: ...lignotement rapide de la LED INB CMD AP au lieu d une Répéter l opération pour rétablir la configuration initiale Nous pouvons ainsi faciliter le déverrouillage de la serrure et permettre par conséquent l exécution correcte de la phase d ouverture Avant de commencer la phase d ouverture la centrale envoie en effet une commande de fermeture pendant 2 secondes avec une puissance relative au choix ef...

Page 26: ...t la LED INB CMD AP s allume de façon permanente et la programmation est terminée De cette façon à chaque début de mouvement la centrale contrôle le départ du moteur en amenant progressivement la force du minimum au maximum dans les deux premières secondes de fonctionnement Pour rétablir la configuration précédente répéter l opération E T MOT Activation de la serrure électrique CMD PIÉT la central...

Page 27: ...tées est effectué à chaque cycle de manœuvre En cas de défaillance de la connexion ou de non fonctionnement la centrale n active pas le mouvement du portail et elle met en évidence visuellement l échec du test en effectuant le clignotement simultané de toutes les LED de signalisation Après avoir restauré le fonctionnement correct des photocellules la centrale est prête pour être utilisée normaleme...

Page 28: ...Rév 3 3 du 15 12 2020 ...

Page 29: ...ut sélectionner une fréquence entre les quatre disponibles voir le paragraphe Sélection de la fréquence de fonctionnement et il est recommandé de vérifier que la bande choisie soit libre qu elle ne soit pas déjà utilisée par un autre dispositif pour effectuer cette vérification procédez comme suit en utilisant la touche SET se placer sur le MENU PROGRAMMATION la base effectue un balayage de la fré...

Page 30: ...r la base que le dispositif de sécurité est activé Signal de pile déchargée servant à informer la base de l état de la batterie ATTENTION Si le dispositif RTX 2252 Capteur est supprimé d une installation il est conseillé d enlever les piles pour éviter que le capteur ne continue à transmettre inutilement Sélection de la modalité de fonctionnement NF ou 8K2 Le dispositif RTX 2252 permet le raccorde...

Page 31: ... 1 5V doivent être remplacées tous les ans pour garantir le fonctionnement optimal Pour remplacer les piles ouvrir le conteneur du Capteur à l aide d un tournevis Les piles usées doivent être éliminées dans les conteneurs spéciaux ...

Page 32: ...chalter der Überspannungskategorie III installiert werden Diese ist so zu installieren dass sie vor einem versehentlichen erneuten Schließen entsprechend den im Punkt 5 2 9 der Richtlinie EN 12453 aufgeführten Bestimmungen geschützt ist Für die Versorgungskabel empfehlen wir flexible Kabel zu verwenden unter einem isolierenden Schutzmantel aus Polychloropren Typ harmonisiert H05RN F mit Mindestque...

Page 33: ...Impuls steuert die Öffnung bis zum Ablaufen der Motorzeit der zweite Impuls steuert die Schließung des Schlosses wird ein Impuls gesendet bevor die Motorzeit abläuft hält die Steuerzentrale die Bewegung sei es in der Öffnungs als auch in der Schließungsphase an Wird ein weiterer Befehl ausgesendet wird die Bewegung in entgegengesetzter Richtung wiederaufgenommen Automatisches Schließen Die Steuerz...

Page 34: ... Werkskonfiguration wird eine Zwischenebene ausgewählt Kontrollleuchte Die Steuerzentrale ermöglicht die Verbindung einer Lampe von 24 VDC für die Anzeige des Automationsstatus Lampe ausgeschaltet Automation geschlossen Lampe eingeschaltet Automation offen langsames Blinken Öffnungsbewegung schnelles Blinken Schließbewegung Blinkerfunktion Die Steuerzentrale ist mit einem Ausgang für die Blinkerbe...

Page 35: ...ang max 4 Minuten Die Steuerzentrale wird vom Hersteller mit einer vorgegebenen Arbeitszeit des Motors 1 Fußgänger von 10 Sekunden ohne Verlangsamung geliefert Falls die Betriebszeit Fußgängerdurchgang verändert werden muss muss dies bei geschlossenen Toren auf folgende Weise erfolgen mit der Taste SEL die Blinkanzeige LED T MOT PED dann kurz die SET Taste drücken der Motor 1 wird den Öffnungszykl...

Page 36: ...P durchgehend einschalten und die Programmierung ist abgeschlossen Falls die Druckstoßfunktion auf die durch den Trimmer Kraft eingestellte Kraft aktiviert werden soll den oben beschriebenen Vorgang wiederholen dh 2 Mal SEL Taste drücken Ergebnis ist schnelles Blinken des LED INB CMD AP anstatt einmal Die Operation wiederholen falls man die Anfangskonfiguration rückstellen will Auf diese Weise erl...

Page 37: ...ehoben aktiviert ist ANTE SEL Taste auf Blinker des LED INB CMD AP positionieren dann SET Taste drücken zeitgleich wird sich die LED INB CMD AP durchgehend einschalten und die Programmierung ist abgeschlossen Auf diese Weise kontrolliert die Steuerzentrale bei jedem Bewegungsbeginn den Motorstart sodass die Kraft in den ersten 2 Sekunden des Betriebs vom Minimum zum Maximum gebracht wird Die Opera...

Page 38: ...fehlenden Anschlusses und oder Disfunktion aktiviert die Steuerzentrale nicht die Schließungsbewegung und unterstreicht sichtbar das Versagen des Tests indem alle Signalleds zugleich blinken Sobald der ordnungsgemäße Betrieb der Fotozellen wiederhergestellt ist steht die Steuerzentrale zur normalen Benutzung bereit So ist eine Überwachung zum Schutz vor Störungen entsprechend der Kategorie 2 der E...

Page 39: ...Rev 3 3 vom 15 12 2020 ...

Page 40: ...nter den vier verfügbaren Frequenzen ausgewählt werden siehe Abschnitt Auswahl der Betriebsfrequenz danach empfehlen wir sicherzustellen dass dieser ausgewählte Bereich frei ist nicht bereits von anderen Vorrichtungen besetzt ist für diese Prüfung wie folgt vorgehen Mit der Taste SET das MENÜ PROGRAMMIERUNG anklicken die Base führt jetzt ein Scannen der ausgewählten Frequenz aus und sollte sie bes...

Page 41: ... informieren dass die Sicherheitsvorrichtung aktiviert wurde Signal Batterie verbraucht dient dazu die Base über den Zustand der Batterie zu informieren ACHTUNG Wenn die Vorrichtung RTX 2252 Sensor aus einer Installation entfernt wird empfehlen wir die Batterien zu entfernen um zu verhindern dass der Sensor weiterhin nutzlos überträgt Auswahl Betriebsmodalität NC oder 8K2 Vorrichtung RTX 2252 ermö...

Page 42: ...des Jahr ausgewechselt werden um den einwandfreien Betrieb zu garantieren Zum Auswechseln der Batterien mit einem Schraubenzieher das Fach des Sensors öffnen Die gebrauchten Batterien müssen in den entsprechenden Sammelbehältern entsorgt werden ...

Page 43: ... con categoría III de sobretensión Éste debe colocarse de manera tal que esté protegido contra los cierres accidentales tal como prescribe el punto 5 2 9 de la EN 12453 Para los cables de alimentación se recomienda usar cables flexibles con funda aislante de neopreno de tipo armonizado H05RN F y conductores que presenten una sección mínima de 1 mm2 El cableado de los diferentes componentes eléctri...

Page 44: ...rola el cierre del cerramiento si se envía un impulso antes de que acabe el tiempo motor la central realiza la parada del movimiento ya sea en la fase de apertura que en la de cierre Otro mando más decide cuándo retomar el movimiento en sentido opuesto Cierre automático La central permite cerrar el cerramiento en modo automático sin enviar mandos suplementarios La elección de este funcionamiento s...

Page 45: ...onamiento de la luz intermitente La central cuenta con una salida para la gestión de una luz intermitente 230 Vca Su funcionamiento está condicionado por el movimiento del motor y del cierre automático que si está activado habilita la luz intermitente incluso durante el tiempo de pausa Funcionamiento con TEMPORIZADOR La central permite conectar en lugar del pulsador de mando abre cierra PUL un tem...

Page 46: ...n pulse de nuevo la tecla SET el LED T MOT PED comenzará a parpadear más lentamente y el Motor 1 efectuará la ralentización al alcanzar la posición deseada pulse la tecla SET para concluir el ciclo de apertura Entonces el LED T MOT PEAT volverá a parpadear de manera normal y el Motor 1 retomará en la fase de cierre repita las operaciones vistas anteriormente para la fase de cierre Si no desea que ...

Page 47: ... durante 2 segundos con la potencia correspondiente a la opción seleccionada E T MOT Golpe de cierre La central se suministra de fábrica con la función de Golpe de cierre deshabilitada Si se desea habilitar la función Golpe de Cierre haga lo siguiente asegúrese de haber habilitado el menú secundario 1 mostrado con el parpadeo alterno de los Ledes T PAUSA y Led RIT ANTE colóquese con la tecla SEL s...

Page 48: ...ectrocerradura CMD PEAT El fabricante entrega la central con la función de activación de la electrocerradura mediante mando peatonal deshabilitada Si se desea habilitar la función haga lo siguiente asegúrese de haber habilitado el menú secundario 2 mostrado con el parpadeo simultáneo de los Led T PAUSA y Led RIT ANTE colóquese con la tecla SEL sobre el LED intermitente T MOT y luego presione la te...

Page 49: ...la fotoeléctrica la central está lista para el uso normal Esto garantiza una monitorización contra las averías de acuerdo con la Categoría 2 de la EN 954 1 Test de input de mandos Para cada entrada de mando de baja tensión la central tiene un LED de señalización que le permite controlar rápidamente el estado Lógica de funcionamiento LED encendido entrada cerrada LED apagado entrada abierta GESTIÓN...

Page 50: ...Rev 3 3 del 15 12 2020 ...

Page 51: ...trol de la Frecuencia de Funcionamiento Elegida anteriormente Antes de realizar la programación del código de transmisión de los Receptores Transmisores RTX 2252 Sensor combinados con un Receptor Transmisor RTX 2278 Base es necesario seleccionar una frecuencia de entre las cuatro disponibles vea apartado Selección de la Frecuencia de Funcionamiento y luego es aconsejable controlar que dicha banda ...

Page 52: ...ñalización es capaz de enviar al dispositivo RTX 2278 Base la información siguiente Señal de supervivencia que sirve para comprobar periódicamente la correcta conexión radio entre los dispositivos Señal de alarma que sirve para informar a la base de que se ha activado el dispositivo de seguridad Señal de batería de descargada que sirve para informar a la base del estado de la batería ATENCIÓN Si s...

Page 53: ...ntual si aparece LED TX intermitente ATENCIÓN Las pilas alcalinas 1 5 V deben cambiarse cada año para garantizar un buen funcionamiento Para cambiar las pilas abra el contenedor del Sensor con un destornillador Las pilas usadas deben eliminarse en los recipientes adecuados ...

Page 54: ...m interruptor unipolar com categoria III de sobretensão Este dispositivo deve estar posicionado de modo que esteja protegido contra os fechos acidentais de acordo com o que foi previsto no item 5 2 9 da EN 12453 Para os cabos de alimentação é recomendável utilizar cabos flexíveis revestidos com bainha isolante em policloropreno de tipo harmonizado H05RN F com secção mínima dos condutores igual a 1...

Page 55: ...a a abertura até se esgotar o tempo do motor o segundo impulso comanda o fechamento da caixilharia ao enviar um impulso antes de se esgotar o tempo do motor a central de comando efetua a paragem do movimento tanto na fase de abertura como na fase de fechamento Um outro comando determina o restabelecimento do movimento no sentido oposto Fecho automático A central permite fechar a caixilharia de mod...

Page 56: ...imento em abertura e intermitente veloz com movimento em fechamento Funcionamento do Pisca pisca A central é dotada de uma saída para a gestão de um pisca pisca 230 Vac O seu funcionamento é condicionado pelo movimento do motor e pelo fechamento automático que se for ativado habilita o pisca pisca mesmo durante o tempo de pausa Funcionamento com TIMER A central permite conectar um timer no lugar d...

Page 57: ...sionar por um instante a tecla SET o Motor 1 iniciará o ciclo de abertura na posição que corresponde ao ponto inicial de desaceleração desejado pressionar novamente a tecla SET o LED T MOT PED começará a piscar mais lentamente e o Motor 1 efetuará a desaceleração quando for obtido o posicionamento desejado pressionar a tecla SET para terminar o ciclo de abertura Nesta altura o LED T MOT PED voltar...

Page 58: ...l intermitente rápido do LED INB CMD AP em vez de uma única vez Repetir a operação se desejar restabelecer a configuração inicial Desse modo será possível facilitar o desbloqueio da fechadura e permitir que a fase de abertura seja realizada corretamente De facto antes de iniciar a fase de abertura a central envia um comando de fechamento durante 2 segundos com potência relativa à escolha seleciona...

Page 59: ...CMD AP ficará aceso de modo permanente e a programação será concluída Desse modo a cada início de movimento a central fará o controlo do arranque do motor aumentando a força de modo gradual do mínimo ao máximo nos primeiros 2 segundos de funcionamento Repetir a operação se desejar restabelecer a configuração anterior E T MOT Ativação da Fechadura Eletrónica CMD PED A central é fornecida pelo fabri...

Page 60: ...da caixilharia e evidencia visualmente o resultado negativo do teste através do piscar simultâneo de todos os Leds de sinalização Após restabelecer o funcionamento correto das células fotoelétricas a central estará pronta para a utilização normal Isso garante um monitoramento contra avarias de acordo com a Categoria 2 da EN 954 1 Teste input dos comandos Na posição correspondente a cada entrada de...

Page 61: ...Rev 3 3 de 15 12 2020 ...

Page 62: ...ansmissores RTX 2252 Sensor combinados a um Recetor transmissor RTX 2278 Base é necessário selecionar uma frequência entre as quatro disponíveis consultar o parágrafo Seleção da Frequência de Funcionamento e também é recomendável verificar se essa banda escolhida está livre não é utilizada por algum outro dispositivo para executar essa verificação seguir estas indicações por meio da tecla SET posi...

Page 63: ... de alarme que tem a função de informar a base que o dispositivo de segurança está ativado Sinal de pilha descarregada que tem a função de informar a base sobre o estado da pilha ATENÇÃO Quando o Dispositivo RTX 2252 Sensor é removido de uma instalação é aconselhável remover as pilhas para evitar que o Sensor continue a transmitir inutilmente Seleção Modalidade de Funcionamento NC ou 8K2 Dispositi...

Page 64: ...devem ser substituídas após um ano para garantir o funcionamento ideal Para substituir as pilhas abrir o compartimento do Sensor com o auxílio de uma chave de fendas As pilhas utilizadas devem ser eliminadas em recolhedores específicos ...

Page 65: ...ει ο τεχνικός εγκατάστασης για μια διάταξη αποσύνδεσης της εγκατάστασης Είναι απαραίτητο να εγκαταστήσετε έναν πολλαπλών πόλων διακόπτη με υπέρταση κατηγορίας III Αυτός πρέπει να τοποθετηθεί με τέτοιο τρόπο έτσι ώστε να προστατεύεται από τα τυχαία κλεισίματα σύμφωνα με τα όσα προβλέπονται στο τμήμα 5 2 9 της EN 12453 Για τα καλώδια τροφοδοσίας συνιστάται η χρήση εύκαμπτων καλωδίων επενδυμένα σε μο...

Page 66: ... το άνοιγμα μέχρι τη λήξη του χρόνου κινητήρα ο δεύτερος παλμός ελέγχει το κλείσιμο της θύρας αν σταλεί ένας πρώτος παλμός πριν από τη λήξη του χρόνου κινητήρα η κεντρική μονάδα εκτελεί τη στάση της κίνησης τόσο στη φάση του ανοίγματος όσο και σε εκείνη του κλεισίματος Ένας επιπλέον εντολέας καθορίζει την επαναφορά της κίνησης σε αντίθετη κατεύθυνση Αυτόματο κλείσιμο Η κεντρική μονάδα επιτρέπει το...

Page 67: ...ρφωση του εργοστασίου έχει επιλεχθεί ένα ενδιάμεσο επίπεδο Ενδεικτική λυχνία Η κεντρική μονάδα επιτρέπει λυχνίας 24Vdc για την ένδειξη της κατάστασης αυτοματισμού Λυχνία σβηστή αυτοματισμός απενεργοποιημένος αναμμένη ενεργοποιημένος αναβοσβήνει αργή κίνηση σε άνοιγμα αναβοσβήνει γρήγορα κίνηση κατά τη διάρκεια του κλεισίματος Λειτουργία της λυχνίας φλας Η κεντρική μονάδα είναι εξοπλισμένη με μια έ...

Page 68: ...αμματισμό είναι πιθανή η χρήση στην θέση του πλήκτρου SET που βρίσκεται στην κεντρική μονάδα το πλήκτρο του ραδιοελέγχου μόνο αν προηγούμενα έχει αποθηκευτεί στην μνήμη 6 Χ ΚΙΝ ΠΕΖΩΝ Προγρ χρόνουλειτουργίαςτων πεζών μέγ 4λεπτά Η κεντρική μονάδα εφοδιάζεται από τον κατασκευαστή με τον προκαθορισμένο χρόνο λειτουργίας του Κινητήρα 1 των Πεζών των 10 δευτερολέπτων και χωρίς επιβράδυνση Αν χρειάζεται ...

Page 69: ... ΦΥΛΛΩΝ πηγαίνετε με το πλήκτρο SEL στη φωτεινή σήμανση του LED INB CMD AP και στην συνέχεια πατήστε το πλήκτρο SET την ίδια στιγμή το LED INB CMD AP θα ενεργοποιηθεί οριστικά και ο προγραμματισμός θα έχει ολοκληρωθεί Αν θέλετε να ενεργοποιήσετε τη λειτουργία του Κτυπήματος Κριού στην ισχύ που ρυθμίζεται μέσω του Trimmer ΔΥΝΑΜΗ επαναλάβετε τη λειτουργία που περιγράφεται πατώντας το πλήκτρο SEL δύο...

Page 70: ...τε τα παρακάτω βεβαιωθείτε ότι ενεργοποιήσατε το εκτεταμένο μενού 2 που επισημαίνεται από το ταυτόχρονο αναβόσβημα των Led Χ ΠΑΥΣΗΣ και Led ΚΑΘ ΦΥΛΛΩΝ πηγαίνετε με το πλήκτρο SEL στη φωτεινή σήμανση του LED INB CMD AP και στην συνέχεια πατήστε το πλήκτρο SET την ίδια στιγμή το LED INB CMD AP θα ενεργοποιηθεί οριστικά και ο προγραμματισμός θα έχει ολοκληρωθεί Με τον τρόπο αυτό η κεντρική μονάδα σε ...

Page 71: ...ας της σύνδεσης ή και μη λειτουργίας η κεντρική μονάδα δεν θα επιτρέψει την κίνηση του κλεισίματος των θυρών και οπτικά επισημαίνει την αποτυχία της δοκιμής πραγματοποιώντας τον ταυτόχρονο διακοπτόμενο φωτισμό όλων των Led σηματοδότησης Μόλις αποκατασταθεί η εύρυθμη λειτουργία των φωτοκυττάρων η μονάδα ελέγχου είναι έτοιμη για κανονική χρήση Αυτό εγγυάται την λειτουργική επιτήρηση έναντι των βλαβώ...

Page 72: ...Αναθ 3 3 της 15 12 2020 ...

Page 73: ...συνίσταται η εξακρίβωση της διαθεσιμότητας αυτού του εύρους ότι δηλαδή δεν χρησιμοποιείται ήδη από κάποια άλλη συσκευή Για να εκτελέσετε αυτόν τον έλεγχο ακολουθήστε τα εξής βήματα Χρησιμοποιώντας το πλήκτρο Set επιλέξτε ΠΡΟΓΡΑΜΜΑΤΙΣΜΟΣ MENU Η βάση σαρώνει την επιλεγμένη συχνότητα και αν αυτή είναι απασχολημένη η Βάση θα σηματοδοτήσει το γεγονός διαμέσου ενός εναλασσόμενου διακοπτόμενου φωτισμού τ...

Page 74: ...αίρεση των μπαταριών για την αποφυγή της ανώφελης συνέχιση της εκπομπής του Αισθητήρα Επιλογή Λειτουργίας NC ή 8K2 Σύστημα RTX 2252 που επιτρέπει την σύνδεση του συστήματος εντοπισμού εμποδίων κλασσικού τύπου NC επαφή κανονικά κλειστή ή τύπου αντίστασης 8K2 Η επιλογή εκτελείται διαμέσου του Dip Switch SW2 n 1 DIP 1 OFF λειτουργία input NC default DIP 1 ON λειτουργία input 8K2 SW2 SW2 NC 8K2 Επιλογ...

Reviews: